
In This Article
- Introduction
- The Create / Edit Work Order Page
Introduction
This article provides a thorough breakdown of the Create / Edit Work Order page in Service Management (Next). This page is used whenever you take any of the following actions:
- Creating a new Work Order
- Creating a Work Order estimate
- Editing an existing Work Order
- Editing a Work Order estimate
The Create / Edit Work Order Page
The Create / Edit Work Order page contains all of the information about your Work Order, organized into panels.
The appearance of this page will differ depending on whether you are creating or editing a regular Work Order or a Work Order estimate. The visibility of each element is expressed next to the element’s name:
The image below has been altered to display all elements.

- Work Order Info Panel
Contains basic information about the Work Order, including its location, date, and priority. - Asset Panel
Contains information on the Asset for which the Work Order has been created. - Comments Panel
Contains any internal or Customer-facing comments left on the Work Order. - Photos Panel
Contains any photos uploaded to the Work Order by a Mechanic in Service Management Mobile. - Signature Panel
Contains the name and digital signature of the party who signed off on the Work Order’s completion. - Inspections Panel
Contains information on any Work Order Inspections that have been completed for the Asset on the Work Order. - Customer Panel
Contains information on the Customer for which the Work Order is being completed. - Mechanics Panel
Contains the names of the Mechanic(s) who will be fulfilling the Work Order. This panel will not appear when creating or editing a Work Order estimate, as Mechanics cannot be assigned to estimates. - Attachments Panel
Contains any URLs or files that have been attached to the Work Order. - Parts Tab
Lists the Parts that have been requested and consumed by the Mechanics completing the Work Order. - Labor Tab
Contains the Labor items that have been added to the Work Order and the Mechanics’ tracked time. - Services Tab
Lists the additional Services that have been added to the Work Order, such as pickup / delivery charges or refueling fees. - Total Panel
Contains the total costs of the Work Order. - Related Open Work Orders Panel
Contains information about other Work Orders in progress for the selected Asset. Appears during Work Order creation. - Work Order Actions
The actions that can be taken for the current Work Order are listed in the page footer. These actions differ depending on the Work Order’s type and current status.
Work Order Info Panel
This panel contains basic information about the Work Order.

- Work Order #
The Work Order’s unique identifier in the system. - Status
The Work Order’s current status. See “About Work Order Statuses” for more information. - Flag
Click to flag the Work Order for attention. This indicates that there is an issue with the Work Order that must be resolved before it can be closed. Flagged Work Orders will appear red in the Work Order List, and cannot be closed until the flag is removed. The system will automatically flag Work Orders under certain conditions. - Division
The Work Order’s Division. - Location
The Work Order’s Location. - Date
The Work Order’s date. By default, this is the date on which the Work Order was created, but this can be manually changed. - Contract #
The number of the Contract with which the Work Order is associated. If the Asset on a Work Order was out on a Contract at the time the Work Order was created, this value will be automatically set to that Contract’s Contract number. Once this value is set, it cannot be changed, even if the Contract is later closed. - Priority
The Work Order’s priority - Low (green), Moderate (orange), or Critical (red). Priority has no bearing on the Work Order’s properties, but serves as a quick visual indicator of which Work Orders should be scheduled first. - Purchase Order #
The PO # of the purchase order associated with this Work Order, if any. - Posting Type
The Work Order’s Posting Type - Standard Invoice, Customer Damage, Customer Repair, or Internal Work Order. This determines the Cost of Goods Sold (COGS) and Revenue accounts to which the Parts used on the Work Order will be posted. See “About Work Order Posting Types” for more information. - Billing Type
The Work Order’s Billing Type - Normal, Split, or Warranty.- Normal: The Work Order is to be charged completely to the Customer.
- Split: The cost of the Work Order is to be split between the Customer and the rental company.
- Warranty: The cost of the Work Order is to be split between the Customer, the rental company, and/or warranty claims from the supplier.
- Scheduled Toggle
Enable to indicate that the Work Order has been scheduled and reveal the Start Time and End Time fields. In order to schedule a Work Order, it must have at least one assigned Mechanic. If you enable the Scheduled toggle and attempt to save the Work Order without assigning a Mechanic, you will receive a message that reads “Please select at least one Mechanic before scheduling a Work Order.” - Start Time
The Work Order’s scheduled start time. This field will only be visible if the Scheduled toggle is enabled. - End Time
The Work Order’s scheduled end time. This field will only be visible if the Scheduled toggle is enabled. - Ship Via
Select an option from the drop-down to indicate the shipping method by which the equipment will be returned to the Customer after servicing. Ship Via codes are managed in Service Management (Classic), at System Maintenance → Configure System Settings → Operations → Ship Via Codes. See “Ship Via Codes” for more information. - Salesperson
The salesperson who will be credited for securing the Work Order. Salesperson codes are managed in Service Management (Classic), at System Maintenance → Configure System Settings → Customer Management → Salesman Codes. See “Salesman Codes” for more information. - Parts Discount
The percentage discount that will be applied to all Parts consumed on the Work Order. - Labor Discount
The percentage discount that will be applied to all Labor items on the Work Order. - Tax Code 1 and 2
The default taxes applied to the Work Order. These tax codes can be overwritten for individual Parts, Labor items, and Services. Tax Codes are managed in Service Management (Classic), at System Maintenance → Configure System Settings → Accounting → Tax Codes. See “Tax Codes” for more information. - Custom Fields
Any custom fields included on Work Orders will appear at the bottom of the Work Order Info panel, indicated by the custom field icon. For more information, see “Custom Fields”.
Asset Panel
This panel contains information on the Asset being serviced on the Work Order.
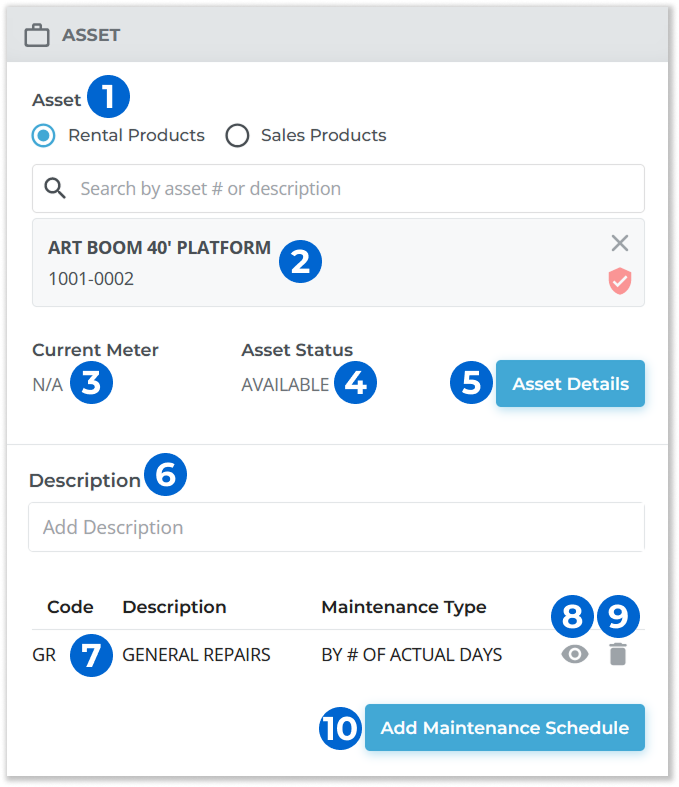
- Asset Search
Use the toggle buttons to switch between searching for Rental Products (Assets) and Sales Products. Click the search bar to open the list of Assets in the system, then begin typing to filter the list by Product # and Description. Click on an Asset to select it and add it to the Work Order. Note that only one Asset can be included on a Work Order, and that adding a new Asset to an existing Work Order will remove the previous Asset. - Asset Details
The details of the Asset to be serviced are displayed below the search bar. If the selected Asset is under warranty, it will be indicated by a red shield icon.
- Current Meter
If the Asset you selected is metered, its current meter reading will be displayed here. - Asset Status
The Asset’s current status. Asset statuses can be configured via the Product Status Codes utility in Service Management (Classic). - Asset Details Button
Click to open the Asset’s details page in a new browser tab. - Description
If the Asset that requires servicing is not present in your system’s Rental or Sales Inventory – if it is a Customer-owned Asset, for example – you can commission a Work Order for that Asset by entering its description into this field instead of selecting an Asset using the Asset Search. If you have already selected an Asset for the Work Order, this field will be disabled. - Maintenance Schedule Information
Information on any Maintenance Schedules that have been added to the Work Order can be found here.- Code: The unique ID of the Maintenance Schedule.
- Description: The Maintenance Schedule’s description.
- Maintenance Type: The Maintenance Schedule’s tracking type – By # of Rental Days, By # of Actual Days, By Actual Date, By # of Meter Units, or By Actual Meter Reading. See “Maintenance Schedule” for more information.
- View Maintenance Schedule
Click the eye iconnext to a Maintenance Schedule to view its details.
- Remove Maintenance Schedule
Click the bin iconnext to a Maintenance Schedule to remove it and its related Inspection forms from the Work Order.
- Add Maintenance Schedule Button
Click to view a list of Maintenance Schedules available for the Asset, then click the “Add” button next to a Maintenance Schedule to attach it and any associated Inspection forms to the Work Order. The Maintenance Schedules available for a given Product Group are managed in Service Management (Classic), at System Maintenance → Configure System Settings → Operations → Groups → Maintenance Schedule. See “Group Maintenance Schedule” for more information.
Comments Panel
This panel contains any comments left on the Work Order by dispatchers using Service Management (Next) or Mechanics using Service Management Mobile.
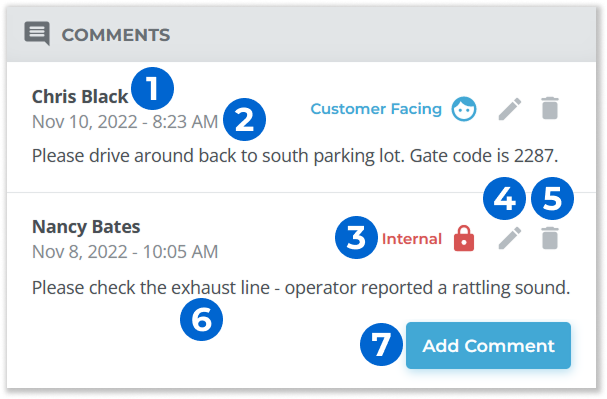
- Commenter Name
The name of the dispatcher or Mechanic who posted the comment. - Timestamp
The date and time at which the comment was posted. - Comment Visibility
Indicates whether the comment is customer-facing or internal only. Customer-facing comments will be included on the printed and .pdf versions of the Work Order. - Edit Comment
Click the pencil iconnext to a comment to edit it.
- Delete Comment
Click the bin iconnext to a comment to delete it. This action cannot be undone.
- Comment Body
The contents of the comment. Comment bodies are limited to 250 characters. - Add Comment Button
Click to add a new comment.
Photos Panel
This panel (left) contains any images uploaded to the Work Order by the Mechanic in Service Management Mobile. Click on an image to open a slideshow of images (right).
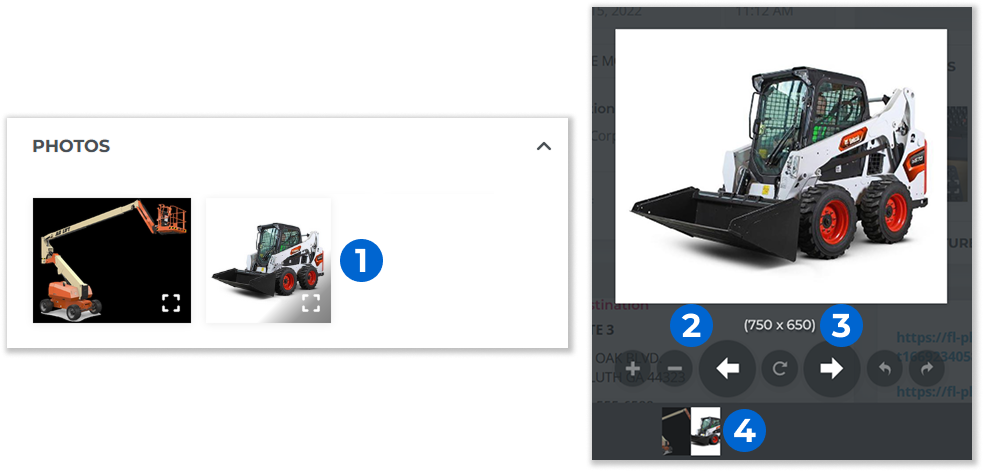
- Image
Images uploaded to the Work Order by the Mechanic are displayed here. Click on an image to open it in a slideshow. - Slideshow Controls
Use the buttons at the bottom of the slideshow to control it. Use the plus + and minus - buttons or the mouse wheel to zoom in and out. Use the left and right arrows to navigate through the slideshow, and the curved arrow buttons to rotate the image by 90 degrees clockwise or counterclockwise. Use the refresh button to reset the image to its default zoom and rotation. - Image Dimensions
The width and height of the currently-displayed image, in pixels. - Additional Images
Click on an image thumbnail at the bottom of the slideshow to display it.
Signature Panel
This panel allows you to view the signature of the Customer who signed off on the Work Order’s completion. Customer signatures are collected using Service Management Mobile, at the time the Mechanic selects “Work Complete” to finalize the Work Order.
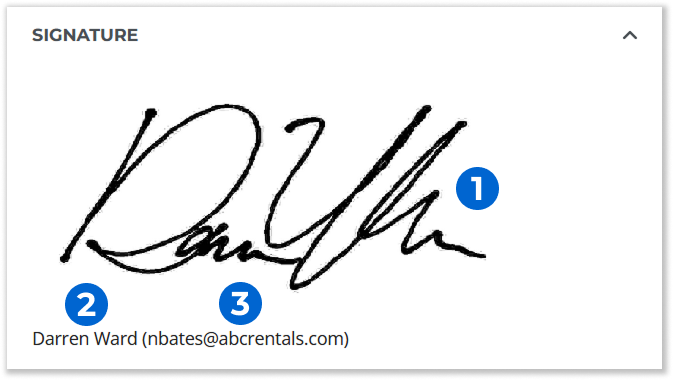
- Customer Signature
The Customer’s signature. - Customer Name
The name of the signing party. - Confirmation Email Address
The email address(es) to which the signature confirmation email was sent.
Inspections Panel
This panel (above) contains a list of all the Inspection forms that have been added to the Work Order, either manually by a dispatcher using Service Management (Classic) or a Mechanic using Service Management Mobile, or automatically via the inclusion of a Maintenance Schedule or Inspection forms associated with the Asset’s Model or Product Group. Note that Inspection forms cannot be added directly to a Work Order in Service Management (Next). See “About Inspections - Work Order Inspections” for more information.
Click on the eye symbol next to an Inspection form to view its details (below).
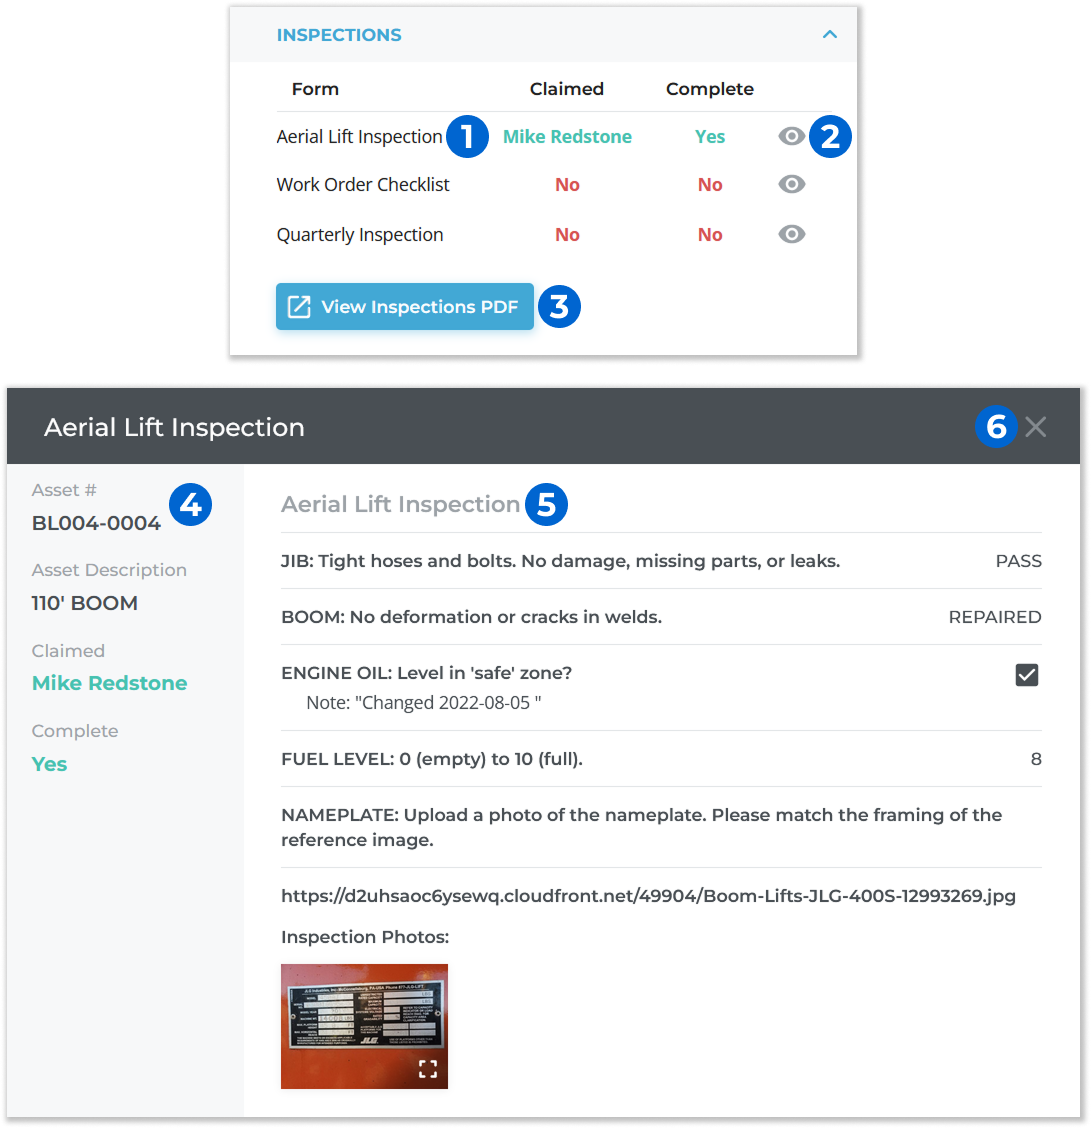
- Inspection Form
Inspection Forms included on the Work Order are listed here.- Form: The name of the Inspection form.
- Claimed: The name of the Mechanic who has claimed the Inspection form, or “No” if it has not been claimed.
- Complete: Whether or not the Inspection form has been completed.
- View Inspection
Click on the eye symbolnext to an Inspection form to view its details.
- View Inspections PDF Button
Click to open all completed Inspections as a single printable .pdf file. This button will be disabled if no Inspections have been completed for the Work Order. - Inspection Information
The Inspection’s basic information. - Inspection Contents
The contents of the Inspection, including the responses submitted by the Mechanic. - Exit Button
Click to close the Inspection details window. You can also accomplish this by clicking outside the window.
Customer Panel
This panel contains information on the Customer for which the Work Order is being completed.
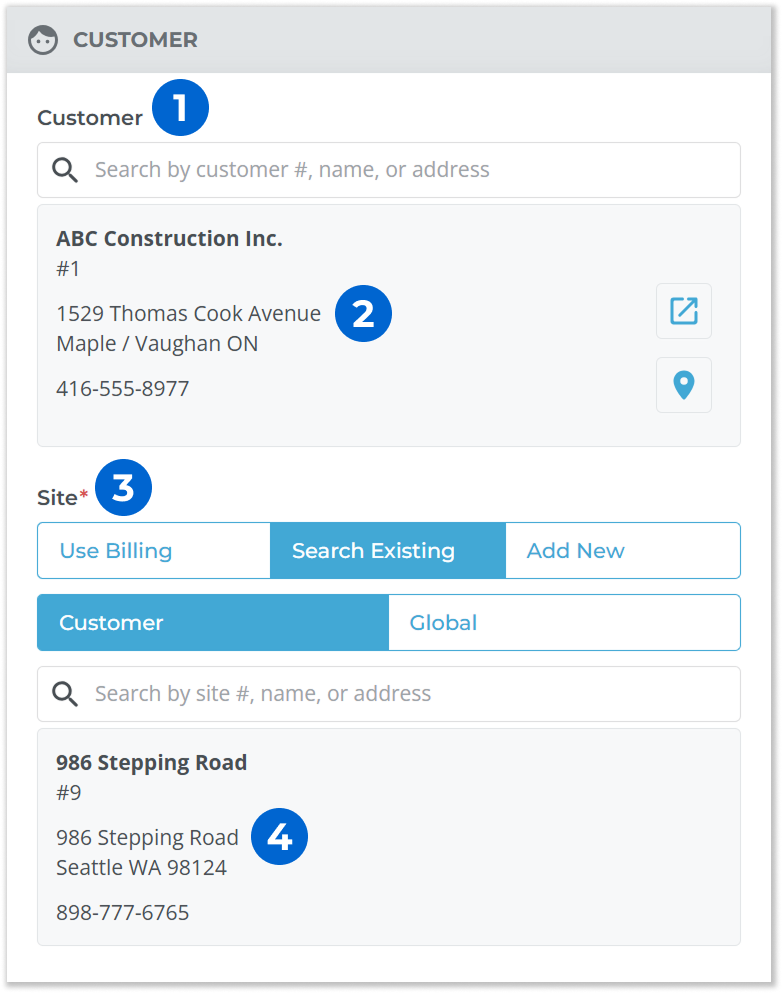
- Customer Search
Click on the search bar to open a list of all the Customers in the system, and begin typing to filter the list by Customer #, Customer name, Phone #, and Address. Click on a Customer to select it and add it to the Work Order. Note that only one Customer can be added to a Work Order. - Customer Details
The details of the Customer currently associated with the Work Order are displayed below the search bar. - Site Selector
Use this tool to select the site at which this Work Order will be completed.- Use Billing: Use the primary (billing) address saved to the Customer’s profile. This is the same address that appears in the Customer Details section below the search bar.
- Search Existing: Search through existing Sites to find the appropriate Site. If you select this option, two additional options will appear:
- Customer: Search through this Customer’s existing Sites.
- Global: Search the list of global Sites.
- Add New: If the desired Site is not yet in the system, use this option to create a new Site and associate it with this Work Order. See “Add A Customer Site to a Document” for more details.
- Site Details
Once you have selected a Site for the Work Order, its address and contact details will appear below the search bar.
Mechanics Panel
This panel contains information on the Mechanics assigned to the Work Order.

- Primary and Alternate Mechanic


Once a Customer has been selected, that Customer’s Primary and Alternate Mechanics will be displayed here. When creating a Work Order, the Primary Mechanic will be assigned to it by default.
These values are read-only. The Primary and Alternate Mechanics for a Customer can be set via the Customer Codes utility in Service Management (Classic), at Accounts Receivable → Customer Information → Codes. - Mechanic
The names and statuses of the Mechanics assigned to the Work Order are listed here. - Unassign Button
Click to unassign the Mechanic from the Work Order. This will cause any changes the Mechanic has already made to the Work Order to be reverted.
Mechanics cannot be unassigned from Completed or Closed Work Orders. - Add a Mechanic
Click anywhere within the “Add a Mechanic” box to open a list of the Mechanics in the system. Begin typing to filter the list, then click on a Mechanic’s name to assign them to the Work Order. They will receive a notification from Service Management Mobile informing them that they have been assigned.
Attachments Panel
This panel contains any URLs or files that have been attached to the Work Order.
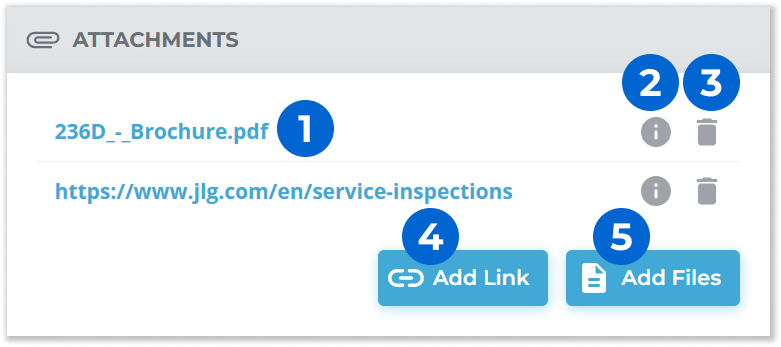
- Attachments
Attachment filenames and URLs are listed here. Click on an attachment to open it in a new browser tab. - More Information
Hover your mouse over the “i” symbolnext to an attachment to view the username of the User who uploaded the attachment, as well as the date on which it was added to the Work Order.
- Delete Attachment
Click the bin iconnext to an attachment to delete it.
- Add Link Button
Click to add a new URL attachment to the Work Order. URLs must be valid in order to be attached; the easiest way to ensure this is to navigate to the desired page in your browser, then copy and paste the URL from the address bar. - Add Files Button
Click to add new file attachments to the Work Order. Clicking this button will open your computer’s file explorer, allowing you to select files to upload. You can attach multiple files at once by ctrl+clicking or clicking and dragging to select multiple files.
Parts Tab
This tab contains information on the Parts that have been consumed on the Work Order. Parts can be added to a Work Order both by dispatchers using Service Management and by Mechanics using Service Management Mobile.
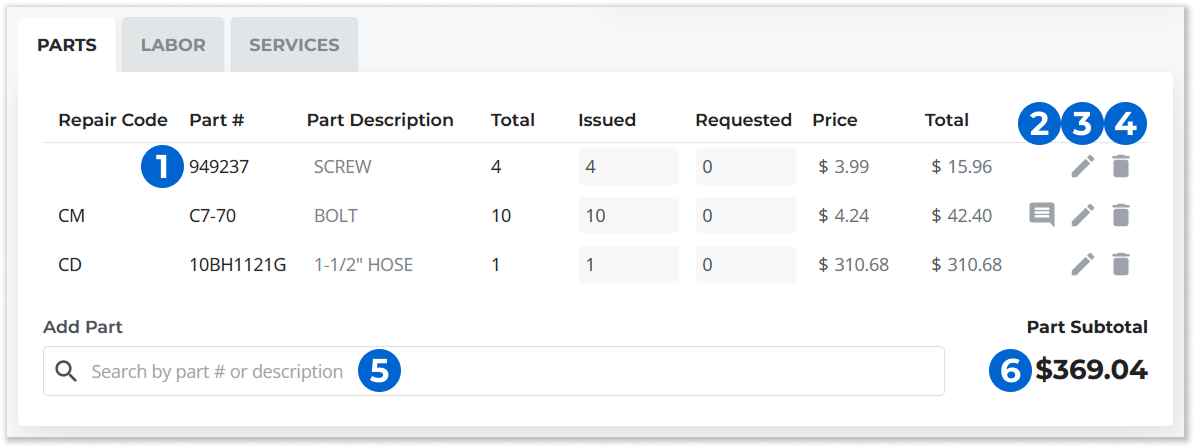
- Part
The information included for each Part is as follows:- Repair Code: The Repair Code under which the Part has been categorized. If the “Prompt for Maintenance Codes on Work Order Details” option is enabled in Service Management (Classic), Mechanics will be prompted to submit each Part, Labor item, and Service under a specific Repair Code when adding it to a Work Order in Service Management Mobile. This option can be found at System Maintenance → Configure System Settings → System → Company Parameters → Estimate and W.O. Parameters. See “Add a Maintenance Code to a Work Order in Service Management Mobile” for more information.
- Part #: The Part’s number.
- Part Description: The Part’s description.
- Total: The total number of this Part on the Work Order. Equal to Issued + Requested.
- Issued: The number of this Part that has been consumed by the Mechanic while completing the Work Order.
- Requested: The number of this Part that the Mechanic has requested to complete the Work Order.
- Price: The Part’s cost per unit.
- Total: The total pre-tax cost of the Part. Equal to Issued * Price * (100 - Discount)%.
- View Comments
A comment iconnext to a Part indicates that a Mechanic has left a comment on it. Clicking on the comment icon will open the Edit Part Details window.
- Edit Part
Click the pencil icon - Remove Part
Click the bin icon - Add Part
Click on the search bar to open a list of Parts in the system, then begin typing to filter the list by Part # and Part Description. Click on a Part to open the Edit Part Details window and add it to the Work Order.
Parts cannot be added to Completed or Closed Work Orders. - Part Subtotal
The total before-tax cost of all Parts on the Work Order. Equal to the sum of Totals for each Part.
Edit Part Details
Clicking the pencil icon next to a Part will open the Edit Part Details window, allowing you to view and edit the details for that Part. This window will also appear when adding a new Part to the Work Order.
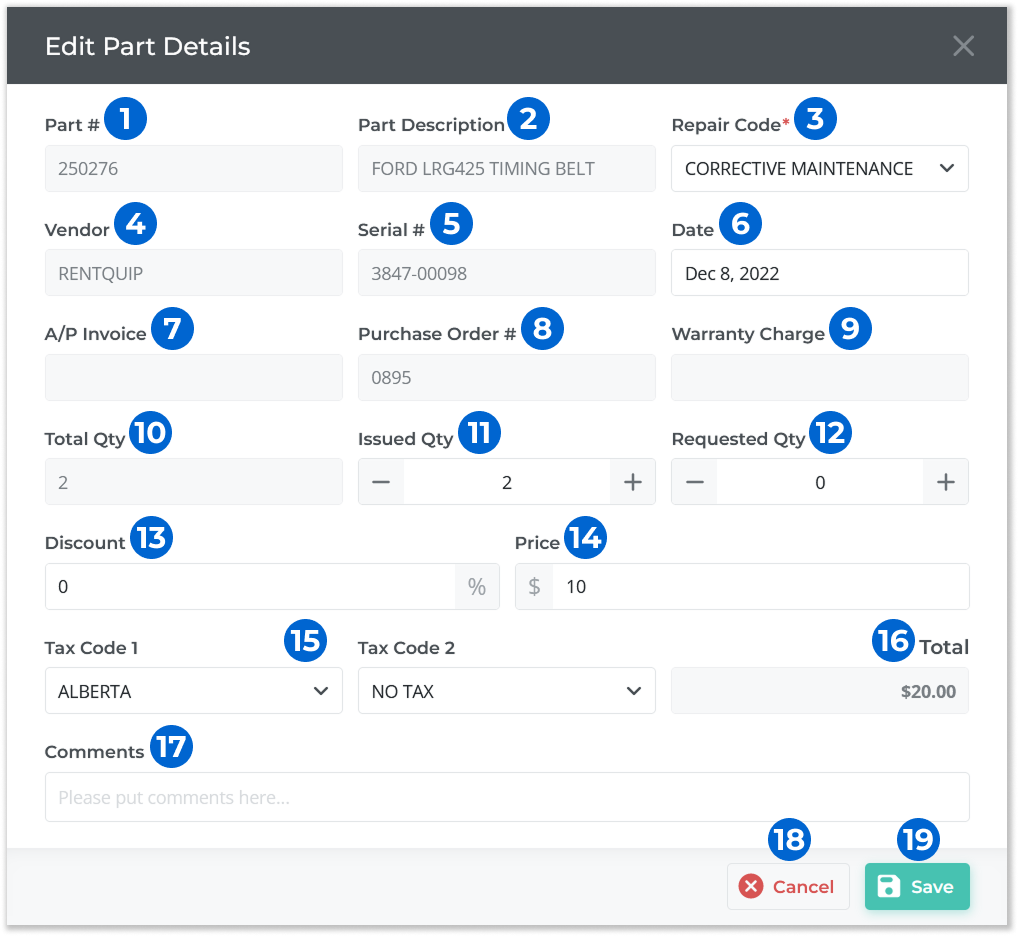
- Part #
The Part’s number. - Part Description
The Part’s description. - Repair Code
The Repair Code under which the Part has been categorized. - Vendor
The Vendor who supplied the Part. - Serial #
The Part’s serial number, if the Part is serialized. - Date
The date on which the Part was added to the Work Order. - A/P Invoice
The Invoice number of the AP Invoice associated with the Work Order. This number is only populated if the "A/P Parts Add To Work Order" feature is enabled in Service Management (Classic), and the Part was added to the Work Order as the result of an AP Invoice billing without being received through the warehouse. See “Work Order Parts” for more information. - Purchase Order #
The PO # of the purchase order associated with the Part, if any. - Warranty Charge
The amount of the Part’s cost that is covered under warranty. - Total Qty
The total number of this Part on the Work Order. Equal to Issued Qty + Requested Qty. - Issued Qty
The number of this Part that has been consumed by the Mechanic while completing the Work Order. - Requested Qty
The number of this Part that the Mechanic has requested to complete the Work Order. - Discount
The percentage discount applied to the Part. - Price
The Part’s price per unit. - Tax Code 1 and 2
The taxes applied to the Part. - Total
The total pre-tax cost of this Part on the Work Order. Equal to Price * Issued Qty * (100 - Discount)%. - Comments
Any comments left on the Part by a dispatcher or Mechanic. - Cancel Button
Close the window without saving any changes. This can also be accomplished by clicking outside the window. - Save Button
Save your changes and close the window.
Labor Tab
This tab contains information on the Labor items that have been added to the Work Order.
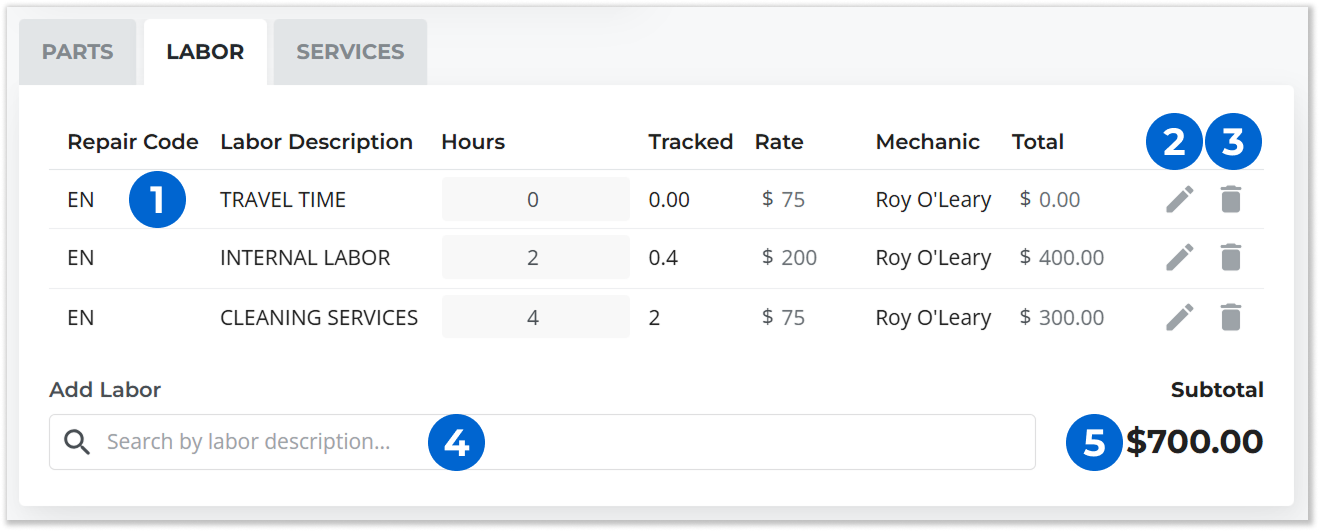
- Labor Item
The information included for each Labor item is as follows:- Repair Code: The Repair Code under which the Labor item has been categorized.
- Labor Description: The Labor item’s description.
- Hours: The number of hours the Mechanic has indicated they spent working on the Labor item.
- Tracked: The actual amount of time the Mechanic has logged against the Labor item in Service Management Mobile. Whenever a Mechanic starts work on a Work Order in Service Management Mobile, they will be prompted to select a Labor line to track their time against. See “About the Time Tracker” for more information.
- Rate: The Labor item’s hourly rate.
- Mechanic: The Mechanic who submitted the Labor item.
- Total: The total pre-tax cost of the Labor item. Equal to Hours * Rate * (100 - Discount)%.
- Edit Labor
Click the pencil icon - Remove Labor
Click the bin icon - Add Labor
Click on the search bar to open a list of Labor items in the system, then begin typing to filter the list by Labor Description. Click on a Labor item to open the Edit Labor Details window and add it to the Work Order. The list of available Labor items is managed in Service Management (Classic), at System Maintenance → Configure System Settings → Accounting → Service Codes. See “Service Codes” for more information.
Labor items cannot be added to Completed or Closed Work Orders. - Labor Subtotal
The total before-tax cost of all Labor items on the Work Order. Equal to the sum of Totals for each Labor item.
Edit Labor Details
Clicking the pencil icon next to a Labor item will open the Edit Labor Details window, allowing you to view and edit the details for that Labor item. This window will also appear when adding a new Labor item to the Work Order.
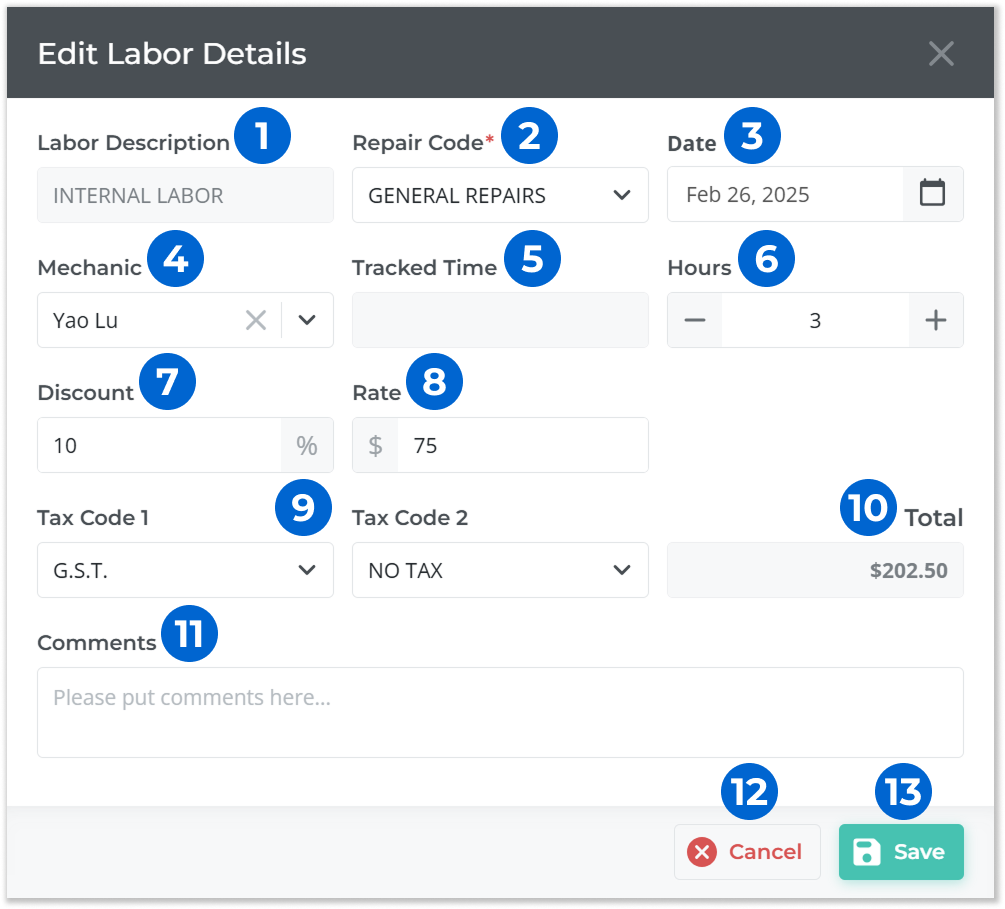
- Labor Description
The Labor item’s description. - Repair Code
The Repair Code under which the Labor item has been categorized. - Date
The date on which the Labor item was added to the Work Order. - Mechanic
The Mechanic who submitted the Labor item. - Tracked Time
The actual amount of time the Mechanic has logged against the Labor item in Service Management Mobile. - Hours
The number of hours the Mechanic has indicated they spent working on the Labor item. - Discount
The percentage discount applied to the Labor item. - Rate
The Labor item’s hourly rate. - Tax Code 1 and 2
The taxes applied to the Labor item. - Total
The total pre-tax cost of the Labor item. Equal to Hours * Rate * (100 - Discount)%. - Comments
Any comments left on the Labor item by a dispatcher or Mechanic. - Cancel Button
Close the window without saving any changes. This can also be accomplished by clicking outside the window. - Save Button
Save your changes and close the window.
Services Tab
This tab contains information on the Services that have been added to the Work Order.
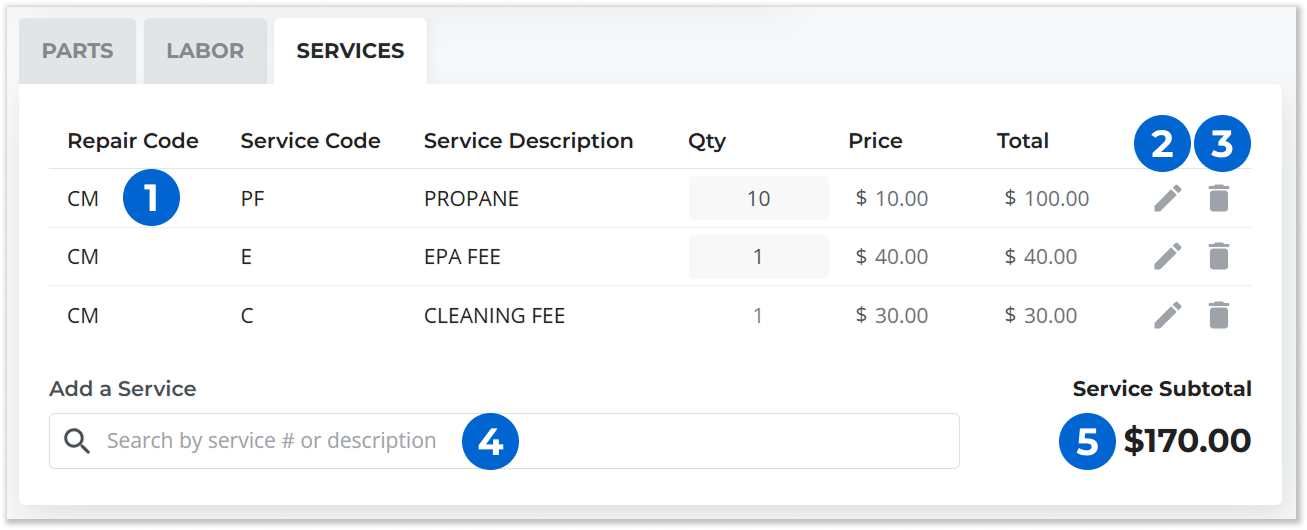
- Service
The information included for each Service is as follows:- Repair Code: The Repair Code under which the Service has been categorized.
- Service Code: The Service’s unique ID.
- Service Description: The Service’s description.
- Qty: The quantity of the Service included on the Work Order.
- Price: The price per unit of the Service.
- Total: The total pre-tax cost of the Service. Equal to Qty * Price.
- Edit Service
Click the pencil icon - Remove Part
Click the bin icon - Add a Service
Click on the search bar to open a list of Services in the system, then begin typing to filter the list by Service Code and Service Description. Click on a Service to open the Edit Service Details window and add it to the Work Order. The list of available Services is managed in Service Management (Classic), at System Maintenance → Configure System Settings → Accounting → Service Codes. See “Service Codes” for more information.
Services cannot be added to Completed or Closed Work Orders. - Service Subtotal
The total before-tax cost of all Services on the Work Order. Equal to the sum of Totals for each Service.
Edit Service Details
Clicking the pencil icon next to a Service will open the Edit Service Details window, allowing you to view and edit the details for that Service. This window will also appear when adding a new Service to the Work Order.
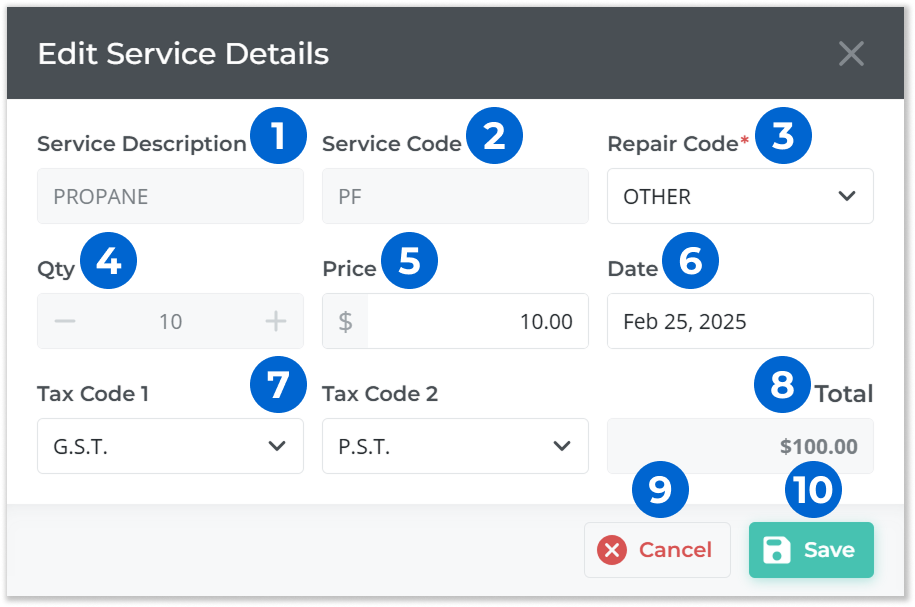
- Service Description
The Service’s description. - Service Code
The Service’s unique ID. - Repair Code
The Repair Code under which the Service has been categorized. - Qty
The quantity of the Service included on the Work Order. - Price
The cost per unit of the Service. - Date
The date on which the Service was added to the Work Order. - Tax Code 1 and 2
The taxes applied to the Service. - Total
The total pre-tax cost of the Service. Equal to Qty * Price. - Cancel Button
Close the window without saving any changes. This can also be accomplished by clicking outside the window. - Save Button
Save your changes and close the window.
Total Panel
This panel contains information on the total costs of the Work Order.
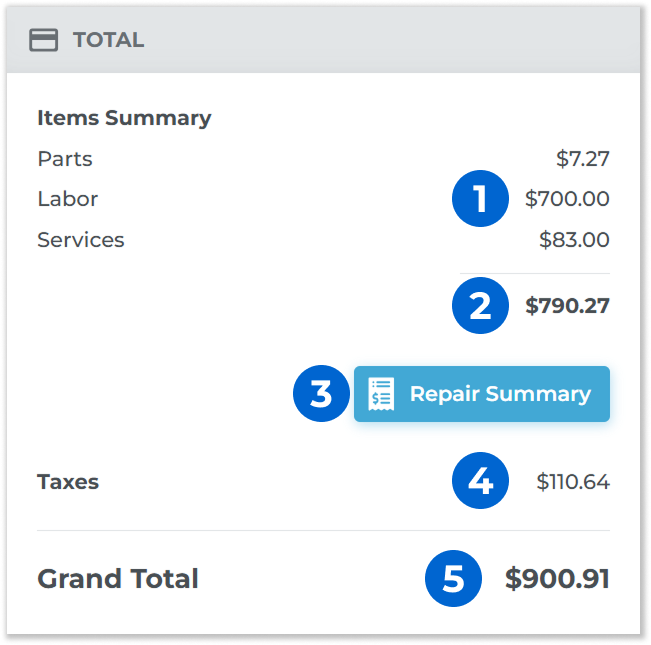
- Parts, Labor, and Services Totals
The total pre-tax costs of the Parts, Labor items, and Services on the Work Order. - Subtotal
The total pre-tax cost of the Work Order. Equal to the sum of the Parts, Labor, and Services Totals. - Repair Summary Button
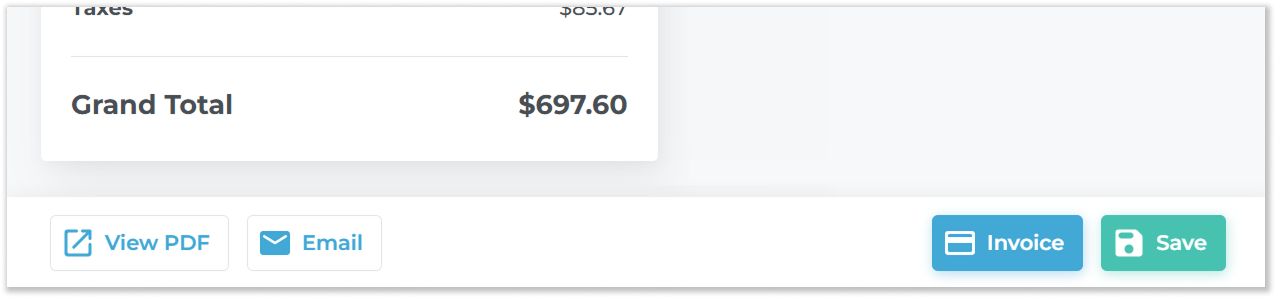
Click to open the Repair Summary window. - Taxes
The total amount of tax charged on the Work Order. - Grand Total
The final cost of the Work Order, equal to Subtotal + Taxes.
Repair Summary
Clicking the “Repair Summary” button in the Totals panel will open the Repair Summary window, which provides a breakdown of the Work Order’s costs organized by Repair Code.
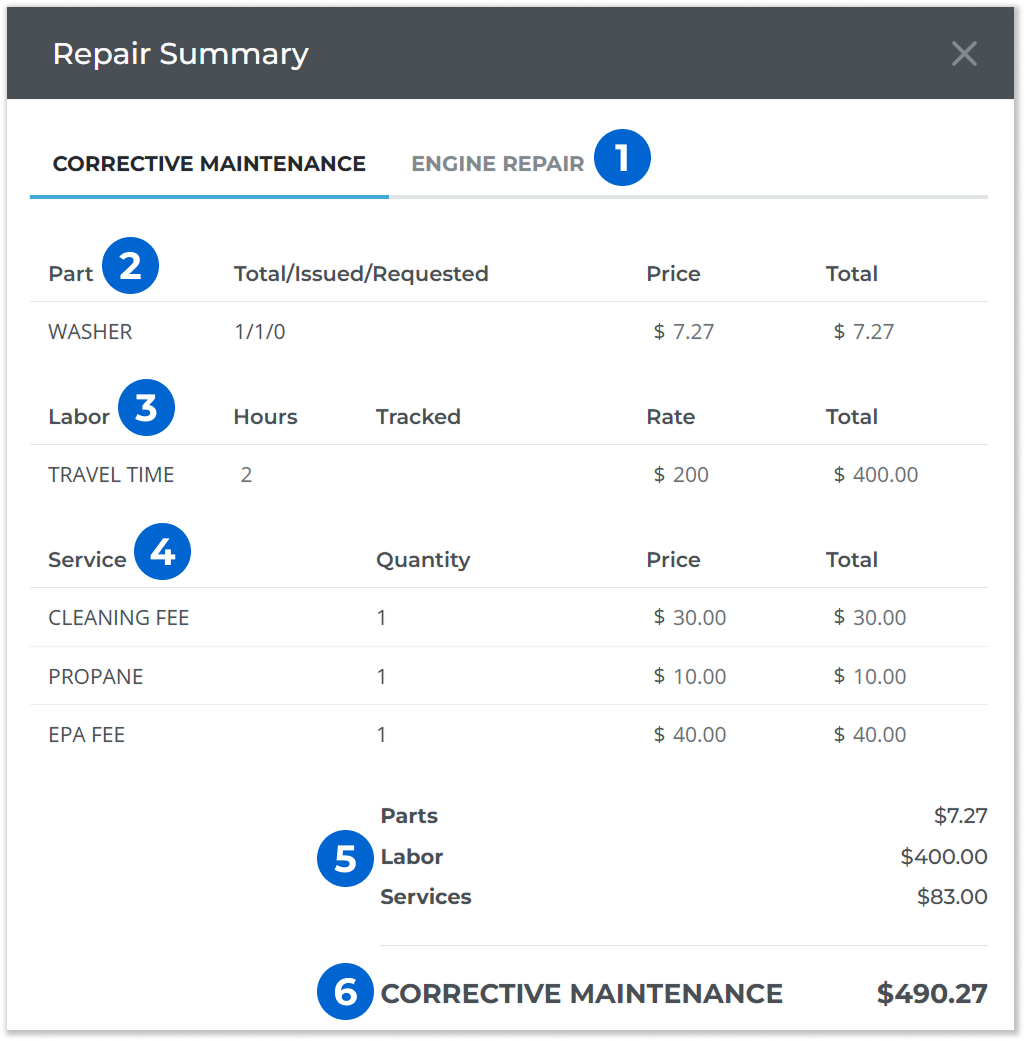
- Repair Codes
The costs in the Repair Summary window are organized by Repair Code. Click on a Repair Code to view a summary of the Parts, Labor items, and Services included under it. - Part Summary
A summary of the Parts included under the selected Repair Code. The information available for each Part is as follows:- Part: The Part’s description.
- Total/Issued/Requested: The total number of the Part issued and requested / the number of the Part that was issued / the number of the Part that was requested.
- Price: The price per unit of the Part.
- Total: The total pre-tax cost of the Part. Equal to Issued * Price * (100 - Discount)%.
- Labor Summary
A summary of the Labor items included under the selected Repair Code. The information available for each Labor item is as follows:- Labor: The Labor item’s description.
- Hours: The number of hours the Mechanic has indicated they spent working on the Labor item.
- Tracked: The actual amount of time the Mechanic has logged against the Labor item in Service Management Mobile.
- Rate: The Labor item’s hourly rate.
- Total: The total pre-tax cost of the Labor item. Equal to Hours * Rate * (100 - Discount)%.
- Service Summary
A summary of the Services included under the selected Repair Code. The information available for each Service is as follows:- Service: The Service’s description.
- Quantity: The quantity of the Service included on the Work Order.
- Price: The price per unit of the Service.
- Total: The total pre-tax cost of the Service. Equal to Qty * Price.
- Parts, Labor, and Services Totals
The total pre-tax costs of the Parts, Labor items, and Services for the Repair Code. - Repair Code Total
The total pre-tax cost of all items under the selected Repair Code. Equal to the sum of the Parts, Labor, and Services totals.
Related Open Work Orders Panel
This panel contains information on any Work Orders for the same Asset that are currently open in the system. The primary purpose of this panel is to prevent you from accidentally creating a duplicate Work Order.

- Related Work Order
Open Work Orders for the same Asset are listed here, along with their basic information. Click on a related Work Order to open the Work Order Info Window, providing more detailed information.
Work Order Info Window
Click on a Work Order in the Related Open Work Orders Panel to open its Info Panel. The Info Panel provides more detailed information on a Work Order, and allows you modify these details directly or jump to its edit page.
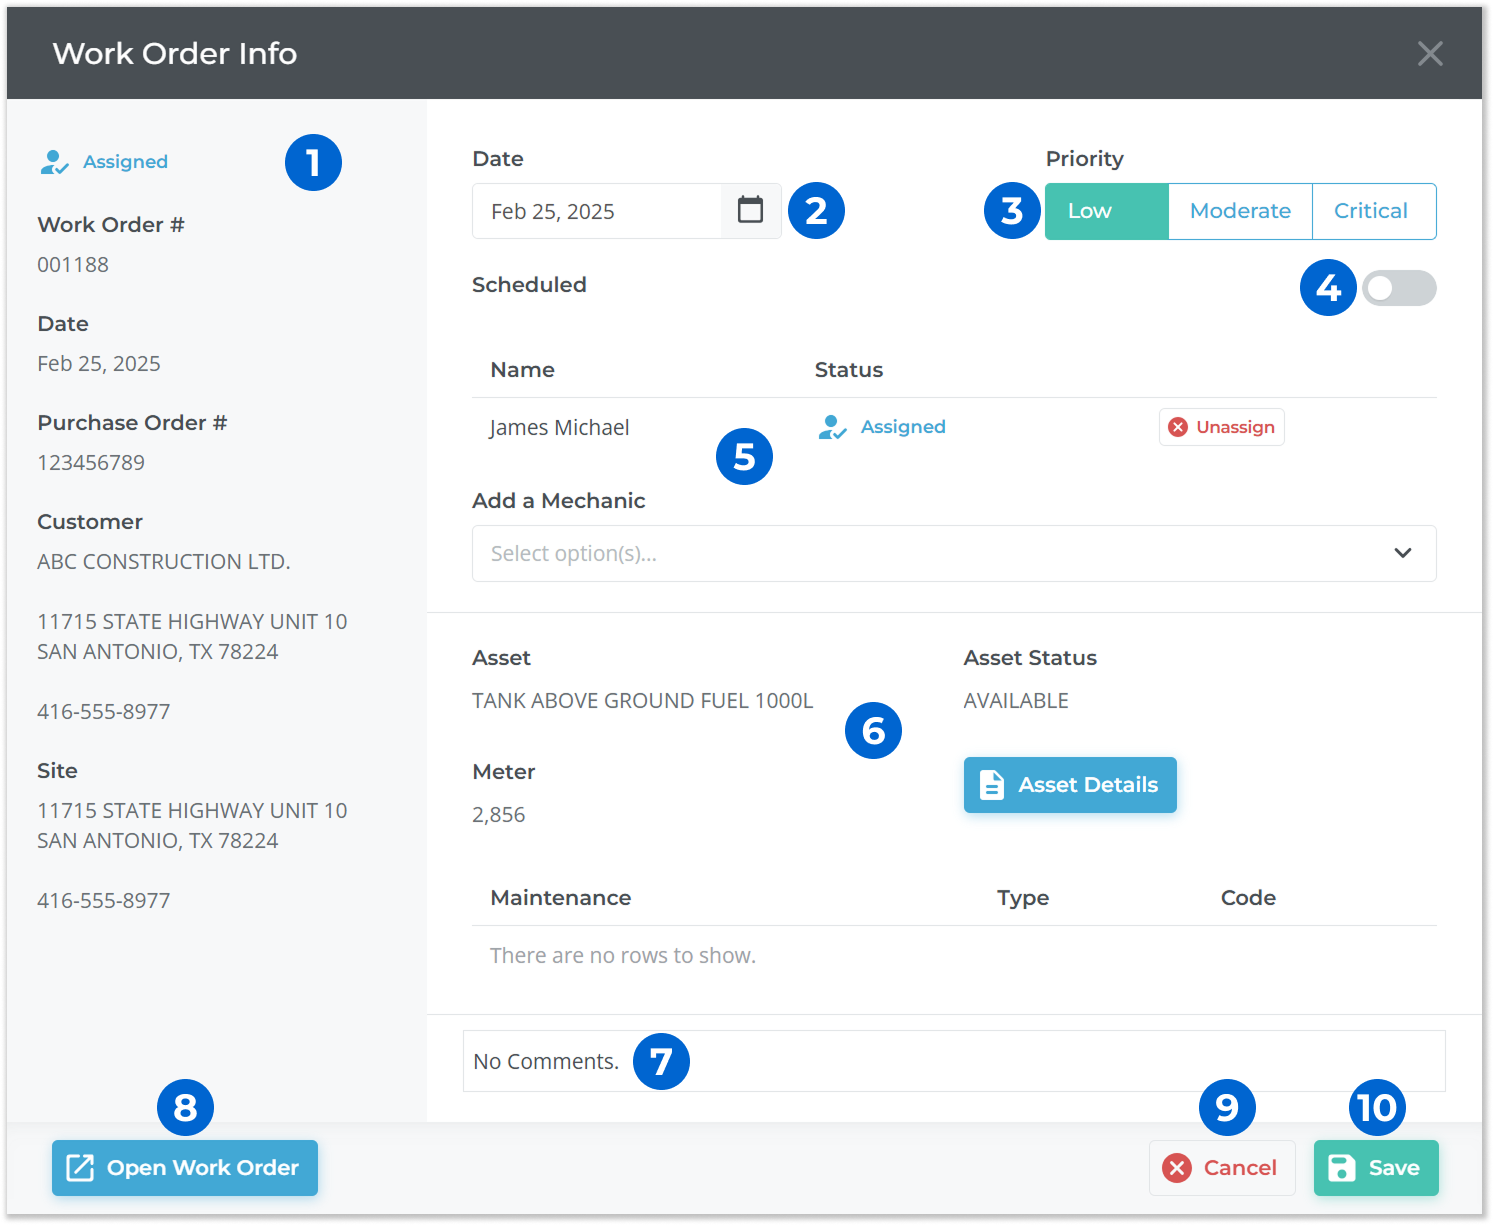
- Information Sidebar
This sidebar provides a quick overview of the Work Order’s details, including its WO #, date, purchase order #, Customer name, address and contact information, and site information. - Date Selector
Use to modify the Work Order’s date. - Priority Selector
Use to modify the Work Order’s priority. - Schedule Information
Use to indicate whether or not the Work Order has been scheduled, and if so, what are the target start and end times. - Mechanic Information
This section contains information on the Mechanic(s) that have been assigned to the Work Order.- To add a Mechanic to the Work Order, click the ‘Add a Mechanic’ drop-down or start typing the Mechanic’s name, then click on his or her name once you have located it in the list.
- To unassign a Mechanic from the Work Order, click the ‘Unassign’ button next to his or her name.
- Asset and Maintenance Information
This section contains information on the Asset assigned to the Work Order, including its name, status, meter, and maintenance information. Click on the ‘Asset Details’ button to open the Asset’s details page in a new browser tab. - Comments
Any comments left on the Work Order are displayed here. - Open Work Order Button
Click this button to open the Work Order’s edit page in a new browser tab. - Cancel Button
Click to close the Info Panel without saving any changes. You can also accomplish this by clicking anywhere outside the panel. - Save Button
Click to save all changes and close the Info Panel.
Work Order Actions
The actions you can take with a Work Order - for example, saving, deleting, invoicing or printing it - will be listed as buttons in the footer of the Create / Edit Work Order page:
Naturally, the actions you can take with any given Work Order will depend on a number of factors, including:
- Whether you are creating or editing the Work Order
- Whether it is a regular Work Order or a Work Order estimate
- The Work Order’s current status
- The Work Order’s Posting Type
The following section lists all possible Work Order actions and the conditions under which they will be available.
Create Work Order
|
Action |
Description |
|
|
Save your changes and create your Work Order. You can only do this if all required fields are filled out. |
Create Work Order Estimate
|
Action |
Description |
|
|
Save your changes and create your Work Order estimate. You can only do this if all required fields are filled out. |
Edit Work Order
|
Action |
Description |
Condition |
|
|
Open a printable PDF version of the Work Order. |
|
|
|
Send a PDF version of the Work Order to the specified email address. |
|
|
|
Print a red or green status tag for the Asset on the Work Order. |
Current status is Completed or Closed |
|
|
Generate an Invoice for the Customer on the Work Order, for an amount equal to the Grand Total specified under the Total Panel. Upon clicking this button, you will be prompted to enter an Invoice date, then automatically redirected to the Edit Invoice page and prompted to submit a payment for the Invoice. Generating an Invoice for a Work Order will set its status to Closed. |
Current status is NOT Closed AND Posting Type is either Standard Invoice, Customer Damage, or Customer Repair |
|
|
Change the Work Order’s status to Closed without invoicing it. |
Current status is NOT Closed AND Posting Type is Internal Work Order |
|
|
Change the Work Order’s status to “In Progress” and enable editing. |
Current status is Completed |
|
|
Save any changes made to the Work Order. |
Current status is NOT Completed or Closed |
Edit Work Order Estimate
|
Action |
Description |
|
|
Open a printable PDF version of the Work Order. |
|
|
Send a PDF version of the Work Order to the specified email address. |
|
|
Delete the Work Order estimate. |
|
|
Close the Work Order estimate without saving your changes and return to the Work Order list. |
|
|
Save any changes made to the Work Order estimate. |
|
|
Convert the Work Order estimate to a Work Order. Note: To see this button, click the down arrow |
 Delete WO Estimate