
Everything you need to know about working with the data tables found throughout Texada Web and Texada GateWay.
Quick Reference
- Tables are commonly found throughout Texada Web and Texada GateWay. While no two tables are exactly alike, many of them share features in common.
- Tips for adjusting a table’s appearance:
- To change the sorting of a table, click on the header of the column you want to sort by. Hold Shift while clicking column headers to sort by multiple columns at once.
- To resize a column, click and drag the thin vertical lines between the column headers.
- To change the order of the columns, click and drag the column headers from side-to-side.
- To “throw away” (hide) a column, click and drag its header up off the table.
- Tips for accessing additional options:
- To access more options for a column, click on the hamburger icon
 next to that column’s name.
 - To access more options for a row, click on the three dots
 at the left side of that row, or click or double-click that row (only available for some tables).
 - To access more options for an individual cell or its row, right-click that cell.
- To access more options for a column, click on the hamburger icon
- Other useful features:
- Type into the search bar near the top-left corner of a table to filter its contents by the text entered.
- Click the “Advanced Search” / Filter icon next to the Search bar to enable advanced filtering. A search bar or drop-down list will appear above each filterable column, allowing you to filter by multiple columns at once.
- Use the ‘Columns’ button on the right side of a table to view a list of columns, and select which columns to display or hide.
- Use the ‘Filters’ button on the right side of a table to filter a table’s rows.
Introduction
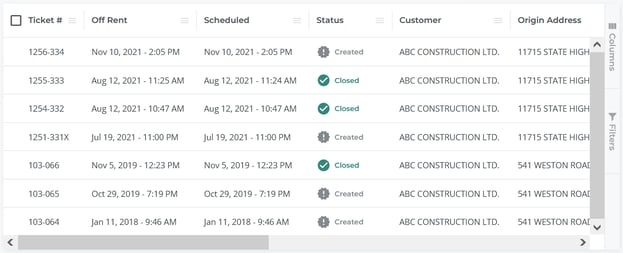 The Ticket List table in Texada Web.
Tables are a common feature of pages throughout Texada Web and Texada GateWay. They provide a clear and concise way to display large quantities of data at once, and offer several options to make searching, sorting, and viewing this data easier.
While no two tables are exactly alike, many of them share features in common. The following article will cover a number of techniques applicable to most tables in GateWay and Web.
The Elements of a Table
Below are two examples of tables found in Texada’s products: the Work Order list in Texada Web (above) and the Open Rentals table in Texada GateWay (below).
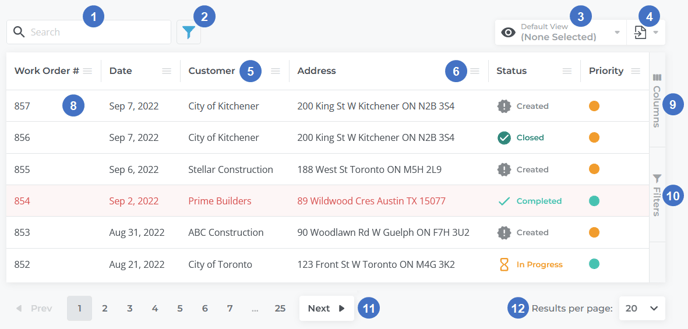 The Work Order list in Texada Web.
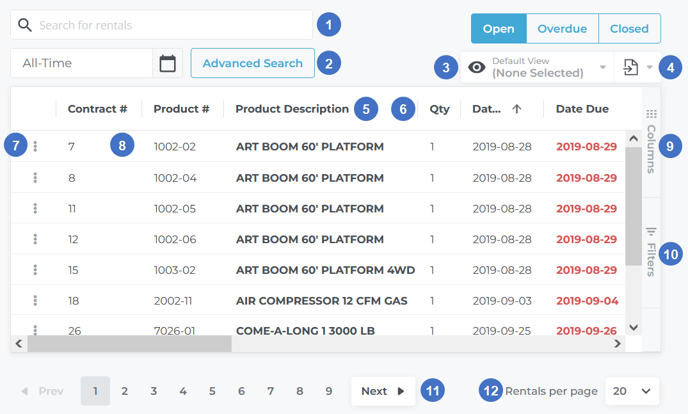 The Open Rentals table in Texada GateWay.
- Search Bar
Begin typing here to filter the table’s contents by the text entered. This will search by different columns depending on the table in question. - Advanced Filter Button
Click to activate advanced filter capabilities, allowing you to filter a table by multiple criteria at the same time. When the advanced filter is active, a search bar or drop-down list will appear above every filterable column, and you will be able to enter or select search terms for as many columns as desired. - View Manager
Use to save, load, and share custom views for the table. See “The View Manager” for more information. - Export Button
Use to export the contents of the table as an Excel spreadsheet (.xlsx) or comma-separated values (.csv) file. See “Exporting the Contents of a Table” for more information. - Column Header
You can adjust columns in various ways by using their headers:- Click a column’s header to change the sorting of that column. The three sorting options are ascending (up arrow), descending (down arrow), and none (no arrow). You can sort by multiple columns at once by holding the Shift key while clicking column headers. Sorting will be prioritized in the order the columns were clicked. For example, in the Work Order list pictured above, holding Shift and clicking the Date column once and the Customer column twice will sort Work Orders by Date ascending, then by Customer name descending.
- Click and drag the thin vertical lines between the columns to adjust their width.
- Click and drag a column’s header from side-by-side to rearrange the order of the columns.
- Click and drag a column’s header upwards to “throw away” (hide) a column. Once hidden, it can be restored via the Column Manager.
- Column Options Menu
Click the hamburger icon next to a column’s name to open its options menu. See ‘Column Options’ for more details. Note that, depending on the table, you may need to hover your mouse over the column header to see the hamburger icon. - Row Options Menu
Some tables, such as the Open Orders table above, feature an additional options menu at the left side of each row. Click the three dots to view this menu. Some tables will instead feature checkboxes for selecting rows, or a draggable area indicated by six dots
  .
. - Row Body
Each of the entries in a table are displayed in their own row. Depending on the table in question, clicking or double-clicking a row may open additional options. You can also right-click most cells to view additional options for that cell, including opening its details in a new tab or copying its contents to the clipboard. - Columns Button
Use this button to quickly see a list of all the columns available for a table, and select which columns to display. See ‘The Column Manager’ for more details. - Filters Button
Use this button to see a list of columns and apply filters to them. See ‘The Filter Menu’ for more details. - Page Navigator
Tables with a large number of rows may be split into several pages; use this tool to move between them. Click ‘Prev’ or ‘Next’ to see the previous or following page, or click a page number to jump directly to that page. - Results per Page Drop-Down
Use this drop-down to adjust how many rows are displayed on a single page. Up to 100 rows can be displayed at once. If your table contains more than 100 rows and you wish to see them all at once, you can use the Export button to download the table and view it in an external program, such as Microsoft Excel.
Column Options
Click on the hamburger icon ![]() next to a column’s name to access its options menu. This will provide a number of additional options for displaying and filtering data. Depending on the table, this menu can have up to three tabs: the options tab, the filter tab, and the columns tab.
next to a column’s name to access its options menu. This will provide a number of additional options for displaying and filtering data. Depending on the table, this menu can have up to three tabs: the options tab, the filter tab, and the columns tab.
Options Tab
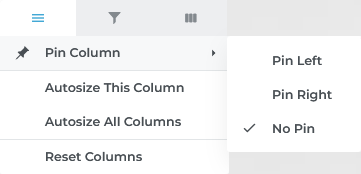
- Pin Column: Use this option to pin the column to the left or right side of the table, ensuring the column will remain visible as you navigate the table.
- Autosize This Column: Adjusts the column’s width to snugly fit all of its data.
- Autosize All Columns: Autosizes all columns simultaneously.
- Reset Columns: Resets all columns’ widths and sort type. Note that this will not reset any filters you have applied.
Filter Tab
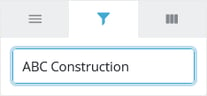
This tab allows you to filter table rows based on specific criteria. Note that the appearance of this tab will change depending on the column selected; some columns will offer a choice of pre-existing options, while others will allow you to filter by text.
Columns Tab
This tab offers the same functionality as the ‘Columns’ button found on the right side of the table. This functionality will be the same regardless of the column selected.
- To show or hide a column, click the checkbox next to its name.
- To show or hide all columns, click the checkbox next to the search bar.
- To search for a particular column, begin typing its name into the search bar.
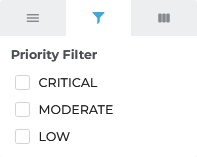
The Filter Menu
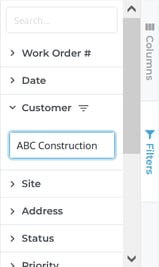
The filter menu allows you to quickly view and apply filters across all columns. To open the filter menu, click on the ‘Filters’ button found on the right side of the table.
- Click on a column to view and modify its filters. Columns that are currently being filtered will have a filter icon
 next to their name.
 - To search for a column, start typing its name into the search bar.
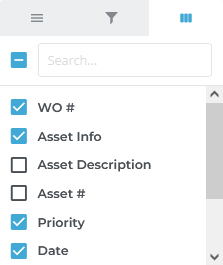
The Column Manager
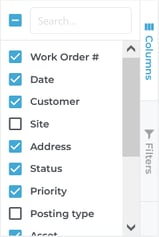
The column manager allows you to view a list of all columns available for a table, and select which ones to display or hide. To open the column manager, click the ‘Columns’ button found on the right side of the table.
- To show or hide a column, click the checkbox next to its name.
- To show or hide all columns, click the checkbox next to the search bar.
- To search for a column, start typing its name into the search bar.