
How to access, view and edit the details of a Part in Texada Web.
Quick Reference
- A Part, also known as a Sale Product, is a small, short-term asset intended for resale or use in repairs.
- To view and edit an existing Part in Texada Web:
- Navigate to Inventory → Parts in the left side menu.
- Locate the Part you want to edit and click on it to view its details.
- Click the Edit button in the bottom-right corner of the screen to enable editing.
- Make your desired edits to the Part. Once you are finished with your edits, click the Save button to save all of your changes and exit editing mode.
Introduction
A Part, also known as a Sale Product, is a small, short-term asset intended for resale or use in repairs. Parts are one of the two main categories of Product in the Texada system, the other being Assets (also known as Rental Products). For more information, see “Rental Products and Sale Products”.
Parts can be created and managed both in Texada SRM and Texada Web. The following article will detail the process of viewing and editing existing Parts in Texada Web.
View and Edit a Part
To view and edit an existing Part in Texada Web:
- Log in to Texada Web and navigate to Inventory → Parts in the left side menu to open the Parts List.
- Locate the Part you want to edit and click on it to view its details.
- Click the Edit button
 in the bottom-right corner of the screen to enable editing.
 - Make your desired edits to the Part. Once you are finished with your edits:
- Click the Save button
 to save all of your changes and exit editing mode. Upon a successful save, you will receive a message that reads “Part has been updated successfully!”
 - Click the Cancel button
 to cancel editing without saving your changes.
- Click the Save button
For a detailed breakdown of all the fields that can be edited from this page, refer to the sections below.
The Edit Part Page
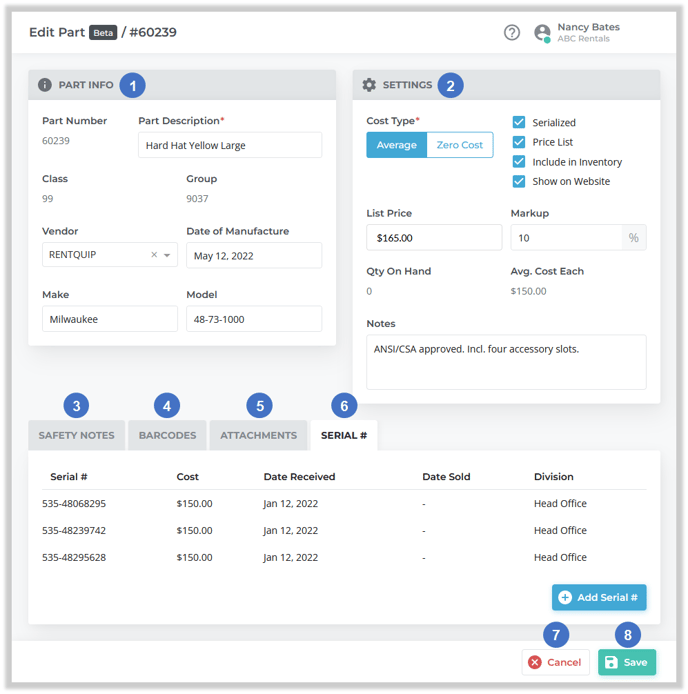
- Part Info Panel
Contains basic information about the Part. - Settings Panel
Contains settings that affect the way the Part behaves in the system, such as whether it should be included in inventory or published on your Texada GateWay eCommerce website. - Safety Notes Tab
Allows you to attach Safety Notes to the Part. - Barcodes Tab
Allows you to specify barcodes for the Part. - Attachments Tab
Allows you to attach additional files to the Part. - Serial # Tab
Allows you to manage serial numbers for the Part. - Cancel Button
Click to cancel your edits without saving. - Save Button
Click to save your changes.
Part Info Panel
This panel contains basic information about the Part.
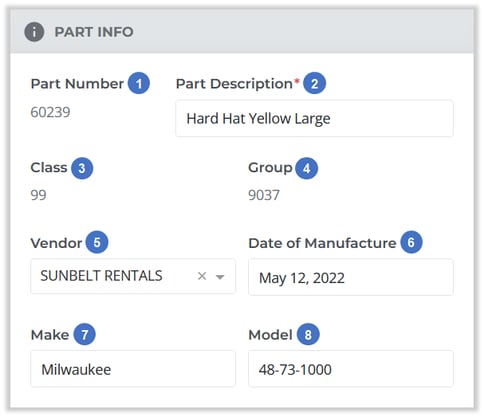
- Part Number
The Part’s unique identifier in the system. - Part Description
The Part’s description. - Class
The Sales Class to which the Part belongs. A Part’s Class cannot be changed once it has been created. - Group
The Group to which the Part belongs. A Part’s Group cannot be changed once it has been created. - Vendor
The equipment supplier from which the Part was purchased. Vendors are managed in Texada SRM, at Accounts Payable → Vendor Information. - Date of Manufacture
The date on which the Part was manufactured. - Make
The Part’s make. - Model
The Part’s model number.
Settings Panel
This panel contains a number of settings that control the way the Part behaves in the system.
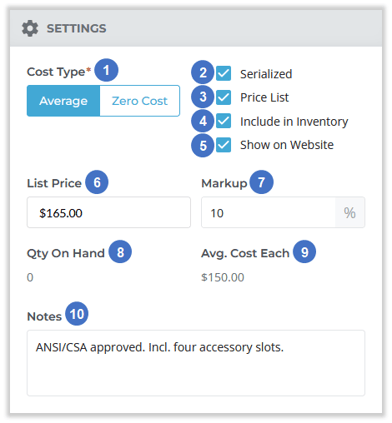
- Cost Type
This option determines how the cost of this Part will be calculated when it is posted to the General Ledger. Select one of the following options:- Average: Post the cost of this Part as its Average Cost Each (9) value.
- Zero Cost: Post the cost of this Part as zero. This usually applies when the Part has already been expensed at the time it is entered into the system.
- Serialized
Check if this Part is serialized; uncheck if it is non-serialized. See “Serialized Products and Non-Serialized Products” for more information.
This field is equivalent to the “Serial #” checkbox in the Sales Inventory utility in Texada SRM. - Price List
Check to include this Part in the Price List. Uncheck if this Part should not be included in the Price List. - Include in Inventory
Check to include this Part in your system’s inventory. Uncheck if this Part should not be included in inventory. This is often the case for re-rental items or other generic items.
This field is equivalent to the “Inventory” checkbox in the Sales Inventory utility in Texada SRM. - Show on Website
Check to show this Part on your GateWay eCommerce website, if one exists. Uncheck if this Part should not be displayed on your website.
This field is equivalent to the “Show on Website” field under the Website Options menu in the Sales Inventory utility in Texada SRM. - List Price
The selling price of the Part. This is the standard price that will print on the Price List and will be the default price when invoicing. - Markup %
The Part’s markup percentage, or the amount by which the purchase price is multiplied to arrive at the sale price. For example, a Part with a purchase price of $200 and a markup of 25% would have a default sale price of $250. - Qty On Hand
The quantity of the Part held in inventory across all locations. Note that this represents the total quantity as opposed to the quantity currently available. - Avg. Cost Each
The average purchase cost of the Part. - Notes
Any additional notes about the Part. Notes are internal and are not published on any documents.
Safety Notes Tab
This tab allows you to add Safety Notes to the Part. A Safety Note is a brief message informing potential users of how to safely and correctly use a Product. Multiple Safety Notes can be added to a single Part. A Part’s Safety Notes will be printed beneath it whenever it appears on a document such as a Contract.
Safety Notes are managed in Texada SRM, at System Maintenance → Configure System Settings → Operations → Safety Notes.
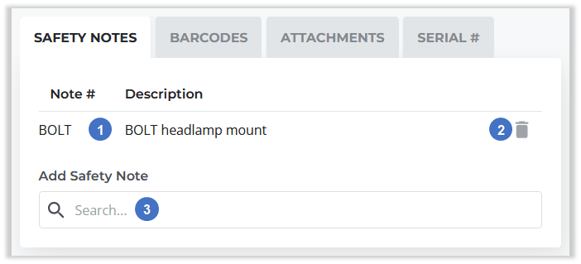
- Safety Note
Safety Notes that have already been added to the Part are listed here. Information displayed for each Part includes:- Note #: The ID of the Safety Note.
- Description: A brief description of the Note’s contents. The contents themselves can be seen via the Safety Notes utility in Texada SRM.
- Delete Safety Note
Click the bin icon next to a Safety Note to remove it from the Part.
 - Add Safety Note
Begin typing into the search bar to search the list of Safety Notes, then click on a Note to add it to the Part.
Barcodes Tab
This tab allows you to specify barcode numbers for your Part. This is useful for tracking the codes used by barcode scanners.
In Texada SRM, you can locate a Product by entering its barcode instead of its Product Number. This works in the Sales Inventory and Rental Inventory utilities as well as all document entry utilities such as Contracts, Invoices, Reservations, etc.
Barcodes can be up to 20 characters in length and must be unique. A Part’s barcode can be the same as its Product Number, but cannot be the same as the Product Number for any other Asset or Part in the system.
For more information, see “Barcodes” (SRM help file).
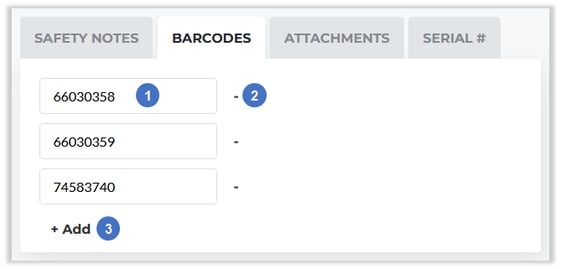
- Barcode
Barcodes associated with your Part are listed here. - Delete Barcode
Click the minus sign next to a barcode to remove it from the Part.
 - Add Barcode
Click to add another barcode to the Part.
Attachments Tab
This tab allows you to attach additional files to the Part.
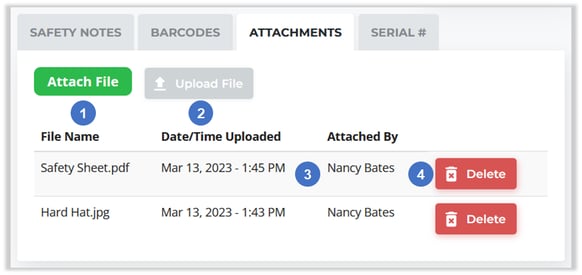
- Attach File Button
Click to open your computer’s file manager and select a file to attach to the Part. Once you have located the file you want to upload, double-click it to select it. The text of the Attach File button will change to the name of the file to indicate that the selection was successful. - Upload File Button
Once you have selected a file to attach to the Part, click this button to upload it. - Attachment
Existing attachments are listed here. Information displayed for each attachment includes:- File Name: The name of the attached file.
- Date/Time Uploaded: The date and time at which the attachment was added to the Part.
- Attached By: The name of the User who added the attachment to the Part.
- Delete Attachment Button
Click to remove the attachment from the Part.
Serial # Tab
This tab allows you to manage serial numbers for your Part. This tab only applies to serialized Parts; if the Part you are editing is not serialized, you will see a message that reads “This Part is not serialized. Check the "Serialized" option in the Settings above to edit the serial numbers on this Part.”
See “Serialized Products and Non-Serialized Products” for more information on serialization.
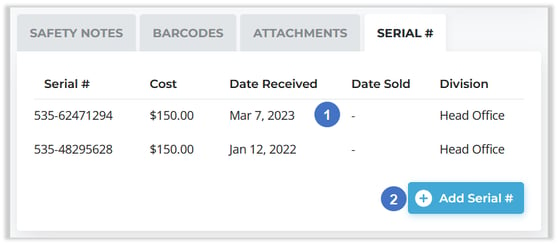
- Serial Number
Existing serial numbers are listed here. Click on a serial number to edit it; see “Add / Edit Serial #” for more information. Information displayed for each serial number includes:- Serial #: The Part’s serial number.
- Cost: The purchase cost of the Part. Parts with different serial numbers may have different purchase costs, if they were purchased at different times or from different vendors.
- Date Received: The date on which the Part was received into inventory.
- Date Sold: The date on which the Part was sold, if applicable.
- Division: The Division at which the Part is located.
- Add Serial # Button
Click to add a new serialized Part. See “Add / Edit Serial #” for more information.
Add / Edit Serial #
This window allows you to edit the details of a new or existing serialized Part, then save the Part into inventory or update its information, respectively.
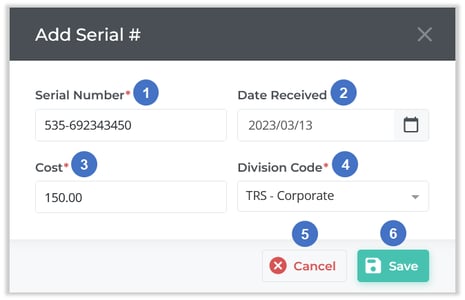
- Serial Number
The Part’s serial number. This can only be set when adding a new serial number. - Date Received
The date on which the Part was received into inventory. Click the calendar icon to open the calendar and select a date. This can only be set when adding a new serial number.
 - Cost
The purchase cost of the Part. - Division Code
The Division at which the Part is located. - Cancel Button
Click to close without saving any changes. - Save Button
Click to create the new serialized Part (if adding) or to save your edits to the Part (if editing).