
How to manage serialized Sale Products and non-serialized Sale Products in Texada Web and SRM.
Quick Reference
- A Product is any asset held in inventory for the purposes of rental, sale, or use in repairs or maintenance. There are two main types of Product in the Texada system: Rental Products, also known as Assets, and Sale Products, also known as Parts.
- All Rental Products have an Asset Tag containing information about the Product, including its serial number. This means that all Rental Products are serialized via their attached Asset Tag. Sale Products, by contrast, may or may not be serialized.
- Tips for managing serialized Parts in Texada Web:
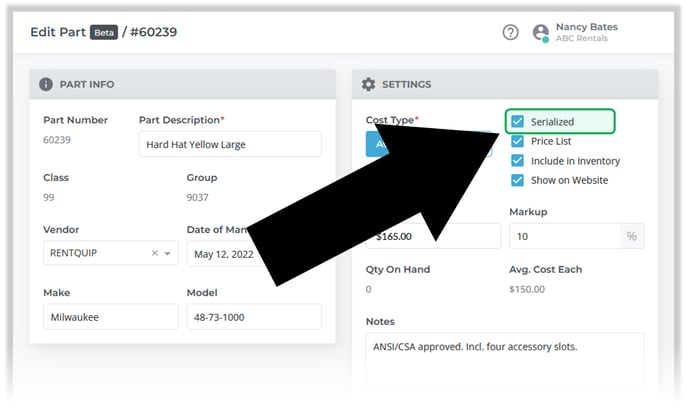
- To view and edit a Part’s serialization status, navigate to Inventory → Parts, then locate the Part you want to edit. Look for the “Serialized” checkbox under the Settings panel. If this checkbox is checked, the Part is a serialized Part. To edit this value, click the Edit button in the bottom-right corner of the screen.
- To manage serial numbers for a serialized Part, navigate to Inventory → Parts, then locate the Part you want to edit. Click the Edit button, then select the Serial # Tab and make your edits there.
- Tips for managing serialized Parts in Texada SRM:
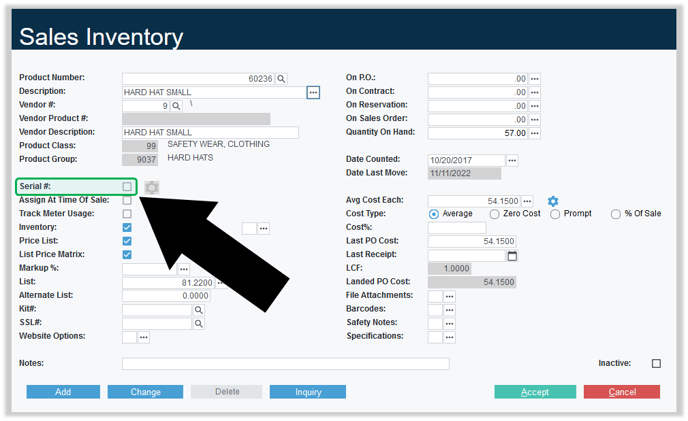
- To view a Part’s serialization status, navigate to Inventory Control → Sales Inventory, then enter the Product Number of the Part you’d like to view and press Enter. Look for the “Serial #” checkbox on the left side of the screen. If this checkbox is checked, the Part is a serialized Part.
- To edit a Part’s serialization status, navigate to Utilities → Inventory Control Utilities → Change Serial # Flag. Enter the Product Number of the Part you would like to edit and select the desired options, then press “Accept” to save your changes.
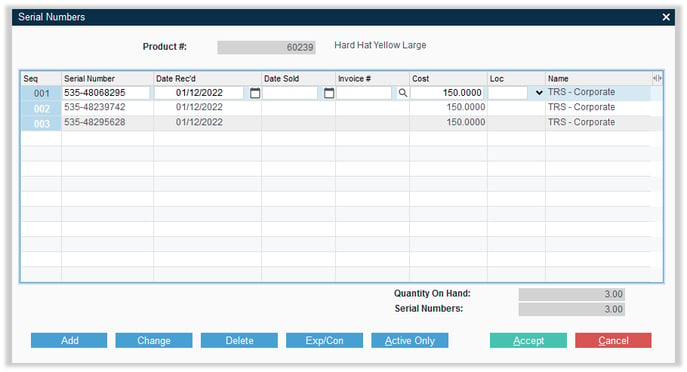
- To manage serial numbers for a serialized Part, navigate to Inventory Control → Sales Inventory. Enter the Product Number of the Part you’d like to view and press Enter. Click on the blue gear icon
 next to the Serial # checkbox to open the Serial Numbers utility. Make your desired changes, then click “Accept” to save.
- The “Assign At Time Of Sale” checkbox in the Sales Inventory utility in Texada SRM controls when the system will prompt the User for serial numbers:
- If “Assign At Time Of Sale” is unchecked, the system will prompt the User for serial numbers at the time the Product is first received into inventory.
- If “Assign At Time Of Sale” is checked, the system will prompt the User for serial numbers at the time the Product is sold.
Introduction
In the context of the Texada system, a “Product” is any asset held in inventory for the purposes of rental, sale, or use in repairs or maintenance. Individual Products are organized into Groups, which in turn are organized into Classes - see “Classes, Groups, and Products” for more information.
There are a number of different ways in which Products can be categorized. These variables affect which information is stored for each Product and how it behaves in the system. One of these distinctions is between Serialized Products and Non-Serialized Products.
Serialized Products and Non-Serialized Products
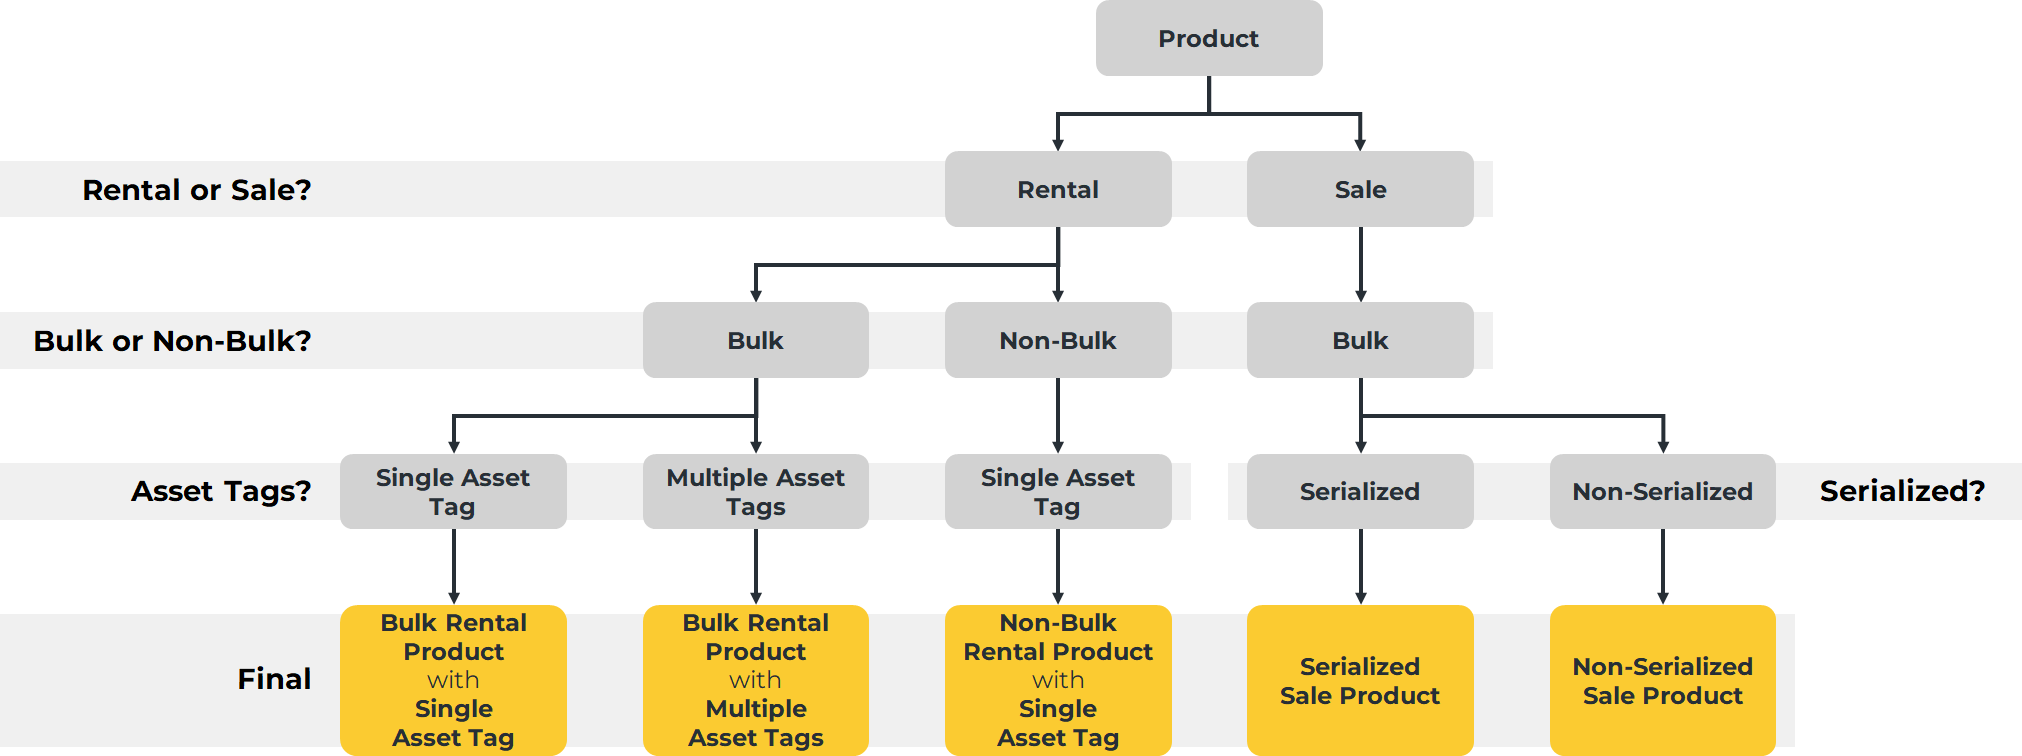 Diagram illustrating the different ways Products can be classified based on Rental or Sales status, bulk status, Asset Tags, and serialization. Click to view the full-sized image.
There are two main types of Product in the Texada system: Rental Products, also known as Assets, and Sale Products, also known as Parts. See “Rental Products and Sale Products” for more information.
All Rental Products have an Asset Tag containing information about the Product, including warranty information, add-ons and depreciation, and the Product’s serial number. This means that all Rental Products are serialized via their attached Asset Tag. Sale Products, by contrast, may or may not be serialized.
The following article focuses on managing serialized Sale Products and non-serialized Sale Products. For more information on managing serial numbers for Rental Products, see “Asset Tags”.
View and Edit a Product’s Serialization Status
Texada Web
- Log in to Texada Web and navigate to Inventory → Parts to access the Parts List.
- Locate the Part you wish to view and click on it to open the Edit Part page.
- Look for the “Serialized” checkbox under the Settings panel. If this checkbox is checked, the Part is a serialized Part.
- To edit this value, click the Edit button
 in the bottom-right corner of the screen. Check or uncheck the Serialized checkbox as desired, then click Save
  to save your changes.
Texada SRM - View
- Log in to Texada SRM and navigate to Inventory Control → Sales Inventory.
- Enter the Product Number of the Part you’d like to view and press Enter.
- Look for the “Serial #” checkbox on the left side of the screen. If this checkbox is checked, the Part is a serialized Part.
Texada SRM - Edit
In Texada SRM, it is not possible to edit a Part’s serialization status directly from the Sales Inventory utility. This can instead be done via the Change Serial # Flag utility.
- Log in to Texada SRM and navigate to Utilities → Inventory Control Utilities → Change Serial # Flag.
- Enter the following information:
- Product Number: The Product Number of the Part you would like to edit.
- Serial Number: Check to convert to a serialized Product. Uncheck to convert to a non-serialized Product.
- Time Of Sale: Serialized Products only. Uncheck if serial numbers should be captured when the Product is first received into inventory. Check if serial numbers should be captured at the moment the Product is used or sold.
- Track Meter Usage: Serialized Products only. Check to allow this Part to inherit the meter usage of non-bulk metered Rental Products when it is added to a Work Order for one such Product. This feature is useful for determining the life expectancy of serialized Parts.
- Press “Accept” to save your changes.

Manage a Product’s Serial Numbers
Texada Web
In Texada Web, you can manage a Part’s serial numbers via the Serial # tab of the Edit Part screen. See “View and Edit a Part in Texada Web - Serial # Tab” for more information.
Texada SRM
- Log in to Texada SRM and navigate to Inventory Control → Sales Inventory.
- Enter the Product Number of the Part you’d like to view and press Enter.
- Click on the blue gear icon next to the Serial # checkbox to open the Serial Numbers utility. From this utility, you can do any of the following:
- Click “Add” to add a new serial number to the Product.
- Click “Change” to edit an existing serial number.
- Click the “Exp/Con” button to show more detailed information for each serial number. This will also allow you to edit this information using the “Change’ button.
- In Change mode, select a serial number then click the “Delete” button to delete it.
- Click “Active Only” to show only serial numbers that have no Date Sold. Click “Display All” to show all serial numbers.
- Once you are finished, click “Accept” to save your changes.
Add Serial Numbers at Time of Sale or Receipt
In addition to managing serial numbers manually as described above, the system will also prompt the User to add serial numbers to a Product either when it is received into inventory or when it is sold. The “Assign At Time Of Sale” checkbox in the Sales Inventory utility in Texada SRM controls when the system will prompt the User for serial numbers:
During Warehouse Receiving
If “Assign At Time Of Sale” is unchecked, the system will prompt the User for serial numbers at the time the Product is first received into inventory.
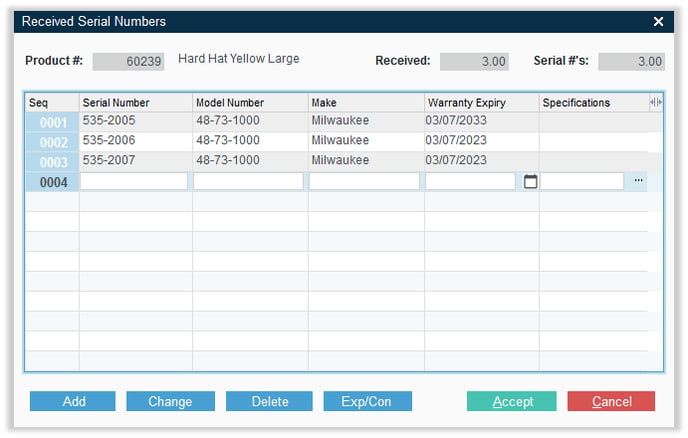
When you receive a Purchase Order via the Warehouse Receiving module, the Received Serial Numbers window will appear, prompting you to enter the serial numbers for the received Products. Click “Add” to add another serial number or click “Change” to edit an existing serial number. Click “Accept” once you are finished.
At Time of Sale
If “Assign At Time Of Sale” is checked, the system will prompt the User for serial numbers at the time the Product is sold.
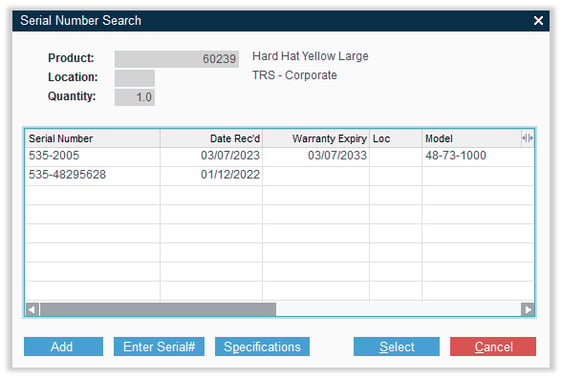
When you add the Product to a Contract, the Serial Number Search window will appear, prompting you to enter the serial number for the sold Product. If this serial number is already in the list, you can double-click it to select it, or click the “Enter Serial#” to type it in manually. If the serial number for the sold Product is not yet in the list, click the “Add” button to add it.
Serial Number Quantity Discrepancies
When managing serial numbers in Texada Web and Texada SRM, it is important to remember that the number of serial numbers that exist for a Product should match the number of that Product in inventory. For example, if you have 15 serialized chainsaws in inventory, the system will expect 15 serial numbers to exist for that Product.
In Texada SRM, attempting to save and exit the Serial Numbers utility when the number of serial numbers does not match the number of Products in inventory will result in the appearance of the Quantity Discrepancy window:
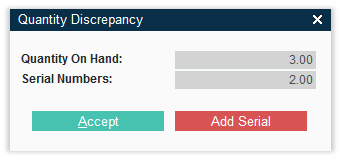
In the example above, this window is indicating that the Quantity On Hand of the Product is 3, but the number of serial numbers is only 2. Click “Add Serial” to reopen the Serial Numbers utility and add the missing serial numbers.
Texada SRM’s Serial # Inventory Integrity Report utility can be used to identify serial number discrepancies. This is a maintenance utility that does not appear in any of SRM’s standard menus; it can instead be added to an Additional Options menu. For more information, see “Additional Menu Options” (SRM help file). If you are having difficulty adding items to an Additional Options menu, please contact Texada support for assistance.