
How to assign a Ticket to a Driver and schedule it for completion.
Quick Reference
- A Ticket is a document indicating that Assets need to be transported from one location to another, usually at the beginning or end of a Contract.
- Each Ticket has a Scheduled time which represents the date and time at which that Ticket should be completed, and an assigned Driver who is responsible for fulfilling the Ticket. A Ticket’s Scheduled time can be set from its details page; its assigned Driver can be changed from its details page or the Ticket Scheduling page.
- To schedule and assign a Ticket from the Ticket details page:
- Open the details of the Ticket you’d like to edit.
- Edit the Scheduled and Driver values under the Ticket Info panel.
- Click the “Save” button to save your changes.
- To assign a Ticket from the Ticket Scheduling page:
- Open the Ticket Scheduling page and use the controls at the top of the screen to navigate to the date for which you’d like to assign Tickets.
- Locate the Ticket you’d like to assign and use the six dots
 to the left of its row to drag and drop it under the name of the desired Driver.
 - You can also assign a Ticket by clicking on it to select it, then clicking the “Assign To…” button in the bottom-right corner of the screen. This will open a list of Drivers. Tap the “Assign” button next to a Driver’s name to assign them to the Ticket.
Introduction
A Ticket is a document indicating that Assets need to be transported from one location to another, usually at the beginning or end of a Contract. Once a Ticket is created in Texada Web, it can be scheduled and assigned to a Driver for completion.
Scheduling
Each Ticket has a “Scheduled” value which represents the date and time at which that Ticket should be completed. When a Ticket is first created, this value defaults to the current date and time. This can be overwritten at the time of creation, and can also be changed from the Ticket’s details page in Texada Web provided it has not already been started.
Assignment
Each Ticket has a “Driver” value which represents the Driver responsible for fulfilling the Ticket. A Ticket can be assigned to a Driver when it is first created, or it can be left unassigned. Once created, a Ticket can be assigned to a Driver either via its details page or the Ticket Scheduling page.
The following article will detail the process of assigning and scheduling a Ticket from the Ticket details page or the Ticket Scheduling page.
Ticket Details Page - Assign and Schedule
- Open a Ticket
Log in to Texada Web and open the details of the Ticket you’d like to edit. See “View and Edit a Ticket in Texada Web” for more information. - Set Scheduled and Driver Values
Look for the “Scheduled” and “Driver” fields under the Ticket Info tab.- Click on the date or time portions of the Scheduled field to open the calendar and select a new Scheduled date for the Ticket.
- Click on the Driver drop-down to open the list of Drivers, then click on a Driver’s name to assign them to the Ticket. Note that you can only assign a Driver who has permissions to work at the Ticket’s Division. Click the cancel button
 next to the Driver drop-down to unassign the current Driver.
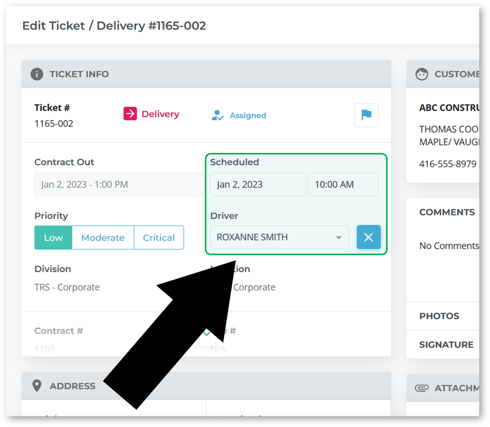
- Save your changes
Click the Save button in the bottom-right corner of the screen to save your changes.
Ticket Scheduling Page - Assign
- Access the Ticket Scheduling page
Log in to Texada Web and navigate to the Ticket Scheduling page. Use the controls at the top of the page to navigate to the date for which you’d like to assign Tickets. - Locate Ticket
Locate the Ticket you wish to assign in the Ticket table. Click the ‘Unassigned’ header at the top of the table to view unassigned Tickets for the selected day. You can also click on a Driver’s name to view their currently-assigned Tickets, and reassign them to a new Driver.
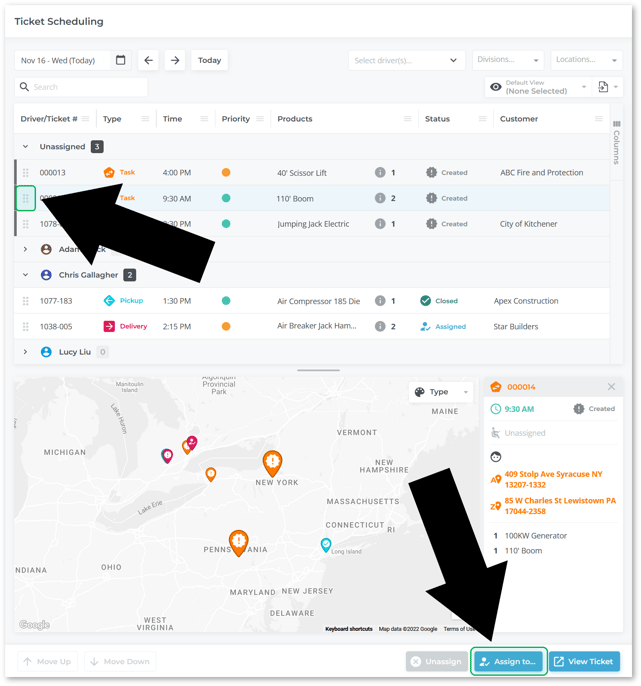
- Assign Ticket
You now have two options for assigning the Ticket:- Drag and Drop
Click the six dots to the left of the Ticket’s row and drag it under the name of the Driver to which you’d like to assign the Ticket. - Assign To…
Click on the Ticket’s row to select it. Click the Assign To… button in the bottom-right corner of the screen to open a list of Drivers, then click the Assign button
  next to a Driver’s name to assign them to the Ticket.
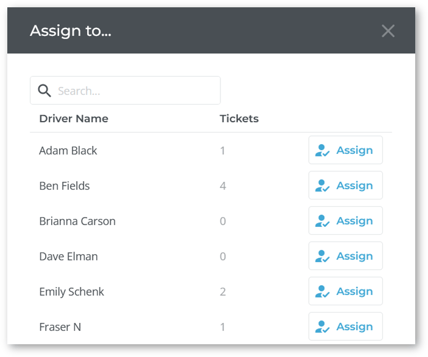
- Drag and Drop