
An overview of the Ticket Scheduling page in Texada Web.
Quick Reference
- A Ticket is a document indicating that Assets need to be moved between locations. Once a Ticket has been created, it can be viewed in multiple places in Texada Web, including the Ticket Scheduling page.
- The Ticket Scheduling page provides you with a focused look at all the Tickets scheduled for a particular day, and allows you to assign Tickets and plot your Drivers’ routes for the day. It is divided horizontally into two halves. The top half contains the Ticket table, which lists Drivers and their assigned Tickets; the bottom half contains the Ticket map, which displays Tickets by their Origin and/or Destination Address.
- Tips for navigating the Ticket Scheduling page:
- Use the controls at the top of the page to select which date you are viewing Tickets for, and to filter the list of Tickets by various criteria.
- Click on a Driver’s name in the Ticket table to view their assigned Tickets for the day. Unassigned Tickets are located at the top of the table.
- Click on a Ticket in the Ticket table or on the Ticket map to highlight it. This will display its details in the panel near the bottom-right corner of the screen.
- Click and drag the gray bar between the Ticket table and the Ticket map to resize them. Drag the bar all the way to the bottom or top of the screen to completely hide the Ticket map or table, respectively.
- Use the buttons at the bottom of the screen reorder, reassign, or unassign the highlighted Ticket.
- You can assign, unassign, reassign, and reorder Tickets by clicking and dragging them in the Ticket table:
- Assign: Click and drag from the Unassigned section to under a Driver’s name.
- Unassign: Click and drag from under a Driver’s name to the Unassigned section.
- Reassign: Click and drag from one Driver to another.
- Reorder: Click and drag within the same Driver’s list of assigned Tickets.
Introduction
A Ticket is a document indicating that Assets need to be moved between locations. Tickets are created by dispatchers using Texada Web or SRM, and are completed by Drivers using Texada Mobile. Once a Ticket has been created, it can be viewed in multiple places in Texada Web: the Pickup, Delivery, or Task Tickets Lists, the Ticket Map, and the Ticket Scheduling page.
The Ticket Scheduling page provides you with a focused look at all the Tickets scheduled for a particular day. It features a split view containing both a list of Tickets and a map where Ticket locations and Driver routes can be reviewed. The ability to reassign Tickets between Drivers by dragging and dropping them makes the Ticket Scheduling page a powerful tool for optimizing your Drivers’ schedules.
To reach the Ticket Scheduling page, navigate to Tickets → Scheduling in the left side menu.
The Ticket Scheduling Page
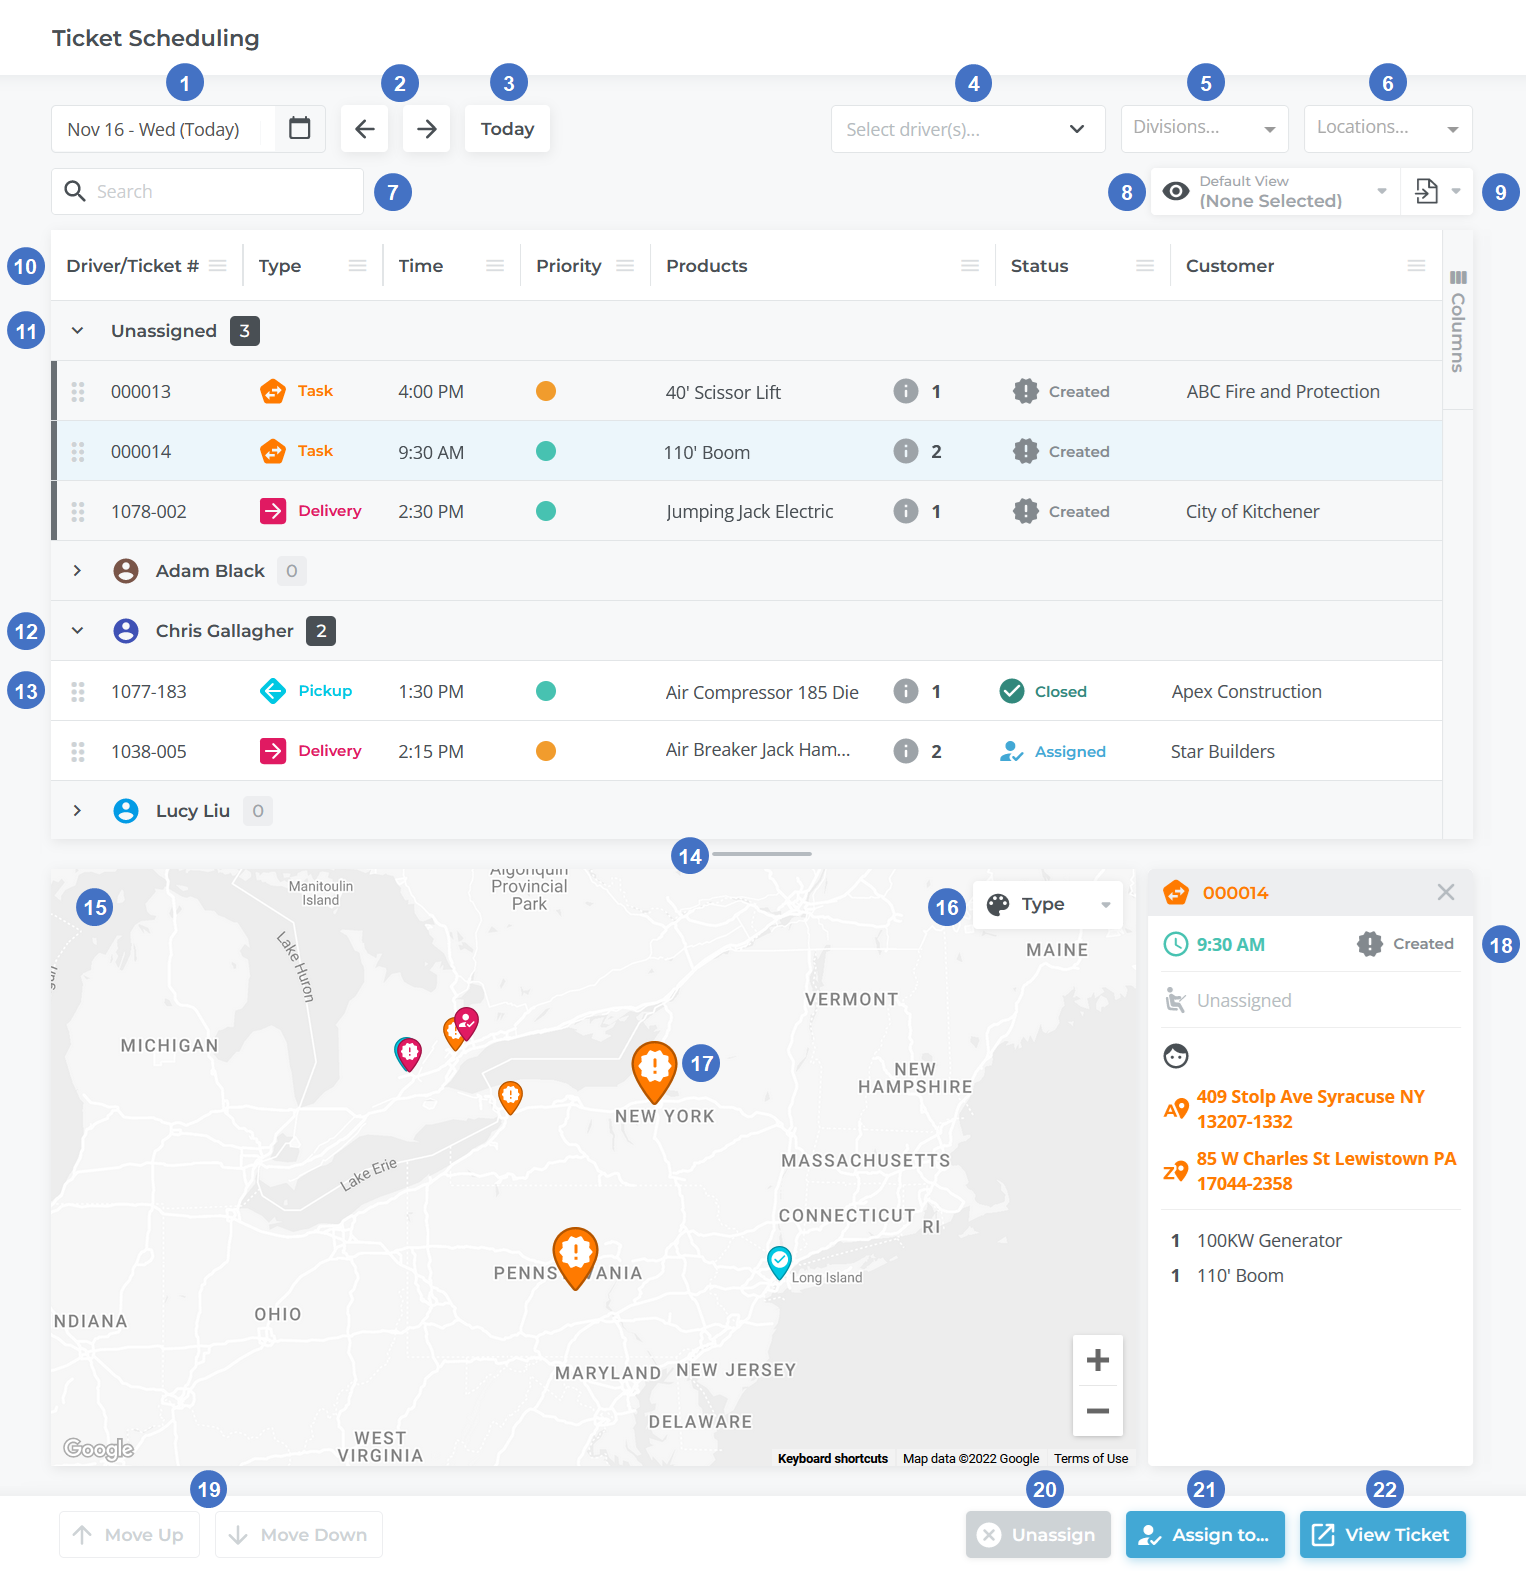
- Date Selector
Select a date from the drop-down calendar to view all of the Tickets scheduled for that date. The number in parentheses indicates how far removed the date is from the current date. For example, (+3) means you are looking at the date three days in the future; (-5) means you are looking at the date five days in the past. - Back / Forward Arrows
Use these to navigate backwards or forwards by one day, respectively. - Today Button
Click to jump to the current date. - Driver Selector
Click on the drop-down to open a list of Drivers in the system. Begin typing to filter the list, and select one or more Drivers to only display those Drivers in the Tickets table (in addition to unassigned Tickets). - Division Selector
Select a Division from the drop-down to only display Tickets for that Division. Once you have made a selection, click the gray ‘x’ next to the Division’s name to remove the filter and display all Divisions. - Location Selector
Select a Location from the drop-down to only display Drivers and Tickets for that Location. Once you have made a selection, click the gray ‘x’ next to the Location’s name to remove the filter and display all Locations. - Search Bar
Begin typing into the search bar to filter the list of Tickets by the text entered. This will search by Ticket #, Products, Customer name, and Origin / Destination Address. - View Manager
Use to manage custom views for the Tickets table. See “The View Manager” for more information. - Export Button
Use to export the contents of the Tickets table for use in an external program. See “Exporting the Contents of a Table” for more information. - Tickets Table
This table contains a list of all the Tickets scheduled for the selected date, organized by Driver. Drivers are sorted alphabetically by name; the Tickets assigned to each Driver are sorted by completion order. Unassigned Tickets are located at the top of the table. The appearance of this table can be modified in a number of ways; see “Working with Tables” for more information. - Unassigned Tickets
Tickets that have not yet been assigned to a Driver are located at the top of the Tickets table. Click on the “Unassigned” header to expand or collapse the list. Unassigned Tickets are indicated by a light gray row in the table. - Driver
Drivers are indicated by a dark gray row in the Tickets table. The number next to each Driver’s name is the number of Tickets assigned to that Driver for the selected date. Click on a Driver’s name to expand or collapse their list of assigned Tickets. - Ticket
Assigned Tickets are indicated by a white row in the Tickets table.- Click on a Ticket to select it. The currently-selected Ticket will be highlighted in blue; its pin on the Ticket map will also double in size, and its details will be loaded into the panel to the right of the Ticket map.
- Double-click a Ticket to open its details in a new browser tab.
- Click and drag a Ticket using the six dots
 to the left of its row to reassign it. Note that you cannot reassign past Tickets.
- To assign a Ticket, drag it from the “Unassigned” section and drop it on or under a Driver’s name. The Driver will receive a notification in Texada Mobile that they have been assigned a new Ticket.
- To unassign a Ticket, drag it out from under a Driver’s name and drop it under the “Unassigned” section. The Driver will receive a notification of the unassignment.
- To reassign a Ticket, drag it out from under a Driver’s name and drop it under a different Driver. The new Driver will receive a notification of the assignment, and the original Driver will receive a notification of the unassignment.
- To reorder Tickets, click and drag them up or down under the same Driver. This feature is useful when used in conjunction with the Ticket map, as it will plot a line between the Driver’s assigned Tickets in the order they are listed. By keeping an eye on the Ticket map while reordering a Driver’s Tickets, you can create an optimized route with a minimum of backtracking.
- Resize Bar
Click and drag the gray bar between the Ticket list and the Ticket map to resize them. Drag the bar to the bottom of the screen to hide the Ticket map entirely; when you do this, the resize bar will be replaced with a “Show Map” button that will reveal the map when clicked. Drag the bar to the top of the screen to hide the Ticket list instead. - Ticket Map
This map displays the locations of all of the Tickets that match the current filters. Pickup Tickets- To pan the map, click and drag anywhere in the map window, or use the arrow keys on your keyboard.
- To zoom in and out, hold ctrl and scroll up or down, use the “+” and “-” keys on your keyboard, or use the “+” and “-” buttons in the bottom-right corner of the map.
- Click on the Google logo in the bottom-left corner of the map to open the map’s current location in Google Maps in a new browser tab.
- Type / Driver / Status Selector
This selector allows you to change the appearance of the pins on the map based on different criteria:- Type: This option color-codes pins based on their Ticket type: Delivery (red), Pickup (blue), and Task (orange).
- Driver: This option changes the symbol on each pin to the first letter of the assigned Driver’s name (for example, a Ticket assigned to John Ashton would be represented by the letter ‘J’). Each Driver will be assigned a random pin color to help distinguish between different Drivers’ pins.
- Status: This option color-codes pins based on their current status: Assigned (blue), In Progress (yellow), Loading/Unloading (orange), Completed (light green), and Closed (dark green).
- Ticket Pin
Each Ticket or Driver on the map is represented by a pin. Click on a Ticket’s pin to highlight it in both the Ticket Map and the Ticket table above. This will also display the Ticket’s details in the panel to the right of the map. The color and symbol of each pin provides information about the Ticket, and can be changed using the Type / Driver / Status selector in the top-right corner of the map. The location of each pin is determined by either the Origin Address or Destination Address of the Ticket, depending on the Ticket’s type:- Pickup Tickets will appear at their Origin Address - the address from which the Assets are to be picked up.
- Delivery Tickets will appear at their Destination address - the address at which the Assets are to be delivered.
- Task Tickets will appear as a set of paired pins - one at the Origin Address and one at the Destination Address. Clicking on a Task Ticket pin will also highlight its paired pin.
- Ticket Details
This panel contains information on the currently-highlighted Ticket, including its Ticket number and type, its scheduled completion time and current status, its assigned Driver, Customer, Origin and Destination Addresses, and the Assets to be moved. Click on the gray ‘X’ in the top-right corner of the panel to deselect the Ticket. - Move Up / Move Down Buttons
Once you have selected an assigned Ticket, use these buttons to reorder it relative to the Driver’s other assigned Tickets. This has the same effect as clicking and dragging it in the Ticket table. Use this feature to create an optimized route for the Driver. - Unassign Button
Once you have selected an assigned Ticket, click this button to unassign it from the Driver. The Driver will receive a notification of the unassignment in Texada Mobile. - Assign to… Button
Once you have selected a Ticket, use this button to assign or reassign it to a new Driver. This will open a window containing a searchable list of Drivers and the number of Tickets currently assigned to each. Click the Assign button next to a Driver’s name to assign the Ticket to them.
 - View Ticket Button
Once you have selected a Ticket, click this button to open its details in a new browser tab.
Tickets Table - Columns
The Tickets table comprises the following columns:
- Driver/Ticket #: Contains either the name of the Driver or the Ticket’s number.
- Type: The Ticket’s type - Pickup, Delivery, or Task.
- Order: The Ticket’s priority relative to the other Tickets assigned to the same Driver. A Driver’s route as displayed on the Ticket map will be plotted based on this order, from lowest to highest. This value changes automatically when a Ticket is reordered by either clicking and dragging it or using the Move Up / Move Down buttons in the bottom-left corner of the screen.
- Time: The Ticket’s scheduled completion time.
- Priority: The Ticket’s priority - Low (green), Moderate (orange), or Critical (red).
- Products: The Products to be moved on the Ticket. Hover your mouse over the “i” symbol
 to view all Products.
 - Status: The Ticket’s current status. See “About Ticket Statuses” for more information.
- Customer: The Customer for which the Ticket is being completed. Pickup and Delivery Tickets inherit the Customer of their parent Contract; Task Tickets are not required to have a Customer.
- Origin Address: The address from which the Products on the Ticket are to be picked up.
- Dest. Address: The address to which the Products on the Ticket are to be delivered.