
Everything you need to know about Instances in Texada Web - what they are, what they are used for, and how to switch between them.
Quick Reference
- An Instance is an independent copy of your system with its own data and configurations. Depending on the way your system is configured, it may comprise one or more different Instances.
- Users with access to multiple Instances can switch between them in Texada Web. Switching Instances effectively means switching databases: each Instance represents a different database with its own version of your system’s data, including all documents, Customer and Asset records, accounting information, and system configurations.
- Your current Instance is displayed directly beneath your name in the top-right corner of Texada Web.
- To change your current Instance, open the User Menu by clicking on your name in the top-right corner of Texada Web. Your available Instances are displayed as a series of buttons below your name. Simply click on an available Instance to switch to it. If you have access to a large number of Instances, you can use the search bar to search for a particular Instance.
Introduction
Depending on the way your Texada system is configured, it may comprise one or more different Instances. An Instance is an independent copy of your system with its own data and configurations. Users with the correct permissions are able to switch between Instances in Texada Web.
Instancing is an extremely useful feature with a number of applications. One of its most basic uses is in maintaining separate Live and Play environments: by having two copies of your system, you can reserve one environment for regular use (the “live” Instance), and a backup environment for training, testing, and experimenting with different features (the “play” Instance). Because the two environments use different databases, any changes made in the Play environment will not affect the Live environment and vice-versa.
Depending on the company structure, you may also want to use different Instances for different branches or divisions of your organization. If you would like to learn more about Instancing or how it can be used for your system, please contact Texada support.
How Instances Work
The concept behind Instancing is simple. At the core of every Texada system is the database, which contains all of the information the system needs to run: documents, accounting information, Customer and Asset records, configurations, and more. Texada’s various products - Texada SRM, Web, and Mobile, for example - serve as interfaces with which you can view and modify this information.
From a technical perspective, an “Instance” and a “database” are the same thing: each Instance is a separate copy of your system’s database. When you switch Instances in Texada Web, you are switching which database’s data you are currently working with. Think of it as swapping out your computer’s hard drive: the data available to the system is different, but the system itself remains the same.
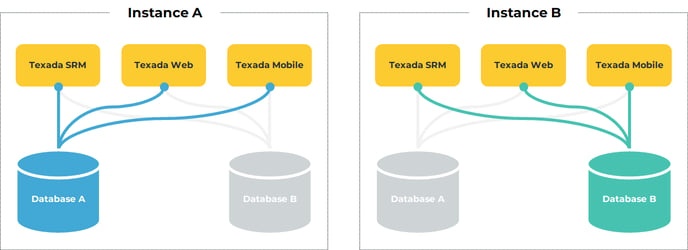
Diagram illustrating the concept of switching Instances. In the scenario on the left, Instance A is the active Instance, and data from Database A is being used to power Texada SRM, Web, and Mobile. In the scenario on the right, Instance B is the active Instance, and Database B’s data is in use. In both scenarios, the functionality of the products remains the same; only the data used is different.
Verifying Your Current Instance
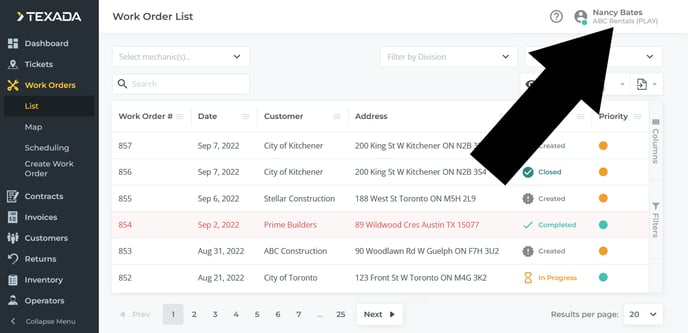
In Texada Web, your current Instance is displayed directly below your name in the top-right corner of the screen. In the image below, Nancy Bates’ current Instance is “ABC Rentals (PLAY)”.
Switching Instances
Texada Web
Switching Instances in Texada Web can be done via the User Menu (click on your name in the top-right corner of any screen).
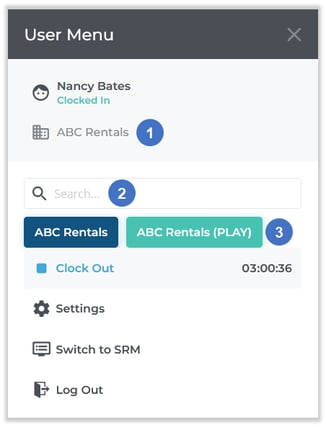
- Current Instance
Your current Instance is displayed here. - Search Bar
Begin typing here to filter the list of available Instances by the text entered. This is useful if you have access to a large number of Instances. - Available Instances
Available Instances are listed here. Click on an Instance to switch to it.
Editing a User’s Instances
Access to your system’s various Instances is controlled at the User level: each User can be given access to a different combination of Instances in accordance with their role within the company. The only requirement is that each User must have access to at least one Instance.
Only Users with Super Admin privileges are able to edit other Users’ Instances. Additionally, Super Admins can only grant access to Instances to which they themselves have access. See “About Super Admins” to learn more.
To edit a User’s Instances, follow the steps below.
- Log in to Texada Web as a Super Admin with access to the necessary Instances.
- Navigate to the User Menu (click on your name in the top-right corner of the screen) → Settings → Company Settings → Users.
- Locate the User you want to edit and click on their name to open the Edit User screen.
- Locate the “Instance” field under the User Info panel. This field will only be visible if you are logged in as a Super Admin; if you do not see this field, verify your permissions or log in as a different User.
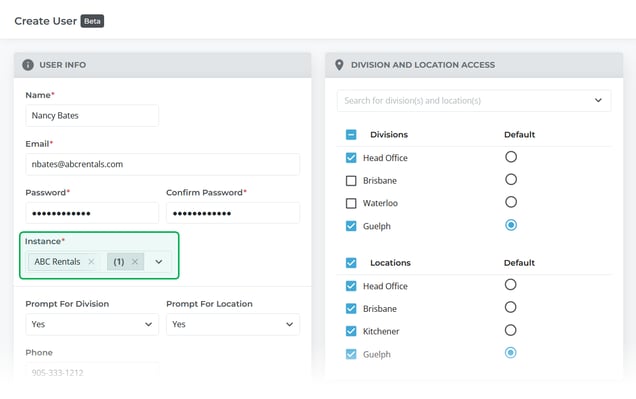
- Click on the Instance field to open a list of available Instances. Check/uncheck each Instance to enable or disable the User’s access to that Instance. Remember that you can only grant Users access to Instances to which you yourself have access.
- Click “Save” to save your changes.