
An overview of the Inventory (My Orders) Process in Texada WorkFlow for iOS and Android.
Quick Reference
- The Inventory (My Orders) Process in the Texada WorkFlow mobile application allows mobile Users to complete inventory orders that have been assigned to them via the Inventory Orders Process in the WorkFlow web application. An inventory order is a prescribed list of assets to be counted.
- To complete an inventory order count in Texada WorkFlow for iOS and Android:
- Log in to the LogiMove app and select a Station. Then, locate and launch the Inventory (My Orders) Process.
- Tap an inventory order to open the Scan Assets screen and begin counting.
- On the Scan Assets screen, you will see a list of all the items included in the inventory order. Point your device’s camera at the barcode of an item in the list to scan it and mark it as counted. Barcodes will be scanned automatically as soon as they are recognized. You can also tap the pencil icon
 to manually enter an item’s barcode, or tap an item in the list to mark it as counted without having to scan it. Once you are finished counting assets, tap the forward arrow
  to advance to the Order Save screen.
 - On the Order Save screen, tap the X button
 next to ‘Close batch’ to save the order without closing it, or tap the check mark button
 to save and close the order. Tap the forward arrow to save your progress and return to the order list.
Introduction
The Inventory (My Orders) Process in the Texada WorkFlow mobile application allows mobile Users to complete inventory orders that have been assigned to them via the Inventory Orders Process in the WorkFlow web application. In contrast to the Inventory (Free Scan) Process, inventory orders cannot be initiated by mobile Users directly. Rather, they are created and assigned by dispatchers using the Texada WorkFlow web application, and provide mobile Users with a prescribed list of assets to count.
For more information on inventory counts and the difference between free scans and inventory orders, see “About Inventory Counts”.
Complete an Inventory Order Count
To complete an inventory count using the Inventory (My Orders) Process, follow the steps below.
- Launch the Inventory (My Orders) Process
On your mobile device, log in to the LogiMove app and select a Station. Then, locate and tap the Inventory (My Orders) Process tile to launch it. Note that the name and appearance of this tile may vary depending on your system.
- Select an Order
The Inventory (My Orders) Process will open to a list of inventory orders that have been assigned to you. The information available for each order includes the batch number, the batch name, the number of items included in the order and any comments left by the dispatcher. The color of each order indicates its priority - Low (green), Standard (blue), or High (red).
Tap an order to select it and start scanning equipment. If you don’t see the order you’re looking for, contact your dispatcher to ensure they have assigned it to you, then tap the refresh button to reload the list.
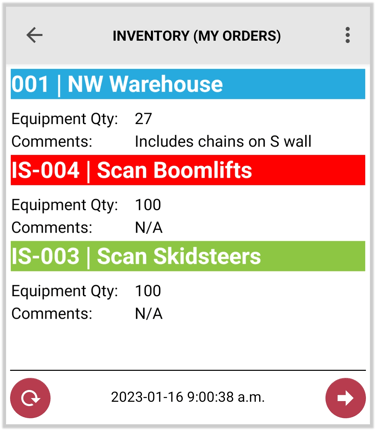
- Scan Assets
Once you have selected an order, you will be brought to the Scan Assets screen. This screen allows you to scan asset barcodes using your device’s camera. You can now begin moving through your inventory, scanning each item to add it to the count. Once you have finished scanning assets, tap the forward arrow to advance to the next screen.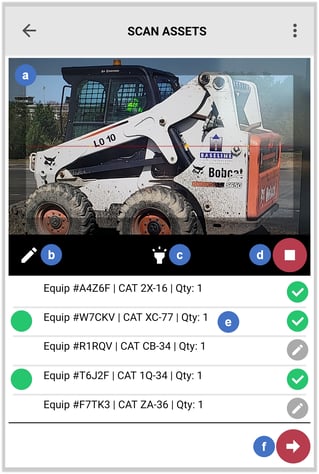
- Viewfinder
While on the Scan Assets screen, your device’s camera will automatically begin scanning for barcodes. The viewfinder at the top of the screen shows your camera’s current view. To scan a barcode, center it in the viewfinder such that the thin red line is perpendicular to the barcode’s vertical lines. Barcodes will be scanned automatically as soon as they are recognized.
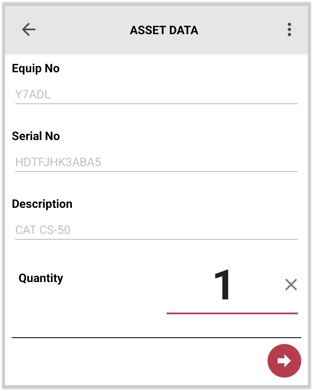
When you scan the barcode of an item included in the inventory order, the Asset Data screen (right) will open, prompting you to review the item’s details and submit a quantity scanned. If you scan the barcode of an item that is not included in the inventory order, you will receive a message that reads “Barcode not found”. Since inventory orders are intended as prescribed lists of items to count, you will not have the option of adding this item to the count.
If the viewfinder does not appear, you will likely need to enable barcode scanning via the Settings Menu. Tap the three vertical dots in the top-right corner of the screen, then tap Settings → Barcode Scanning → Camera.
 - Enter Barcode
If you know the barcode number of the item you want to add, tap the pencil icon to enter it manually. If the barcode is recognized, the Asset Data screen (right) will open, prompting you to review the item’s details and submit a quantity. If the barcode is not recognized, you will receive a message that reads “Barcode not found”. - Flashlight
Tap the flashlight icon to activate or deactivate your device’s flashlight. This may make some barcodes easier to scan.
 - Pause / Resume Scanning
Tap the stop button to temporarily disable your device’s camera. While disabled, you will see a message that reads “SCANNER STOPPED!” near the bottom of the viewfinder. Use this feature to prevent your camera from accidentally scanning items while you are moving through your inventory. While disabled, tap the play button
  to resume scanning.
 - Item
Items included in the inventory count are listed below the viewfinder. Tap an item to open the Asset Data screen (right), then enter a quantity and tap the forward arrow to mark the item as counted.
Items marked with a green check mark have been counted. Items marked with a gray pencil icon
  have not yet been counted. Items marked with a green circle
  on the left side of their row have been counted during this session specifically.
 - Next Button
Once you have finished scanning assets, tap the forward arrow to advance to the next screen.
- Viewfinder
- Save and Close Order
Tap the forward arrow on the Scan Assets screen to advance to the Order Save screen. This screen allows you to save your progress and optionally close the inventory order.
You do not need to complete inventory counts in a single session. If you are finished scanning items for now but would like to return to the order later, tap the X button next to ‘Close batch’ to save the order without closing it. The order will remain visible from the order list and you can return to it in the future to scan additional assets. If instead you are finished counting and would like to close the order, tap the check mark button next to ‘Close batch’ to save and close the order. Note that orders cannot be edited once they are closed.
Once you have decided to either close the order or leave it open, tap the forward arrow to save your progress and return to the order list. Your progress can now be reviewed via the Inventory Orders Process in the Texada WorkFlow web application.