
An overview of the Inventory Orders Process in the Texada WorkFlow web application.
Quick Reference
- The Inventory Orders Process is designed to be used alongside the Inventory (My Orders) Process in Texada WorkFlow for iOS and Android. It allows you to create batches of inventory items and assign them to other WorkFlow Users as inventory counts. To reach the Inventory Orders Process, log in to the Texada WorkFlow web application and select a Station, then select “Inventory Orders” from the Process list.
- Tips for navigating the Inventory Orders Process:
- Click on an existing inventory batch to view the items included in that batch. The “Qty Scanned” column indicates whether each item has been scanned by the mobile User responsible for completing the count.
- To create a new inventory batch, click the New Batch button
 .
. - To edit an existing batch, click the blue pencil icon
 next to that batch under the “Edit” column.
 - To add items to an existing batch, click the blue plus icon
 next to that batch under the “Add Equipment” column.
Introduction
The following article will provide an overview of the Inventory Orders Process in the Texada WorkFlow web application. This Process is designed to be used alongside the Inventory (My Orders) Process in Texada WorkFlow for iOS and Android.
The Inventory Orders Process allows you to create batches of inventory items and assign them to other WorkFlow Users as inventory counts. The assignee can then use the Inventory (My Orders) Process to complete the count. By using these two processes together, you can create curated inventory lists and verify whether the information in your system matches your physical inventory.
For more information on inventory counts, see “About Inventory Counts”.
To reach the Inventory Orders Process, log in to the Texada WorkFlow web application and select a Station from the navigation menu. Then, select “Inventory Orders” from the Process list.
The Inventory Orders Process
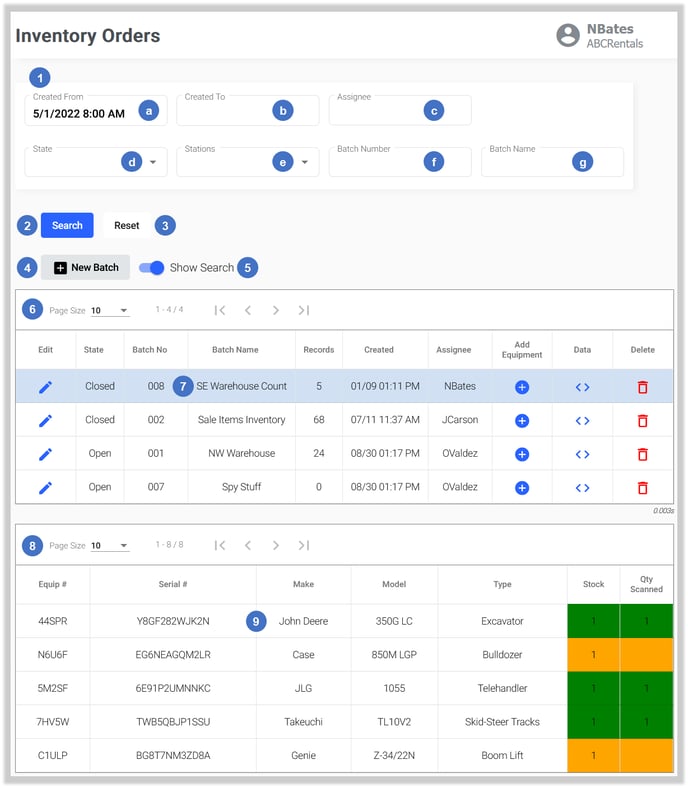
- Search Terms
Enter search terms into one or more of these fields to filter inventory batches by the criteria entered. You can enter multiple search criteria at once, in which case the system will only display batches that match all of the selected criteria. The available search criteria are:- Created From: Display batches created after the selected date.
- Created To: Display batches created before the selected date.
- Assignee: Enter a username to display batches assigned to that User.
- State: Display batches with the selected status.
- Stations: Select one or more Stations to display batches for those Stations.
- Batch Number: Filter batches by batch number.
- Batch Name: Filter batches by batch name.
- Search Button
Click to apply the current search terms and refresh the Batches table. - Reset Button
Click to clear all of the currently-entered search terms. After clicking this button, click the Search button to refresh the Batches table and display all batches. - New Batch Button
Click to create a new inventory batch. See “Create or Edit an Inventory Batch” for more information. - Show Search Toggle
Click to show or hide the search feature. - Batches Table
Contains all of the inventory batches that match the current search criteria. For information on how to navigate and use this table, see “Working with Tables in Texada WorkFlow”. - Batch
Each inventory batch that matches the current search criteria will appear as a row in the Batches table. Click on a batch to display its contents in the Items table. - Items Table
Contains all of the items included in the currently-selected inventory batch. For information on how to navigate and use this table, see “Working with Tables in Texada WorkFlow”. - Item
Each item in the currently-selected inventory batch appears as a row in the Items table.
The Batches Table - Columns
The Batches table comprises the following columns:
- Edit: Click the pencil icon next to an inventory batch to edit it. See “Create or Edit an Inventory Batch” for more information.
- State: The batch’s current status - Open, Scheduled, Closed, or Turnaround. The list of possible states may vary based on your system’s configuration.
- Batch No: The batch’s number. This is the unique identifier for the batch.
- Batch Name: The batch’s name. This is a descriptive name given to the batch at the time it was created.
- Records: The number of inventory items included in the batch.
- Created: The date and time at which the batch was created.
- Assignee: The username of the User who has been assigned to complete the inventory count.
- Add Equipment: Click the blue plus icon next to an inventory batch to add items to it. See “Add Equipment” for more information.
- Data: Click the angle brackets icon
 next to a batch to view all of the information in that batch as raw data. This can be useful for troubleshooting purposes.
 - Delete: Click the red bin icon
 next to a batch to delete it.
The Items Table - Columns
The Items table comprises the following columns:
- Equip #: The item’s equipment number.
- Serial #: The item’s serial number.
- Make: The item’s make.
- Model: The item’s model number.
- Type: The item’s type.
- Stock: The quantity of this item included in the inventory count. This will always be 1 for non-bulk items. The color of this cell and that of the “Quantity Scanned” cell indicates the status of the item as it pertains to the count:
- Green: The quantity of the item in stock matches the quantity of the item scanned.
- Orange: The quantity of the item in stock does not match the quantity of the item scanned.
- Gray: The mobile User assigned to the count has not updated the count since this item was added. In other words, the mobile User has not had the opportunity to count this item yet.
- Qty Scanned: The number of the item that has been counted by the mobile User assigned to the count.
Create or Edit an Inventory Batch
To create a new inventory batch, click the New Batch button ![]() above the Batches table. To edit an existing inventory batch, click the blue pencil icon
above the Batches table. To edit an existing inventory batch, click the blue pencil icon ![]() next to that batch in the Batches table. Both of these actions will open the Create / Edit Batch window, pictured below.
next to that batch in the Batches table. Both of these actions will open the Create / Edit Batch window, pictured below.
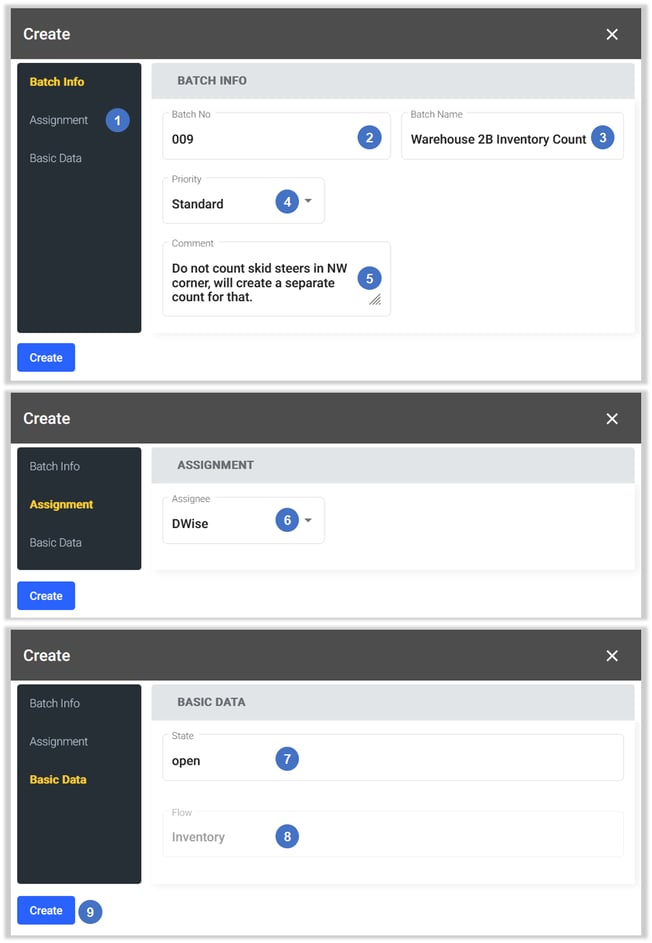
- Batch Info / Assignment / Basic Data Tabs
Click on a tab in the left navigation menu to switch to that tab. - Batch No
The batch’s number. - Batch Name
The batch’s name. - Priority
The batch’s priority - Low (green), Standard (blue), or High (red). Batches in the Inventory (My Orders) Process in the Texada WorkFlow mobile app are color-coded by priority, giving mobile Users a quick visual indication of which inventory counts should be prioritized. - Comment
Leave a comment on the batch. This will be visible to the assignee when viewing the Inventory (My Orders) Process. - Assignee
Select a User from the drop-down to assign them to the batch. The selected User will now be able to complete an inventory count for this batch using the Inventory (My Orders) Process in the Texada WorkFlow mobile application. - State
The batch’s current status. This can be manually overwritten if desired. - Flow
The batch’s flow. This option is currently disabled for most systems. - Create / Save Button
Click to save your changes and close the window. If creating a new batch, the batch will be created at this time.
Add Equipment
To add items to an inventory batch, click the blue plus icon ![]() next to its row in the Batches table. This will open the Add Equipment window.
next to its row in the Batches table. This will open the Add Equipment window.
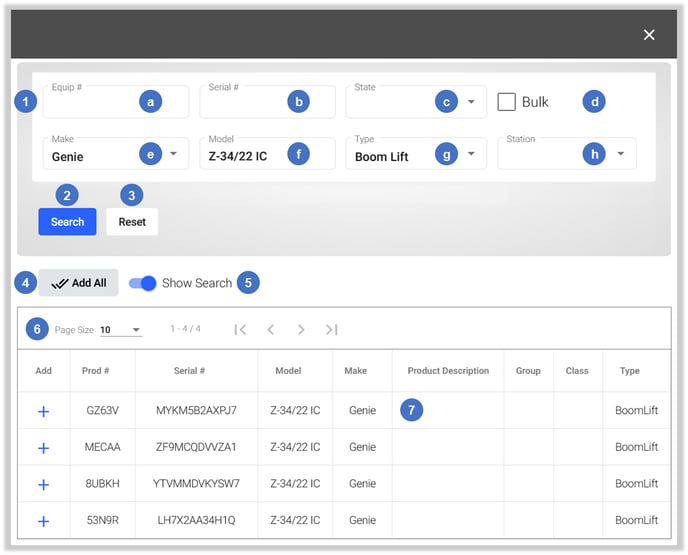
- Search Terms
Enter search terms into one or more of these fields to filter items by the criteria entered. You can enter multiple search criteria at once, in which case the system will only display items that match all of the selected criteria. The available search criteria are:- Equip #: Filter items by Equip #.
- Serial #: Filter items by Serial #.
- State: Select a state to only show items with that state.
- Bulk: Check to show bulk items, uncheck to show non-bulk items.
- Make: Select a make to only show items of that make.
- Model: Filter items by model.
- Type: Select a type to only show items of that type.
- Station: Select a Station to only show items from that Station.
- Search Button
Click to apply the current search terms. - Reset Button
Click to clear all of the currently-entered search terms. After clicking this button, click the Search button to display all items. - Add All Button
Click to add all items that match the current search terms to the batch. - Show Search Toggle
Click to show or hide the search feature. - Items table
Items matching the current search terms are displayed in this table. - Item
Click the blue plus icon next to an item in the Items table to add it to the batch.