
Everything you need to know about Inspections in Texada Web, SRM, and Mobile.
Quick Reference
- Inspections are a key component of Texada’s functionality, allowing Drivers and Mechanics to report on the condition of the Assets with which they work.
- An Inspection form is a series of questions designed to guide the User through the process of inspecting an Asset. Inspection forms should be customized to the needs of each Asset type, ensuring that the information gathered is relevant and comprehensive.
- Inspections are created and managed in Texada SRM, completed in Texada Mobile, and can be reviewed in Texada Web or SRM.
- There are three types of Inspections:
- Work Order Inspections are completed as part of an associated Work Order. In SRM, Inspections can be added to a Work Order when it is first created. Mechanics using Texada Mobile can also add Inspection forms to their assigned Work Orders.
- Ticket Inspections are completed for each Asset on a Pickup or Delivery Ticket. They are filled out by the Ticket’s Driver when loading Assets onto their truck, and can also be updated at the time those Assets are unloaded.
- Standalone Inspections are completed as-needed for a particular Asset.
- In Texada SRM, Inspection forms can be associated with specific Models and Product Groups. This allows the relevant Inspection forms to be automatically included when an Asset is added to a Work Order or Ticket.
Introduction
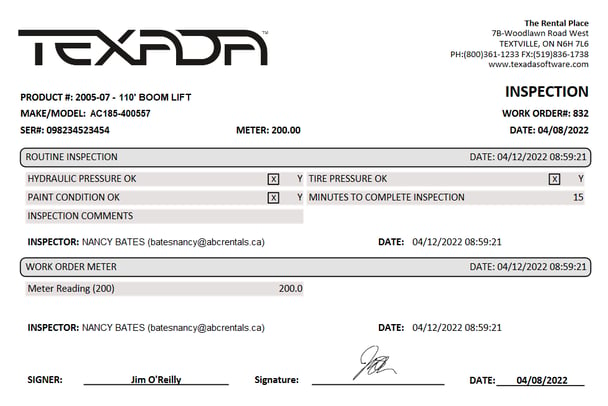 A completed Inspection.
Inspections are a key component of Texada’s functionality, giving Drivers and Mechanics a fast and convenient way to report on the condition of the Assets with which they work.
Inspections created in Texada SRM can later be completed in Texada Mobile. Once an Inspection is complete, it is added to the Inspection history of the Work Order, Ticket, or Asset in question, and can be reviewed in Web and SRM. This system promotes transparency between Users of Texada Mobile and Texada Web / SRM, and provides valuable insights into the state of the Assets in your system.
By phasing out paper inspection forms in favor of digital inspections powered by Texada, you can reduce error frequency, eliminate the need to transcribe inspection forms, and take advantage of the instantaneous communication between Texada Mobile and Web / SRM.
Inspection Forms
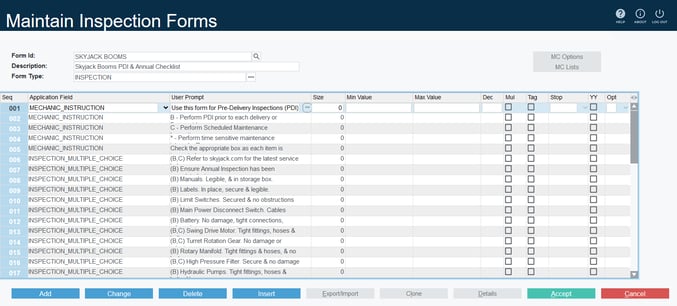 An Inspection form being edited in SRM.
An Inspection form is a series of questions designed to guide the User through the process of inspecting an Asset. Inspection forms are created in Texada SRM, and can either be completed independently or associated with a Work Order, Pickup Ticket, or Delivery Ticket (see “Types of Inspections”). Multiple Inspection forms can be associated with a single document, allowing for a high degree of flexibility. For example, a Mechanic completing a Work Order on an articulated boom lift might be prompted to complete two Inspection forms: a generic form common to all Work Orders, and a specialized form specifically for boom lifts.
For this reason, it is highly recommended to consider the specific needs of each Asset when creating Inspection forms in SRM. This ensures that the inspections carried out by your Drivers and Mechanics will cover all the necessary components, while not containing questions irrelevant to the type of Asset being inspected. For example, it would not be useful to have a Mechanic check the tread condition on a pressure washer.
At the time of creation, the SRM Operator determines which questions are included on the form, and whether each question is mandatory or optional. The Operator can also cause certain behaviors to be automatically triggered when specific responses are given. For example, if a Mechanic indicates that an Asset’s engine is not functional, that Asset can be automatically flagged for maintenance and removed from the available rental inventory.
Once an Inspection form has been created in SRM, it can be reused indefinitely.
For more information on creating Inspection forms in SRM, see “Maintain Inspection Forms” (SRM help file).
Types of Inspections
There are three types of Inspections in Texada software:
- Work Order Inspections
- Ticket Inspections (including Pickup Inspections and Delivery Inspections)
- Standalone Inspections
When managing Inspection forms in Texada SRM, you can select which types of Inspection each form can be used for. The same Inspection form can be used for multiple Inspection types.
To view and modify the types of Inspection for which an Inspection form can be used:
- Log in to SRM and navigate to System Maintenance → Configure System Settings → Operations → Inspection Forms.
- Enter the Form ID of the form you want to edit and press Enter, or click the search icon
 to search and select the form from a list.
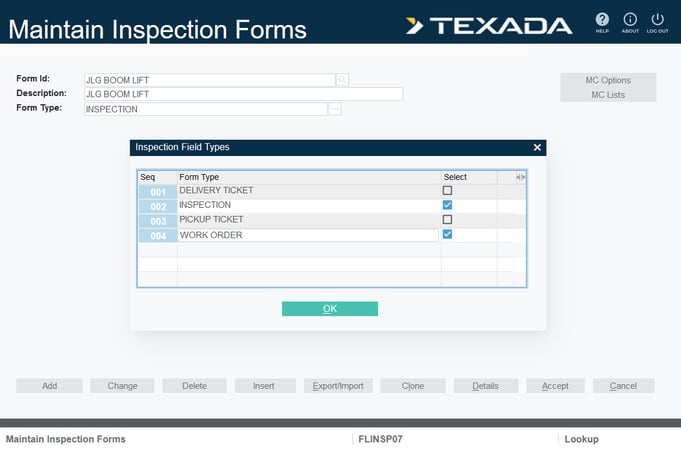
 - Click the three dots
 next to the Form Type field to open the Inspection Field Types window.
 - Check and uncheck the boxes next to each Inspection type to allow or disallow the form to be used for that Inspection type. There are four options available:
- DELIVERY TICKET: The form can be used for Delivery Ticket Inspections.
- INSPECTION: The form can be used for standalone Inspections.
- PICKUP TICKET: The form can be used for Pickup Ticket Inspections.
- WORK ORDER: The form can be used for Work Order Inspections.
More detailed information on the different types of Inspection can be found below.
Work Order Inspections
Work Order Inspections are components of a Work Order, and are inherently associated with the Work Order to which they have been added. A single Work Order can have zero, one, or several associated Inspection forms.
Inspection forms can be added to Work Orders in a number of ways, both automatically and manually, by dispatchers using Texada SRM / Web and by Mechanics using Texada Mobile:
- If an Asset’s Model has any Inspection forms assigned to it in SRM, those forms will be automatically added to any Work Order to which the Asset is added.*
- If an Asset does not have a Model, or if the Asset’s Model does not have any assigned Inspection forms, then any Inspection forms assigned to that Asset’s Product Group will be added instead.*
- When a Work Order is first created in SRM, the Operator can manually add an Inspection form to the Work Order by using the “Inspections” button at the bottom of the Work Orders screen.
- Mechanics using Texada Mobile also have the option of adding Inspections to Work Orders to which they are assigned. See “Add an Inspection Form to a Work Order in Texada Mobile” for more information.
*This behavior can be enabled or disabled on a per-Model / per-Group basis in SRM. See “Maintain Inspection Forms” and “Equipment Groups” (SRM help files) for more information.
Work Order Inspections are completed by the Mechanic fulfilling the Work Order. The Inspection forms for a Work Order can be viewed and completed from the Inspection tab in Texada Mobile. Any fields marked as mandatory must be filled out before the associated Work Order can be submitted. See “Complete an Inspection Form in Texada Mobile” for more information.
Work Order Inspections - Workflow
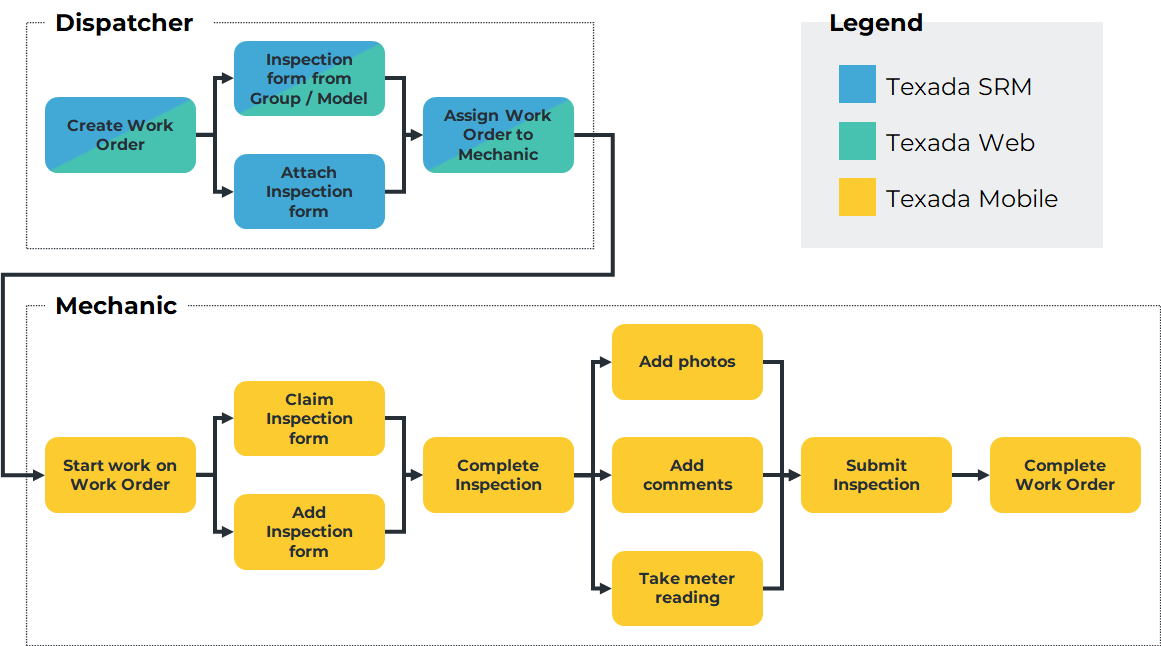
The workflow for a Work Order Inspection begins in Texada Web / SRM, when a dispatcher creates a Work Order. If the Asset associated with the Work Order has Inspection forms specified for its Model or Group, those Inspection forms will automatically be added. If the dispatcher is working in SRM, they will also have the option of manually adding Inspection forms to the Work Order. Mechanics are also able to attach additional forms to a Work Order in Texada Mobile.
If multiple Mechanics are assigned to the same Work Order, each Inspection form will need to be claimed before it can be completed. Mechanics will automatically be prompted to claim a form when they first attempt to fill it out.
Once all the required fields on the Inspection form(s) have been filled out, the Mechanic can complete and submit the associated Work Order. Completed Inspections will be added to the Inspection history for that Work Order, which can then be viewed in Texada Web / SRM.
Ticket Inspections
Ticket Inspections are designed to be completed when a Driver on a Pickup or Delivery Ticket loads Assets onto, or unloads Assets from, their delivery truck. Each Asset has its own associated Pickup and Delivery Inspection forms, determined by its Model and Product Group. These forms are automatically included on any Ticket to which the Asset is added. As such, a Ticket’s Driver may be required to fill out zero, one, or several Inspection forms for each of the Assets on the Ticket.
Ticket Inspections - Workflow
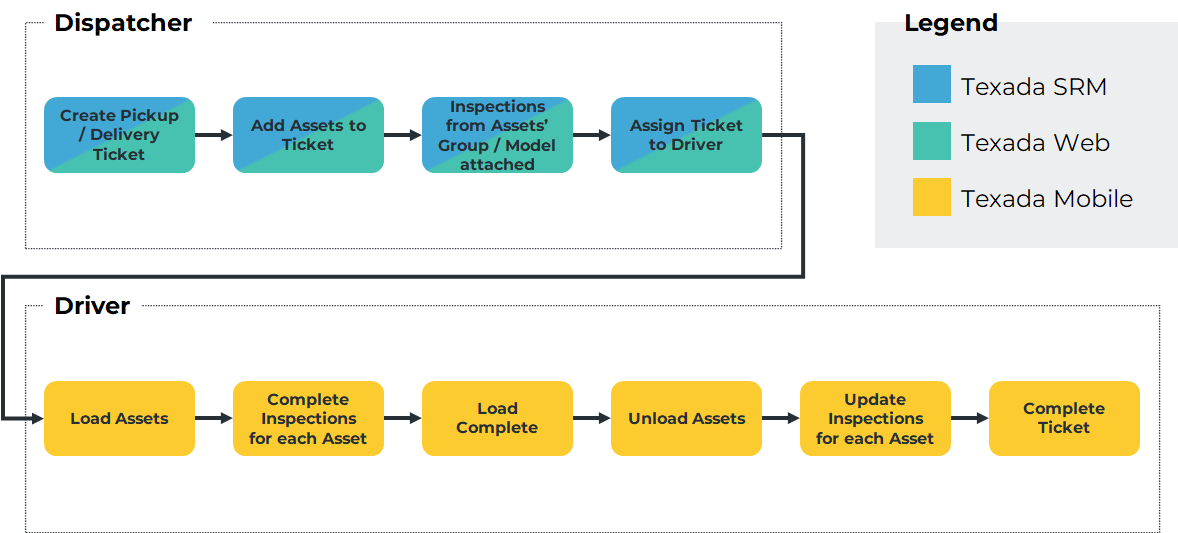
The workflow for a Ticket Inspection begins in Texada Web / SRM, when a dispatcher creates a Pickup or Delivery Ticket. At the time each Asset is added to the Ticket, any Inspection forms of the appropriate type that are associated with that Asset’s Model or Product Group will automatically be attached. The dispatcher then assigns the Ticket to a Driver for completion.
When the assigned Driver opens the Ticket in Texada Mobile and selects “Load Assets”, they can tap on each Asset to view and complete its associated Inspection forms. Assets with incomplete Inspections cannot be bulk loaded via the “Load All” button - attempting to do so will result in an “Incomplete Inspections: Products with incomplete inspections were not loaded” message.
Once the Driver has arrived at the drop-off location and selected “Unload Assets”, they can once again tap each Asset to review its Inspection forms. Any responses that the Driver had already submitted during the loading process will be preserved; the Driver can update their existing responses as well as fill out any missed questions. As when loading, Assets with incomplete Inspections cannot be bulk unloaded via the “Unload All” button.
Once a Ticket has been completed, the Inspection forms for each Asset can be reviewed in Texada Web / SRM.
Standalone Inspections
As the name suggests, standalone Inspections are one-off Inspections completed for a particular Asset. These Inspections are optional by nature and can be completed at any time. There is no limit to the number of standalone Inspections that can be completed for a given Asset; depending on its history, an Asset might have zero, one, or multiple associated standalone Inspections.
Standalone Inspections are completed via the Asset Management screen in Texada Mobile. When a Mobile User indicates that they wish to complete a standalone Inspection, they will have a choice of including any or all of the Inspection forms associated with that Asset’s Model or Product Group. If no Inspection forms have been assigned to the Asset’s Model or Group in SRM, the User can still submit an Inspection consisting of photos taken of the Asset.
Standalone Inspections can be completed on any Asset in the system, by any Texada Mobile User (unlike Work Order and Ticket Inspections, which can only be completed by Mechanics and Drivers, respectively). See “Complete an Inspection Form in Texada Mobile” for more information.
Standalone Inspections - Workflow
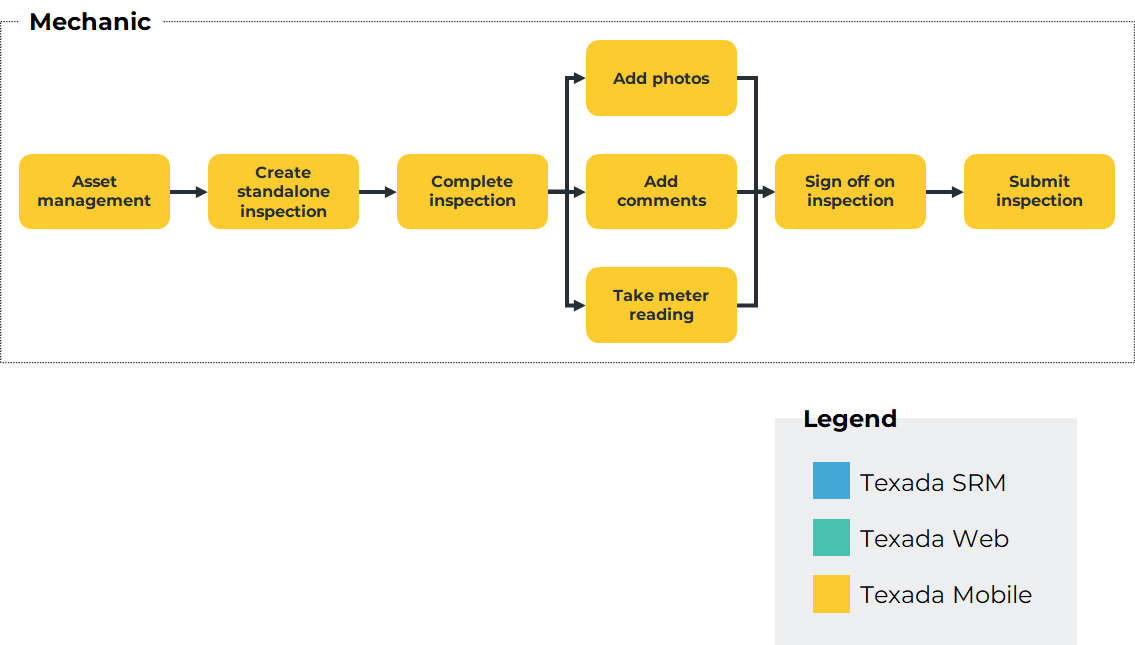
The workflow for standalone Inspections begins in Texada Mobile, when a User initiates a new Inspection via the Asset Management screen.
Standalone Inspections must be filled out immediately after they are created, and must be digitally signed once complete.
Once a standalone Inspection is completed, it is added to the Inspection history of that Asset, which can then be reviewed by a dispatcher using Texada Web / SRM.
Inspection Form Components
Each Inspection form consists of at least one of the following components:
|
Field Type |
Appearance |
Description |
|
Text |
|
A question requiring a text response - for example, “Describe any dings or paint scratches found on the exterior.” The maximum answer length is specified in SRM, and can be anywhere between 1 and 250 characters. |
|
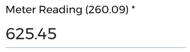
Number |
|
A question requiring a numerical response - for example, “How many minutes were spent on the inspection?” The maximum digit count of the answer is specified in SRM, and can be anywhere between 1 and 9 digits.The SRM administrator can also specify minimum and/or maximum values. |
|
Checkbox |
|
A compound question that combines three elements in one: a checkbox, an “N/A” toggle, and a comment button. Check or uncheck the checkbox to indicate an affirmative or negative response to the question. Tap the “N/A” toggle to disable the checkbox and indicate that this question is not applicable. Tap the comment button to leave a comment and provide the rationale behind your answer. |
|
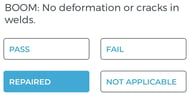
Multiple Choice |
|
A question with multiple predetermined answers, such as Excellent/Fair/Poor or Pass/Fail/Repaired/Not Applicable. Operators are able to create reusable lists of multiple choice answers via the “MC Options” and “MC Lists” buttons on the Maintain Inspection Forms screen in SRM. |
|
Status Code Selector |
|
A question allowing the inspector to select a status code from a drop-down list - for example, “light damage” or “hard down”. The status codes that can be selected for each Asset are defined in SRM. |
|
Photo |
|
A question allowing the inspector to upload a photo of the Asset as a response - for example, to provide photographic evidence of a meter reading. |
|
Instruction |
|
A text field that does not require the Mechanic to submit a response. Use these fields to provide Mechanics with instructions on how to carry out an inspection. |
|
Reference Image |
|
A reference image used to provide visual instructions to the Mechanic completing the Inspection, such as where to locate a serial number, what an ideal equipment setup should look like, or what dashboard lights indicate. |

Working With Inspections
The following section serves as a reference describing the various places where Inspections can be viewed, created, edited, and completed in Texada SRM, Mobile, and Web.
In Texada SRM
- Create, edit, and delete Inspection forms:
- System Maintenance → Configure System Settings → Operations → Inspection Forms
- Add an Inspection form to a Work Order:
- Work Orders → Work Orders → Add or Change → Inspections
- View completed Work Order Inspections:
- Work Orders → Work Orders → Change → [enter Work Order ID] → Header → Inspections → View Results
- Modify the Inspection forms associated with a Product Group:
- System Maintenance → Configure System Settings → Operations → Groups → Add or Change → Inspection Forms
- Modify the Inspection forms associated with a Product Model:
- System Maintenance → Configure System Settings → Operations → Product Makes & Models
In Texada Mobile
- View or complete a Work Order Inspection:
- Work Orders → [select Work Order] → Inspection
- Note that Work Order Inspections can only be completed when the associated Work Order is In Progress.
- Work Orders → [select Work Order] → Inspection
- View or complete a Ticket Inspection:
- Tickets → [select Ticket] → Load / Unload Assets → [select an Asset]
- Scroll down past the Quantity and Photos sections to view Inspection forms associated with the Asset.
- Tickets → [select Ticket] → Load / Unload Assets → [select an Asset]
- View or complete a standalone Inspection:
-
- User Menu (
 ) → Asset Management → [search for an Asset] → Inspections
- User Menu (
In Texada Web
- View a completed Work Order Inspection:
- Work Orders → List or Map → [select Work Order] → Inspections
- Click the eye symbol
 to view a single Inspection.
 - Click “View Inspections PDF” to view all Inspections on the Work Order as a printable PDF.
- Click the eye symbol
- Work Orders → List or Map → [select Work Order] → Inspections
- View a completed Ticket Inspection:
- Tickets → Pickup or Delivery → [select Ticket]
- Scroll down to the Products tab and click the eye symbol under the “Inspections” column for the Asset whose Inspections you want to view.
- Scroll down to the Products tab and click the eye symbol
- Tickets → Pickup or Delivery → [select Ticket]
- View a completed standalone Inspection:
- Inventory → Assets → [select Asset] → Inspection History
- Click on an Inspection in the list to view its details. While viewing the details of an Inspection, click “View PDF” to view the Inspection as a printable PDF.
- Inventory → Assets → [select Asset] → Inspection History