
How to create a new Part in Texada Web.
Quick Reference
- A Part, also known as a Sale Product, is a small, short-term asset intended for resale or use in repairs. Parts can be created and managed both in Texada SRM and Texada Web.
- To create a new Part in Texada Web:
- Navigate to Inventory → Create Part in the left side menu.
- Enter the information for your new Part.
- Click the “Create Part” button in the bottom-right corner of the screen.
Introduction
A Part, also known as a Sale Product, is a small, short-term asset intended for resale or use in repairs. Parts are one of the two main categories of Product in the Texada system, the other being Assets (also known as Rental Products). For more information, see “Rental Products and Sale Products”.
Parts can be created and managed both in Texada SRM and Texada Web. The following article will detail the process of creating a new Part in Texada Web.
Texada Web’s Part creation functionality is currently under development and does not yet offer the ability to receive new Parts via a Purchase Order. To do this, use the Warehouse Receiving utility in Texada SRM.
Create a Part
To access the Create Part screen in Texada Web, navigate to Inventory → Create Part in the left side menu.
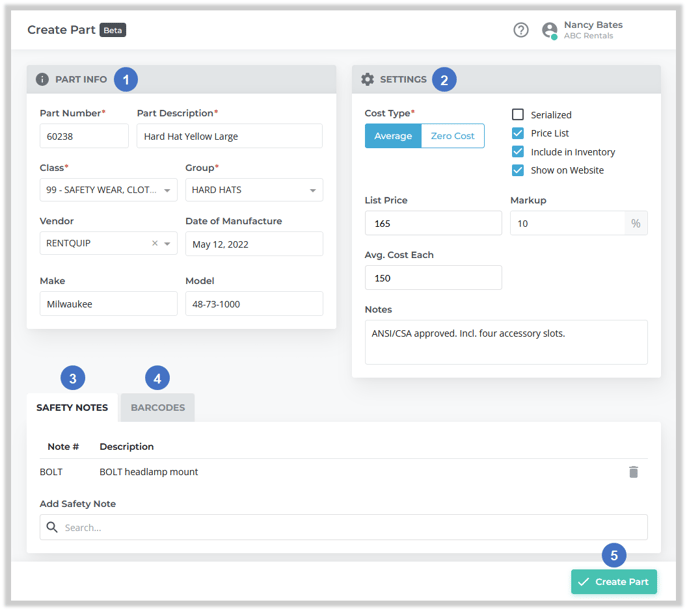
- Part Info Panel
Contains basic information about the Part. - Settings Panel
Contains settings that affect the way the Part behaves in the system, such as whether it should be included in inventory or published on your Texada GateWay eCommerce website. - Safety Notes Tab
Allows you to attach Safety Notes to the Part. - Barcodes Tab
Allows you to specify barcodes for the Part. - Create Part Button
Click to create the new Part.
Fill out the information for your new Part, then click the “Create Part” button to create it. Required fields are marked with a red asterisk ![]() . At minimum, each Part needs a Part Number, Description, Class, Group, and Cost Type.
. At minimum, each Part needs a Part Number, Description, Class, Group, and Cost Type.
See the sections below for more information on the individual fields in the Create Part screen.
Part Info Panel
This panel contains basic information about the Part.

- Part Number
The Part’s unique identifier in the system. Part numbers are alphanumeric and can be up to 12 characters in length. - Part Description
The Part’s description. - Class
The Sales Class to which the Part belongs. Click on the drop-down to view the list of available Classes, and begin typing to filter it. Sales Classes are managed in Texada SRM, at System Maintenance → Configure System Settings → Accounting → Sales Classes. - Group
The Group to which the Part belongs. Groups are managed in Texada SRM, at System Maintenance → Configure System Settings → Operations → Groups. - Vendor
The equipment supplier from which the Part was purchased. Vendors are managed in Texada SRM, at Accounts Payable → Vendor Information. - Date of Manufacture
The date on which the Part was manufactured. - Make
The Part’s make. - Model
The Part’s model number.
Settings Panel
This panel contains a number of settings that control the way the Part behaves in the system.
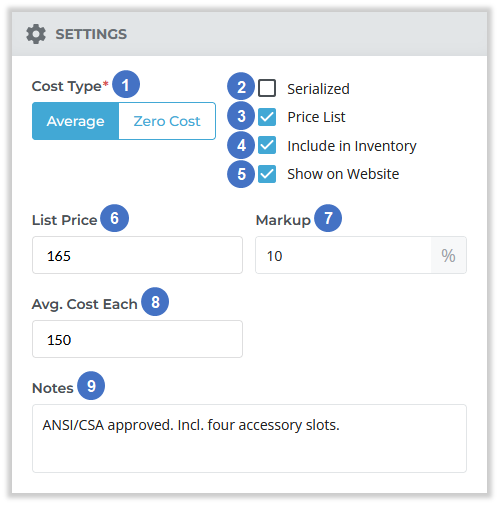
- Cost Type
This option determines how the cost of this Part will be calculated when it is posted to the General Ledger. Select one of the following options:- Average: Post the cost of this Part as its Average Cost Each (8) value.
- Zero Cost: Post the cost of this Part as zero. This usually applies when the Part has already been expensed at the time it is entered into the system.
- Serialized
Check if this Part is serialized; uncheck if it is non-serialized. See “Serialized Products and Non-Serialized Products” for more information.
This field is equivalent to the “Serial #” checkbox in the Sales Inventory utility in Texada SRM. - Price List
Check to include this Part in the Price List. Uncheck if this Part should not be included in the Price List. - Include in Inventory
Check to include this Part in your system’s inventory. Uncheck if this Part should not be included in inventory. This is often the case for re-rental items or other generic items.
This field is equivalent to the “Inventory” checkbox in the Sales Inventory utility in Texada SRM. - Show on Website
Check to show this Part on your GateWay eCommerce website, if one exists. Uncheck if this Part should not be displayed on your website.
This field is equivalent to the “Show on Website” field under the Website Options menu in the Sales Inventory utility in Texada SRM. - List Price
The selling price of the Part. This is the standard price that will print on the Price List and will be the default price when invoicing. - Markup %
The Part’s markup percentage, or the amount by which the purchase price is multiplied to arrive at the sale price. For example, a Part with a purchase price of $200 and a markup of 25% would have a default sale price of $250. - Avg. Cost Each
The average purchase cost of the Part. - Notes
Any additional notes about the Part. Notes are internal and are not published on any documents.
Safety Notes Tab
This tab allows you to add Safety Notes to the Part. A Safety Note is a brief message informing potential users of how to safely and correctly use a Product. Multiple Safety Notes can be added to a single Part. A Part’s Safety Notes will be printed beneath it whenever it appears on a document such as a Contract.
Safety Notes are managed in Texada SRM, at System Maintenance → Configure System Settings → Operations → Safety Notes.
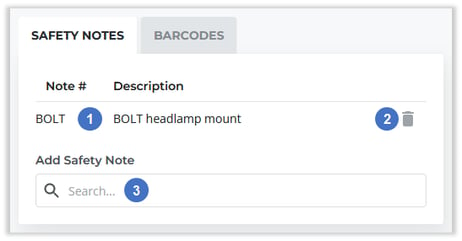
- Safety Note
Safety Notes that have already been added to the Part are listed here. - Delete Safety Note
Click the bin icon next to a Safety Note to remove it from the Part.
 - Add Safety Note
Begin typing into the search bar to search the list of Safety Notes, then click on a Note to add it to the Part.
Barcodes Tab
This tab allows you to specify barcode numbers for your Part. This is useful for tracking the codes used by barcode scanners.
In Texada SRM, you can locate a Product by entering its barcode instead of its Product Number. This works in the Sales Inventory and Rental Inventory utilities as well as all document entry utilities such as Contracts, Invoices, Reservations, etc.
Barcodes can be up to 20 characters in length and must be unique. A Part’s barcode can be the same as its Product Number, but cannot be the same as the Product Number for any other Asset or Part in the system.
For more information, see “Barcodes” (SRM help file).
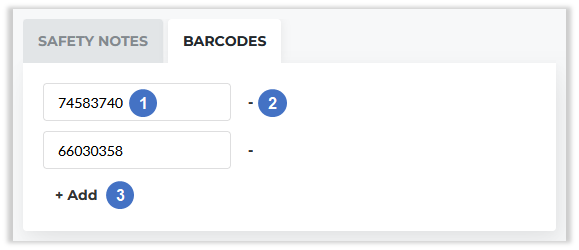
- Barcode
Barcodes associated with your Part are listed here. - Delete Barcode
Click the minus sign next to a barcode to remove it from the Part.
 - Add Barcode
Click to add another barcode to the Part.