
How to create a new Mechanic with access to Texada Mobile in Texada SRM.
Quick Reference
- A Mechanic is a Texada Mobile User who is responsible for completing Work Orders. SRM’s flexible permission management system allows you to designate any SRM Operator as a Mechanic.
- To create a new Mechanic in Texada SRM:
- Create a Mechanic Security Role. This step only needs to be completed once per system.
- Navigate to System Maintenance → Configure System Settings → Security → Security Roles.
- Click “Add”, then enter a name and description for the new Role. Continue to press Enter until you are prompted to assign menu access. Click “Yes” to access the Menu Security utility and select the SRM menus to which Mechanics should have access.
- After closing the Menu Security utility, click the three dots
 next to the “Permissions” column of the Role you just created, then select “Texada Web/Rental Logic”. Locate the “Texada Web Mechanic” permission and enable it.
 - Save all of your changes and exit the Security Roles utility.
- Create a Time Charge Operator.
- Navigate to System Maintenance → Configure System Settings → Operations → Time Charge Operators.
- Click “Add” to switch to Add mode, then enter all of the information for your new Mechanic and click “Accept”.
- Create an Operator account.
- Navigate to System Maintenance → Configure System Settings → Security → Operators.
- Click “New Operator” to open the Add a New Operator utility. Select your Mechanic’s Division and assign them a 3-character Operator code, then click “Accept”.
- In the Operators window, do the following:
- Enter the basic information for your Mechanic, including their Name, E-Mail Address, and Password.
- Enter the employee number of the Time Charge Operator you created in the previous step into the “Employee Number” field.
- Click the three dots
 next to the “Security Roles” field, then enable the Mechanic Security Role you created in the first step and click “Accept”.
 - Ensure the “Texada Web Access” checkbox is checked.
- Save all of your changes and close the Operators utility.
- Create a Mechanic Security Role. This step only needs to be completed once per system.
Introduction
A Mechanic is a Texada Mobile User who is responsible for completing Work Orders. In Texada SRM, Mechanics are designated using Security Roles as well as a special Operator type called a Time Charge Operator. Depending on the structure of your organization, a Mechanic’s role may or may not overlap with other roles in the system. SRM’s flexible permission management system allows you to associate any SRM Operator with the appropriate Security Role and Time Charge Operator record to designate them as a Mechanic.
The following article will cover everything you need to know to create new Mechanics in Texada SRM.
Adding a Mechanic
There are three steps to adding a new Mechanic User in Texada SRM. Click on each step’s name for more information.
- Create a Mechanic Security Role
This step involves using the Security Roles utility to create a “Mechanic” Security Role that grants the correct permissions to Operators who are given that Role. This step only needs to be completed once, and has likely already been completed if your system is configured to work with Texada Mobile. - Create a Time Charge Operator
This step involves using the Time Charge Operators utility to create a new Time Charge Operator record for your Mechanic. These records are used to track Mechanics and other employees whose time is billable. - Create an Operator account
This step involves using the Operators utility to create an SRM Operator account for the new Mechanic, giving it the Mechanic Security Role created in step 1, and associating it with the Time Charge Operator record created in step 2. If the person you want to appoint as a Mechanic already has an Operator account, you can skip the creation step and simply assign them the Security Role and Time Charge Operator Account.
Create a Mechanic Security Role
This step only needs to be completed once, when your system is first configured to be used with Texada Mobile. If you have existing Mechanic Users, this step has most likely already been completed. If in doubt, verify with your fellow employees or with Texada support before creating an additional Security Role.
In this step, you will create a Mechanic Security Role that gives Operators access to the Mechanic-specific features of Texada Web and Texada Mobile.
- Log in to Texada SRM and navigate to System Maintenance → Configure System Settings → Security → Security Roles.
- Click “Add” to create a new Security Role.
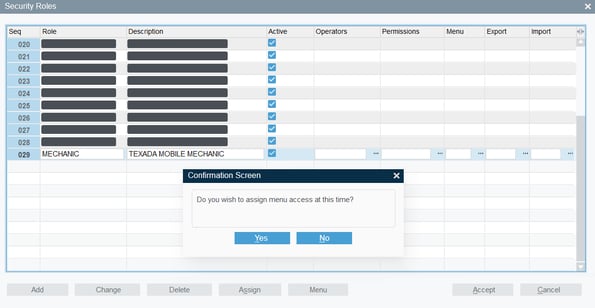
- Enter a Role name (e.g. “MECHANIC”) and press Enter.
- Enter a Description (e.g. “TEXADA MOBILE MECHANIC”) and press Enter.
- Ensure the “Active” checkbox is checked, then continue to press Enter until a prompt appears that reads “Do you wish to assign menu access at this time?”
- Click “Yes” to open the Menu Security utility. If you clicked “No” by accident, you can also open this utility by clicking the three dots next to the “Menu” column of the Role you just created.
- In the Menu Security utility, select the SRM menus to which Mechanics should have access by clicking on them in the leftmost panel then clicking “Add”. You can add multiple menus at once by holding Ctrl and selecting multiple menus, then clicking “Add”. At minimum, Texada recommends giving Mechanics access to the Counter, Inventory Control, Purchase Orders, and Work Orders menus.
Once you are finished making your selections, click “Apply” to grant menu access to Mechanic Users. The utility will refresh and display menus to which Mechanic Users have access in the rightmost panel. Continue to make adjustments if desired, or press “Esc” to return to the Security Roles utility.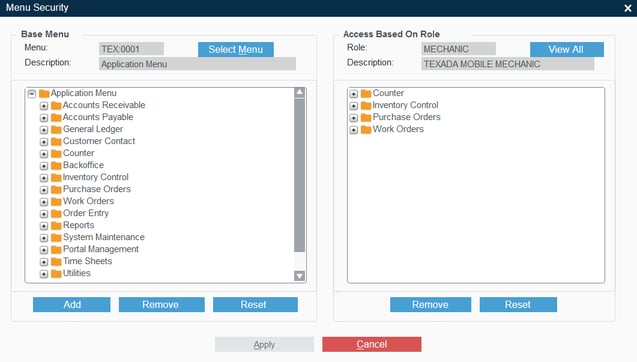
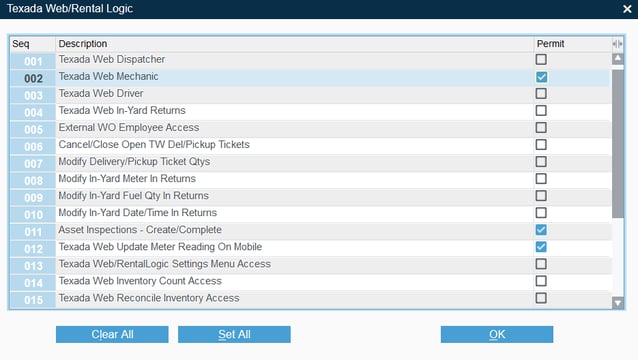
- Click the three dots next to the “Permissions” column of the Role you just created to open the Security Role Permissions utility. Click on the three dots next to “Texada Web/Rental Logic” to open a list of permissions relevant to Texada Web and Mobile. Locate the “Texada Web Mechanic” permission and enable it. You may want to enable other relevant permissions, as well, such as “Asset Inspections - Create/Complete” and “Texada Web Update Meter Reading on Mobile”.
- Once you are finished, click “OK”, then “OK” again, and finally “Accept” to save your changes and close the Security Roles utility. The Mechanic Security Role has now been configured and is ready to be assigned to your new Operator. Record the name of the Security Role for use in later steps.
Create a Time Charge Operator
In this step, you will create a Time Charge Operator record for your Mechanic. In order to function as Mechanics, SRM Operator accounts must be associated with a Time Charge Operator record.
- Navigate to System Maintenance → Configure System Settings → Operations → Time Charge Operators.
- In the Time Charge Operators utility, click the “Add” button to switch to Add mode, then enter the following information for your new Mechanic:
- Employee #: The employee’s unique identifier in the system. Depending on your organization’s conventions, you may choose to use a numeric code such as 47, or a text code such as the employee’s last name in all caps.
- Last Name: The employee’s last name.
- Full Name: The employee’s full name.
- Reg Hrly Rate: The employee’s regular rate of pay. This is not required.
- Over-Time Rate: The employee’s overtime rate of pay. This is not required.
- Division: The employee’s division.
- Employee Type: The employee’s type. This is an aesthetic choice that does not influence the behavior of the Time Charge Operator record. Employee types are managed via the Employee Type Codes utility, at System Maintenance → Configure System Settings → Operations → Employee Type Codes.
- Work Order Labor: Used to establish custom labor charges for the employee. See “Work Order Labor Service Charges” (SRM help file) for more information.
- Time Clock: Used to configure the employee’s time tracker settings. See “Time Charge Operators” (SRM help file) for more information.
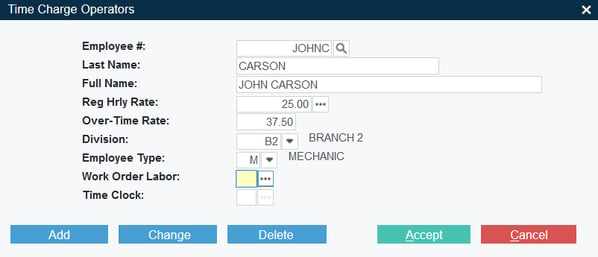
- Click “Accept” to save the new Time Charge Operator record. It is now ready to be assigned to your new Operator. Record the Employee # of the new record for use in the next step.
Create an Operator Account
In this step, you will create a new Operator account for your Mechanic, then grant it the Mechanic Security Role created in step 1 and associate it with the Time Charge Operator record created in step 2. This will allow your new Mechanic to log in to Texada Web and Mobile and access Mechanic-specific features.
- Navigate to System Maintenance → Configure System Settings → Security → Operators.
- Click “New Operator” to open the Add a New Operator utility. Select your Mechanic’s Division and assign them a 3-character Operator code, then click “Accept”.
- In the Operators window, enter the following:
- Name, E-Mail Address, and Password: Fill out the basic information for your Mechanic the same as you would for any new Operator record.
- Employee Number: Enter the employee number of the Time Charge Operator you created in the previous step. If done correctly, the employee’s name will appear to the right of the field.
- Security Roles: Click the three dots next to this field to open the list of Security Roles, then select the Mechanic Security Role you created in the first step and click “Accept”. You can also assign additional Security Roles if desired.
- Texada Web Access: Ensure this box is checked.
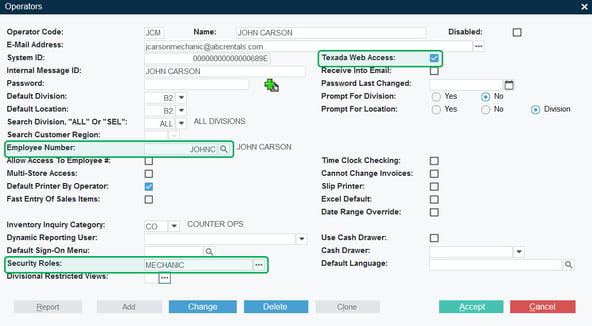
- Once you are finished configuring your Mechanic’s Operator record, click “Accept” to save it.
- Within a few minutes, your new Mechanic should be able to log in to Texada Web and Texada Mobile using the E-mail Address and Password specified in their Operator account. See “Log In and Out of Texada Web” and “Log In and Out of Texada Mobile” for more information.