
How to create a new Asset in Texada Web.
Quick Reference
- An Asset is a piece of heavy equipment, such as a scissor lift or compressor, which can be sold or rented out as part of a Contract.
- To create a new Asset in Texada Web:
- Navigate to Inventory → Create Asset in the left side menu.
- Enter all relevant information for the Asset, including its product number, description, class and group.
- Press “Create Asset” to save the new Asset.
Introduction
An Asset, also known as a Rental Product, is a piece of heavy equipment, such as a scissor lift or compressor, which can be sold or rented out as part of a Contract. Assets can be created and managed in both Texada SRM and Texada Web.
The following article will detail the process of creating a new Asset in Texada Web.
Creating an Asset
To create a new Asset in Texada Web, navigate to Inventory → Create Asset in the left side menu. This will open the Create Asset page.
- Asset Info Panel
Contains basic information about the Asset, such as Product Number and description, Class, Group, and vendor information. - Options Panel
Contains pricing and inventory options, such as list price, markup percentage, and options for including this Asset in Inventory, marking it as a bulk item, or displaying it on your eCommerce website. - Safety Notes Panel
Allows you to attach Safety Notes to the Asset. - Rates Panel
Contains options for the Asset’s rental rates. - Reorder Info Panel
Contains additional manufacturer information on the Asset, such as the make, model, and date of manufacture, along with fuel type information. - Attachments Panel
Any additional files attached to the Asset will be listed here. Note that attachments can only be added once the Asset has already been created. - Barcodes Panel
Allows you to add barcodes to this Asset. - Create Asset Button
Once the Asset details have been entered, use this button to create the Asset.
Required fields are marked with a red asterisk ![]() .
.
Once you have entered all relevant information for the Asset, use the “Create Asset” button to create the new Asset. Once the new Asset has been created, it can be viewed from the Asset List page.
Detailed information on the individual panels within the Create Asset page can be found below.
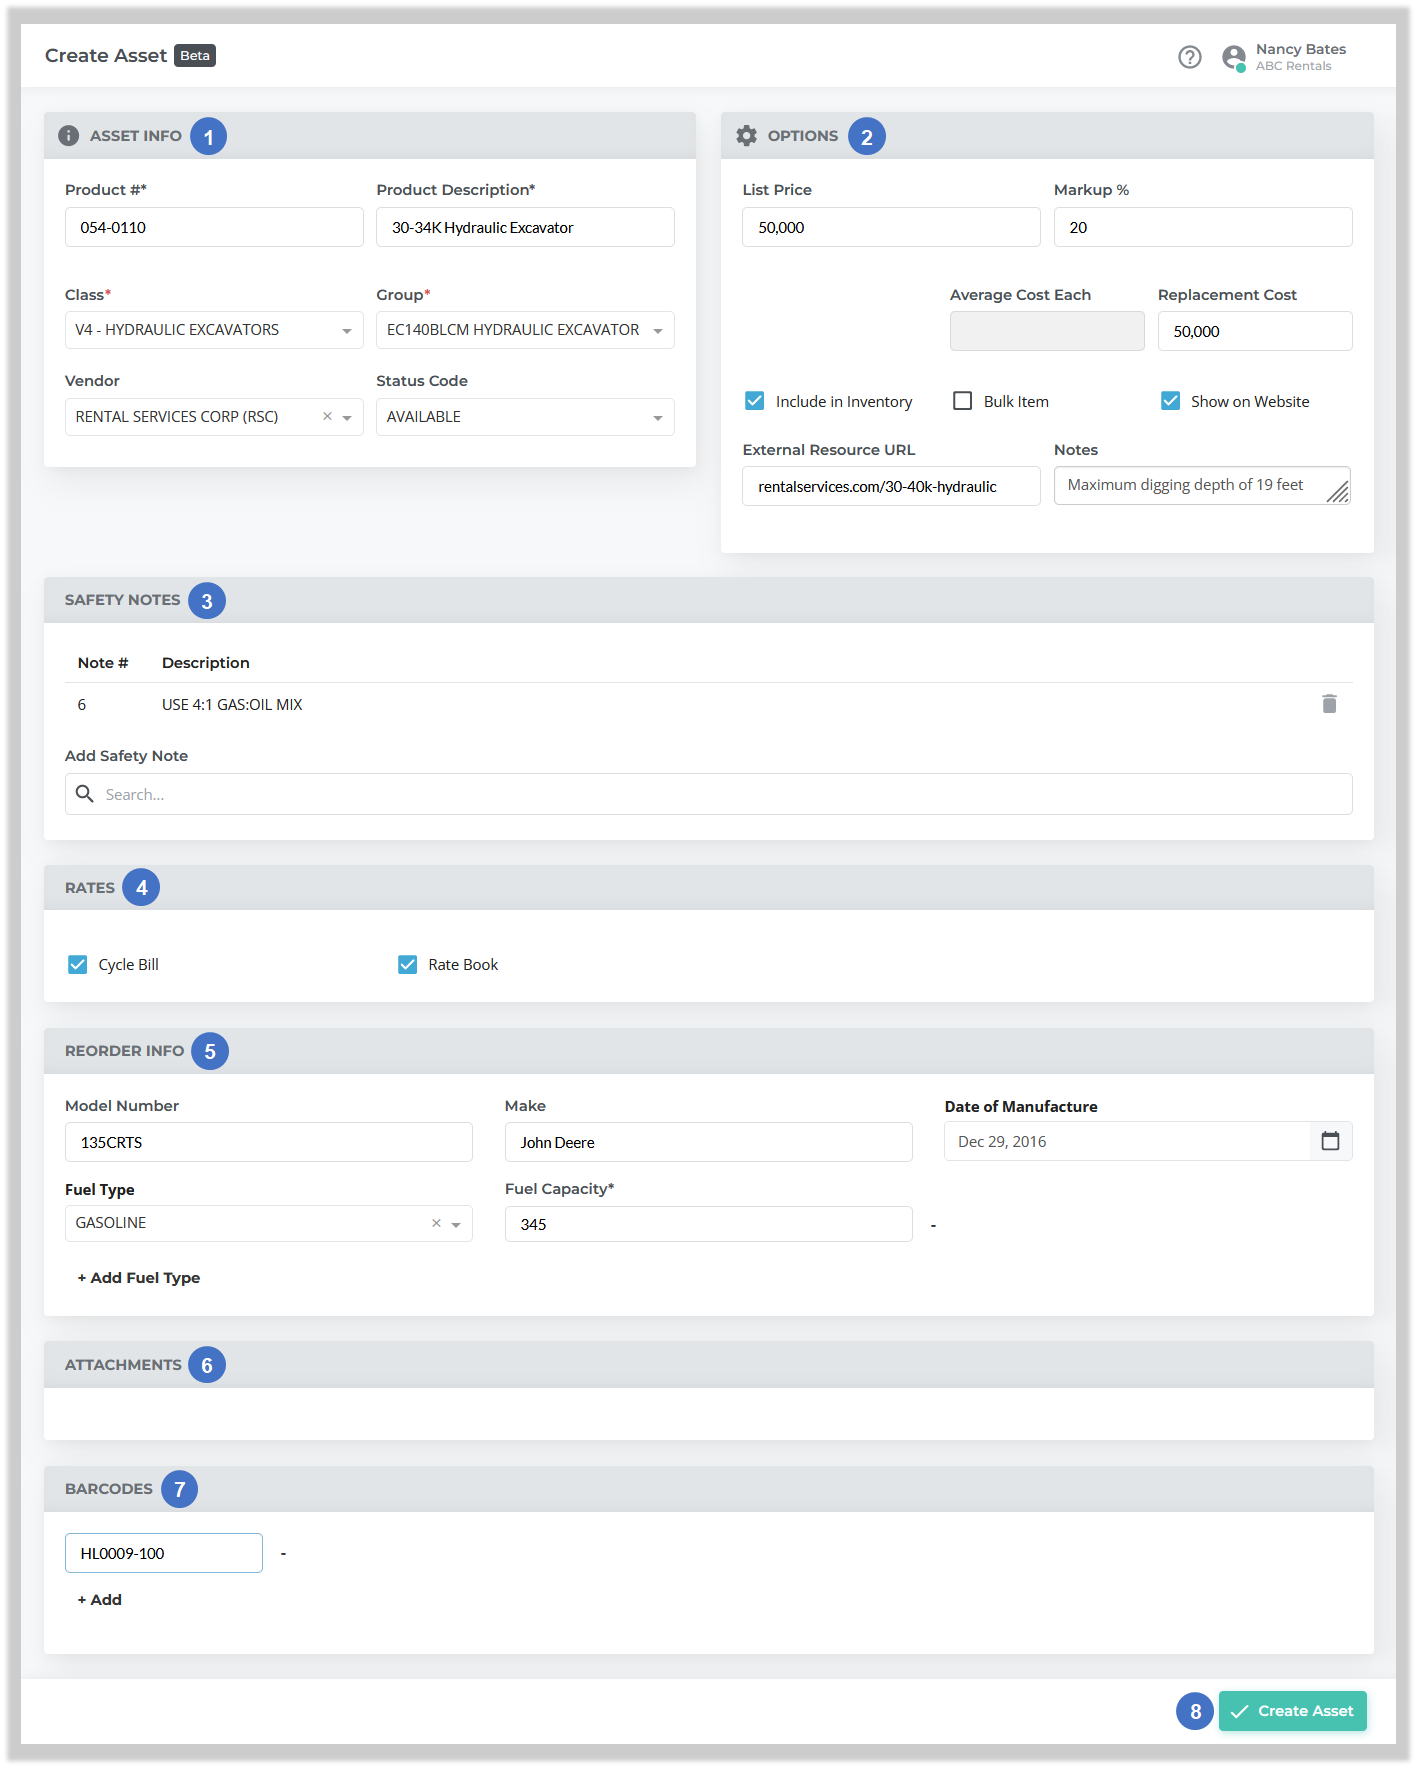
Asset Info Panel
Use this panel to enter basic information about the Asset.
- Product #
The unique identifier for the Asset. Product numbers are alphanumeric and can be up to 12 characters in length. - Product Description
The Asset’s name or description in plain text. - Class Selector
Use to select the Class to which this Asset belongs. A Class is a major category of Products, such as air compressors or plumbing tools. An Asset’s Class determines which General Ledger accounts are posted to when that Asset is rented, sold, or repaired. See “Classes, Groups, and Products” for more information.. - Group Selector
Use to select the Group to which this Asset belongs. A Group represents a group of similar Products, such as 110’ Boom Lifts, 25KW Generators, or 50-Ton Hydraulic Jacks. An Asset’s rental rates are usually established at the Group level. See “Classes, Groups, and Products” for more information. - Vendor Selector
The vendor from which this Asset was acquired. - Status Code
The Asset’s initial status code.
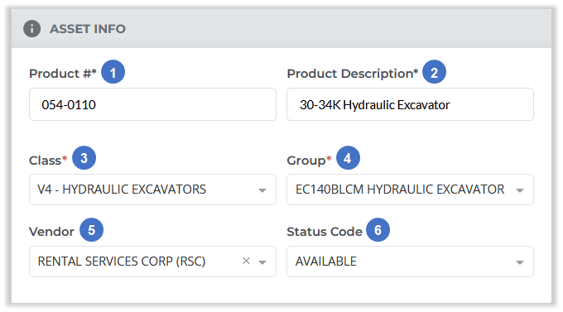
Options Panel
Use this panel to manage pricing and inventory options for the Asset.
- List Price
The purchase price of this Asset. - Markup %
The percentage by which the Asset’s cost was marked up to reach the list price. Used to calculate the average cost each. - Average Cost Each
The calculated cost of purchasing this Asset. Note that this field is read-only and is automatically calculated based on the list price and the markup percentage. This is calculated based on the following formula:
Average Cost Each = List Price/(Markup%+100%). - Replacement Cost
The cost of replacing this Asset if damaged or lost. - Include in Inventory Flag
Check to include this Asset in your system’s Inventory. Uncheck if this Asset is not part of inventory - this is generally the case for re-rental items or other generic items. See “Rental Inventory” (SRM help page) for more information. - Bulk Item Flag
Check to indicate that this Asset is a bulk Product. Bulk Products are small, interchangeable assets, such as scaffolding components and chainsaws, that can have a quantity greater than 1 in the system. See “Bulk Products and Non-Bulk Products” for more information. - Show on Website Flag
Check this box to display this Asset on your company’s eCommerce website, if applicable. - External Resource URL
If this Asset has an external information page, for example on your company website, you can enter the URL of that page here for reference. - Notes
Any additional notes about this Asset not captured elsewhere.
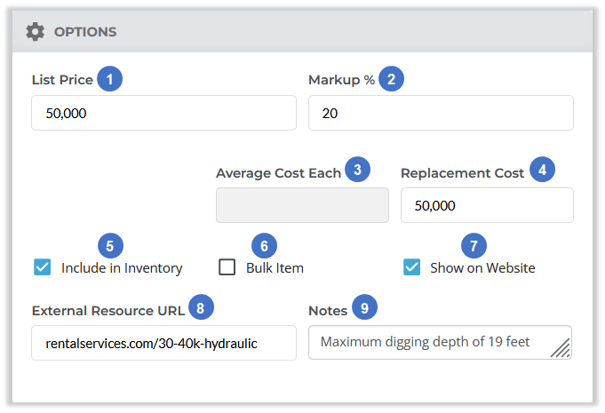
Safety Notes Panel
Use this panel to add Safety Notes to your Asset. Safety Notes are brief, basic instructions that can apply to various Products.
- Safety Note
Safety Notes that have already been added to the Asset are listed here. Click the bin icon next to a Safety Note to remove it.
 - Add Safety Note
Begin typing into the search bar to search for Safety Notes to add to the Asset. Safety Notes are managed in Texada SRM, at System Maintenance → Configure System Settings → Operations → Inventory → Safety Notes.
Rates Panel
Use this panel to adjust options pertaining to the Asset’s rental rates. Note that rental rates themselves must currently be set in Texada SRM.
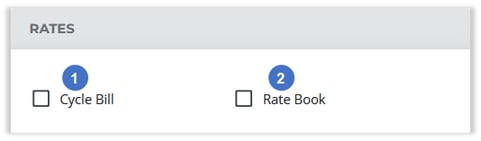
- Cycle Bill Checkbox
Check this box to enable cycle billing for this Asset. See “Cycle Billing” (SRM help page) for more information. - Rate Book
Check this box to include this Asset’s rates in the rate book. See “Rate Book” (SRM help page) for more information.
Reorder Info Panel
This panel contains additional information about the Asset, such as make, model, and fuel type information.
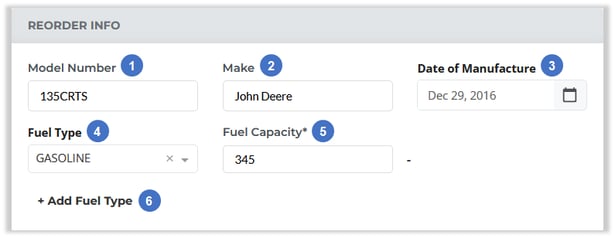
- Model Number
The Asset’s model number. - Make
The Asset’s make or brand name. - Date of Manufacture
The Asset’s date of manufacture. - Fuel Type
The type of fuel the Asset takes. An Asset can have multiple fuel types. Click on the drop-down to select a fuel type, or click the “X” to clear your selection. The list of fuel types is managed in SRM, at System Maintenance → Configure System Settings → Operations → Fuel Types. - Fuel Capacity
The Asset’s tank capacity for this fuel type. Press the “-” next to this field to remove this fuel type from the Asset. - +Add Fuel Type Button
Click this button to add another fuel type to the Asset. This button is only enabled once the fuel type and fuel capacity for the previous fuel type have been filled out.
Attachments Panel
Attachments can only be added to an Asset after it has been created. For more information on attaching files to Assets, please see “View and Edit an Asset in Texada Web”.
Barcodes Panel
Use this panel to add barcodes to the Asset. One Asset can have multiple barcodes.
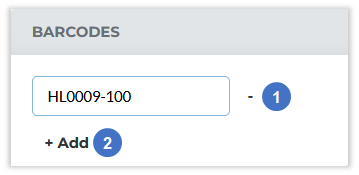
- Barcode
Enter the Asset’s barcodes here. Press the “-” symbol next to a barcode to remove it from the Asset. - + Add Barcode Button
Click to add a new barcode to the Asset.