How to add Labor to an existing Work Order in Texada Mobile.
Quick Reference
- A Work Order is a document indicating that an Asset needs servicing, either for repairs or routine maintenance.
- Once a Work Order has been created and assigned to a Mechanic for completion, the Mechanic is able to add billable items to it to track the resources consumed during the repair. These billable items fall into three categories: Parts, Labor, and Services.
- Each Labor item on a Work Order has two different time values that correspond to the two different ways of tracking Labor:
- Tracked Time represents the actual amount of time the Mechanic logged against the Labor Line while completing the Work Order. This does not affect the cost of the Work Order.
- Labor Hours represents the “official” amount of time spent on a Labor item - in other words, the amount of time for which the Customer will be billed.
- To track time against a Labor Line:
- Log in to Texada Mobile and open the Work Order you want to track time against.
- Tap the play button
 in the top-right corner of the screen to start working on the Work Order.
 - Select an existing Labor Line to track your time against, or select “Add Labor Line” to add a new Labor Line to the Work Order.
- Your time will now be tracked against the selected Labor Line until the Work Order is either completed or paused, or until you log out of Texada Mobile.
- To manually add Labor to a Work Order:
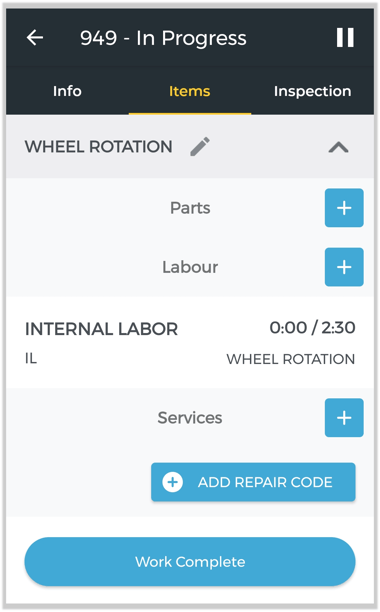
- Log in to Texada Mobile and open the Work Order you want to edit. Tap “Items” to open the Items tab.
- Click the blue plus icon
 next to the Labor header to add a new Labor item. If Maintenance Codes are enabled for your system, multiple Labor headers will exist - make sure you have selected the one that corresponds to your desired Maintenance Code.
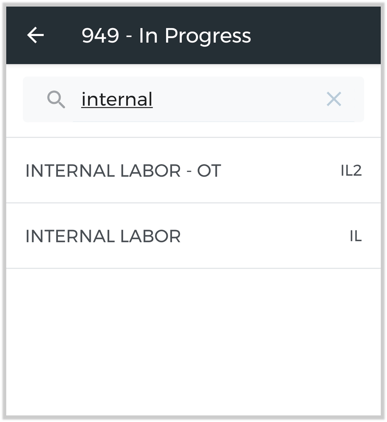
 - Begin typing into the search bar to filter the list of Labor items, then tap the desired item to add it to the Work Order.
- Fill out the details for the Labor item, then tap “Save” to save your changes.
Introduction
A Work Order is a document indicating that an Asset needs servicing, either for repairs or routine maintenance. Once a Work Order has been created in Texada SRM, Web, or Mobile, it is assigned to a Mechanic for completion. The Mechanic then completes and submits the Work Order using Texada Mobile.
In Texada Mobile, Mechanics can add billable items to a Work Order to track the resources consumed during the repair. These billable items fall into three categories: Parts, Labor, and Services.
The following article will detail the process of adding Labor items to a Work Order in Texada Mobile.
Tracked Time vs. Labor Hours
Compared to Parts and Services, Labor items are unique in that Mechanics are able to add them to Work Orders in two different ways: by tracking their time against a Labor Line or by adding Labor hours manually. These two different methods of tracking Labor correspond to the two different time values the system tracks for each Labor Line: Tracked Time and Labor Hours. It is important to note that these two values are completely independent of one another.
- Tracked Time (Track Work Order Labor)
A Labor item’s Tracked Time represents the actual amount of time the Mechanic logged against it while completing the Work Order. Mechanics are able to select a Labor Line to track their time against whenever they start or resume work on a Work Order. This time does not affect the Work Order’s Labor costs. - Labor Hours (Add Labor Manually)
A Labor item’s Labor Hours value represents the “official” amount of time spent on that Labor item - in other words, the amount of time for which the Customer will be billed. This is the value that is updated when a Mechanic manually adds Labor to a Work Order.
The Tracked Time and Labor Hours values are presented side-to-side both in Texada Mobile and Texada Web. The below image illustrates the locations of these fields in both programs.

In Texada Mobile, Tracked Time and Labor Hours are displayed as a fraction next to each Labor Line under the Items tab of the Work Order. In Texada Web, these values can be seen under the Labor tab of the Work Order, as well as in the Edit Labor Details window (pictured). Click to see the full-size image.
Track Work Order Labor
To track time against a Labor item in Texada Mobile:
- Ensure that the “Auto Time Tracker” option is enabled in Texada Web.
- Log in to Texada Mobile and open the Work Order you want to track time against. See “Browsing Work Orders in Texada Mobile” and “View and Edit a Work Order in Texada Mobile” for more information.
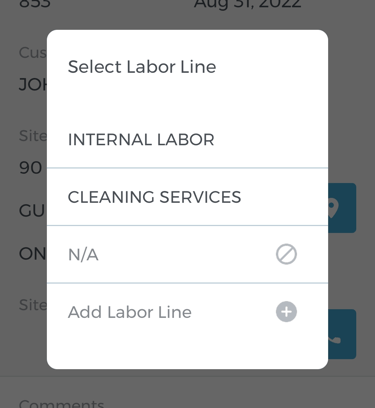
- Tap the play button in the top-right corner of the screen to start working on the Work Order. If you have not worked on this Work Order before, you can also do this by tapping the “Start Working” button at the bottom of the screen. This will open a list of Labor Lines you can log time against. This list consists of all the Labor Lines that have already been added to this Work Order.
- Select a Labor Line to start logging time against it.
- Select “N/A” to opt out of tracking your time for this session.
- Select “Add Labor Line” to add a new Labor Line to the Work Order and start logging time against it.
- Your time will now be tracked against the selected Labor Line until the Work Order is either completed or paused, or until you log out of Texada Mobile. If you opted to add a new Labor Line to the Work Order, the new line will automatically be added to the Items tab.
The amount of time that has been logged so far can be seen next to the Labor item in the Items tab.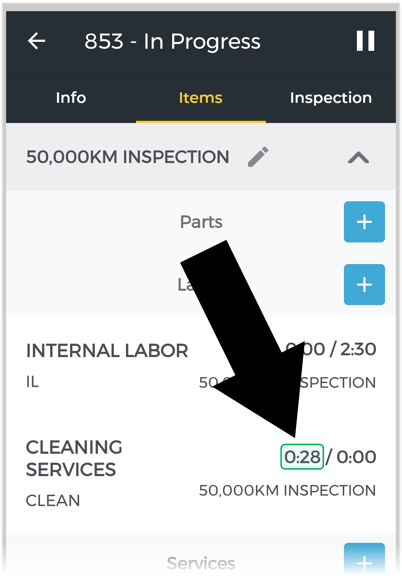
If you have already started work on a Work Order and would like to switch which Labor item you are tracking time against, tap the pause button ![]() in the top-right corner of the screen to pause the Work Order, then tap the play button
in the top-right corner of the screen to pause the Work Order, then tap the play button ![]() again to resume it. This will allow you to select a new Labor Line for the new work session.
again to resume it. This will allow you to select a new Labor Line for the new work session.
Add Labor Manually
To manually add Labor to a Work Order in Texada Mobile:
- Log in to Texada Mobile and open the Work Order you want to edit. See “Browsing Work Orders in Texada Mobile” and “View and Edit a Work Order in Texada Mobile” for more information.
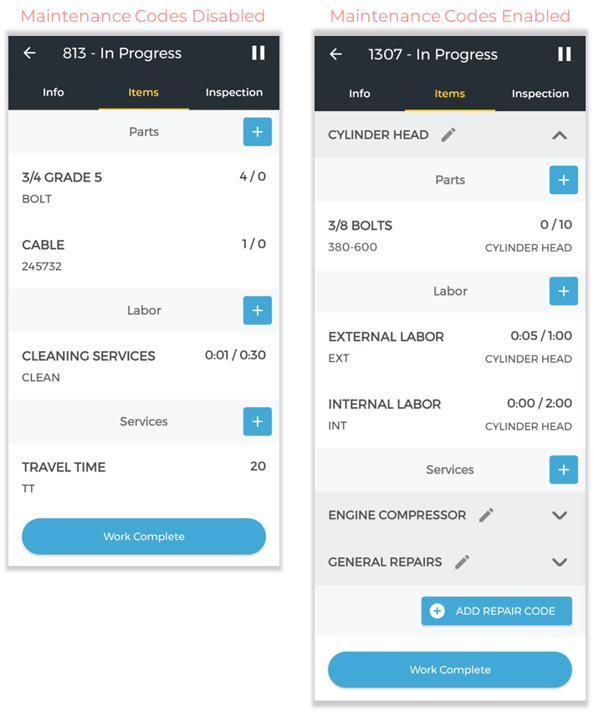
- Tap “Items” at the top of the screen to open the Items tab. Note that the appearance of this tab will vary depending on whether the “Prompt for Maintenance Codes on W.O. Details” option in Texada SRM has been enabled:
- If this option is enabled, billable items will be organized by Maintenance Code, with each code having its own Parts, Labor, and Services sub-categories. In this case, labor is logged against a particular Maintenance Code instead of the Work Order as a whole. Tap the down arrow
 next to a Maintenance Schedule to expand it and add billable items.
 - If this option is disabled, the Items tab will only contain the Parts, Labor, and Services categories, and all labor will be logged against the Work Order itself.
- If this option is enabled, billable items will be organized by Maintenance Code, with each code having its own Parts, Labor, and Services sub-categories. In this case, labor is logged against a particular Maintenance Code instead of the Work Order as a whole. Tap the down arrow
- Tap the blue plus icon next to the Labor header to add a new Labor item. If Maintenance Codes are enabled, make sure you are adding Labor under the desired Maintenance Code.
- Begin typing into the search bar to filter the list of Labor items, then tap the desired item to add it to the Work Order. The list of Labor items is managed in Texada SRM, at System Maintenance → Configure System Settings → Accounting → Service Codes.
- Fill out the details for the Labor item, including the amount of time spent working and any additional comments. If Maintenance Codes are enabled, you will also have the option of changing which Code the item is logged under by selecting a different code from the drop-down at the bottom of the screen.
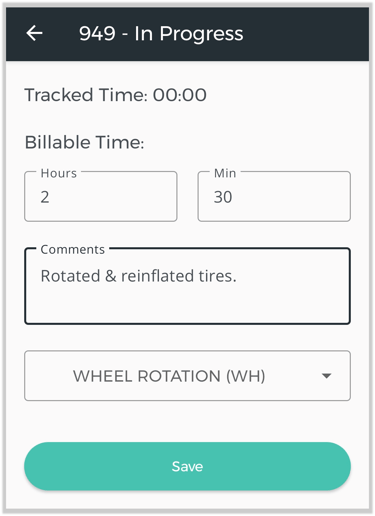
- Once you are finished, tap “Save” to save your changes and return to the Items tab.Once your Labor item has been added to the Work Order, you can edit it by tapping on it.