
An overview of the Company Settings page in Texada Web.
Quick Reference
- The Company Settings page allows Users with the necessary permissions to view and modify details about their company.
- The Company Settings page comprises six different tabs:
- Users: Provides a number of options for managing Users of Texada SRM, Web, and Mobile.
- Emails: Allows you to configure the outgoing email address for system emails.
- Time Tracker: Contains options relating to the Time Tracker.
- Permissions: Allows you to review and modify the permissions associated with the various User Roles.
- Roles: Allows you to see which Users have been assigned to the various User Roles.
- Instances: Allows you to change the color and display name of your system’s Instances. This tab is only visible to Super Admins.
- The Company Settings page can be found under the User Menu (click on your name in the top-right corner of Texada Web) → Settings → Company Settings.
Introduction
The Company Settings page allows Users with the necessary permissions to view and modify details about their company, including adding new Users, editing User permissions, and configuring User Roles. The following article provides an overview of the options available via the Company Settings page.
The Company Settings page can be found under the User Menu (click on your name in the top-right corner of Texada Web) → Settings → Company Settings.
The Company Settings Page
- Company Settings Tab
Contains settings for configuring Users, system emails, the Time Tracker, and User permissions and Roles. - Division Settings Tab
Contains per-Division settings, such as whether unavailable Products can be added to Contracts and whether multiple Mechanics can be assigned to a single Work Order. See “The Division Settings Page” for more information. - Users Tab
Allows you to view, edit, and create Texada Web Users. - Emails Tab
Allows you to configure the outgoing email address for system emails. - Time Tracker Tab
Allows you to enable or disable the automatic Time Tracker. - Permissions Tab
Allows you to configure the permissions associated with each User Role. - Roles Tab
Allows you to view which Users have been assigned to the various User Roles. - Instances Tab
Allows you to change the color and display name of your system’s Instances. This tab is only visible to Super Admins.
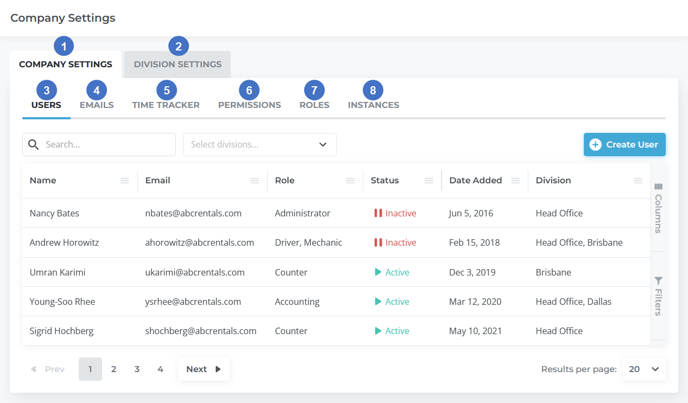
The Users Tab
The Users tab provides you with a number of options for managing Users of Texada SRM, Web, and Mobile.

- Search Bar
Begin typing here to filter the list of Users by the text entered. This will search by Name and Email address. - Division Selector
Use this to filter the list of Users by Division. Click on the drop-down to open a list of Divisions, then check or uncheck each Division to include or exclude it. Once you have selected at least one Division, click the ‘X’ next to the Division’s name to remove it from the filter, or click the ‘X’ next to the number of selected Divisions to clear the filter and display all Divisions. - Create User Button
Use this to create a new User. See “Create a User in Texada Web” for more information. - Users Table
Existing Texada Web / SRM / Mobile users are listed in this table. The appearance of this table can be modified in a number of ways; see “Working with Tables” for more information. - User
Click on a User’s row in the table to view and edit their profile. See “Edit a User Profile in Texada Web” for more information.
Users Table - Columns
The Users table comprises the following columns:
- Name: The User’s name.
- Email: The User’s email address. Used when logging in.
- Role: The Role(s) to which the User has been assigned.
- Status: Indicates whether the User is currently able to log in (Active) or whether their access has been disabled (Inactive). This is determined by the “Disabled” flag in Texada SRM; see “Operator Codes” (SRM help file) for more information. Users may be automatically disabled after too many failed login attempts.
- Date Added: The date on which the User was created.
- Division: The Division(s) to which the User has been given access.
- Location: The Location(s) to which the User has been given access.
- Last Login: The date on which the User last logged in.
- Two Factor Authentication: Indicates whether or not two-factor authentication has been enabled for the User.
- User Type: Indicates the Texada products to which the User has been given access, as well as whether the User is a Super Admin.
- Default Language: The User’s default language.
- Employee Number: The User’s unique Employee Number. This is equivalent to the User’s Operator Code in Texada SRM.
The Emails Tab
This tab allows you to configure the outgoing email address for system emails. Note that the appearance of this tab will change depending on whether or not an outgoing email address has already been established. For more information, please see “Configure Texada Web to Send System Emails”.
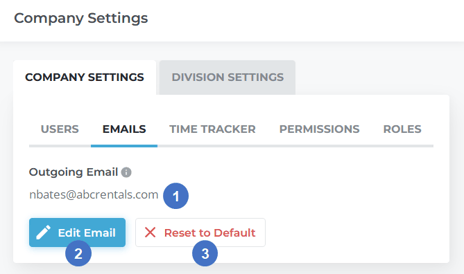
- Outgoing Email Address
The current outgoing email address for system emails. This address will be used as the “From:” address for system-generated emails, such as when emailing an Invoice or Contract to a Customer. - Edit Email Button
Use this to view and change the current email configuration. See “Configure Texada Web to Send System Emails” for more information. - Reset to Default Button
Use this to reset the current configurations and remove the existing outgoing email address.
Clicking “Reset to Default” will remove your existing email configurations and will prevent your system from sending system emails until new information is entered. It is highly recommended to use the “Edit Email” button to capture the existing configurations before clicking this button.
The Time Tracker Tab
This tab contains options relating to the Time Tracker.
![]()
- Auto Time Tracker Toggle
If this option is enabled, Mechanics will automatically be prompted to select a Labor Line to track time against when starting or resuming a Work Order in Texada Mobile.
The Permissions Tab
This tab allows you to view and modify the permissions associated with the various User Roles.
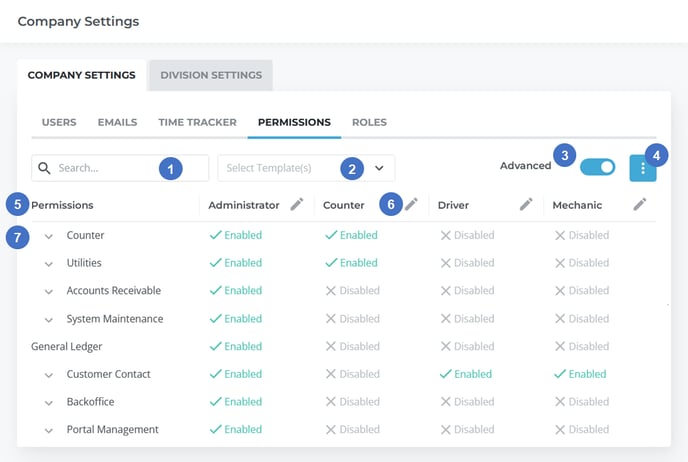
- Search Bar
Begin typing here to filter the list of permissions by the text entered. This will search through all sub-levels of permissions, even those that are not currently visible. For example, searching for “counter” will return the “Utilities” permission, since “Counter Utilities” is a sub-level of that permission. - Template Select
Use this to filter the Roles (columns) displayed in the Permissions table. Click on the drop-down to open a list of Roles, then select which Roles you would like to display in the table. Click “Clear Selection” to clear the filter and display all Roles. - Advanced Toggle
Use this to switch between basic view and advanced view. These views present the same permission information in different ways. Advanced view (toggle enabled) displays permissions in a style similar to the Security Role Permissions utility in Texada SRM. Basic view (toggle disabled) provides streamlined categories with an emphasis on permissions most relevant to Texada Web and Mobile. - Role Manager
Click the three dots in the top-right corner of the Permissions table to access the Role Manager. This tool allows you to create, clone, edit, and delete User Roles. See “The Role Manager” for more information.
 - Permissions Table
This table displays all the permissions that are enabled and disabled for the various User Roles. Each row in the table corresponds to a permission, while each column corresponds to a User Role. Whether or not a given permission is enabled for a particular Role can be observed at the intersection of the corresponding row and column. - Edit Role Button
Click the pencil icon next to a Role’s name to edit it. See “The Role Manager - Edit Role” for more information.
 - Permissions
Each permission is displayed in its own row. Permissions are organized into a hierarchy, with broader permissions at the top level containing sub-levels of increasing granularity. Click the down arrow to the left of a permission’s name to expand its sub-levels; click the up arrow
  to the left of an expanded category to collapse it.
The Roles Tab
This tab allows you to see which Users have been assigned to the various User Roles.
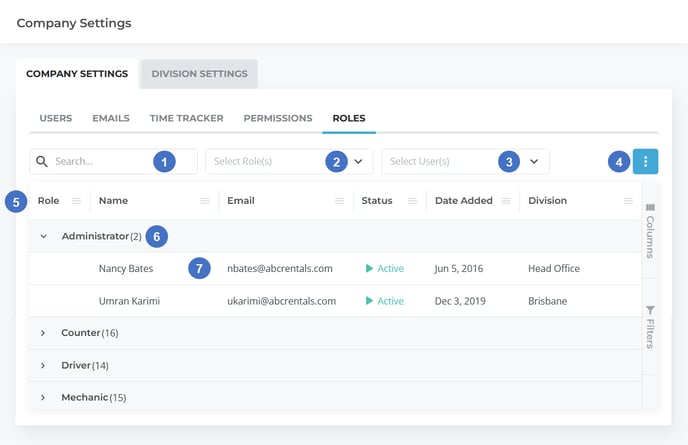
- Search Bar
Begin typing here to filter Users by the text entered. - Role Selector
Use this to select which Roles are displayed in the table. Click on the drop-down to open a list of Roles, then select one or more Roles to be displayed. Click “Clear Selection” to clear the filter and display all Roles. - User Selector
Use this to select which Users are displayed in the table. This is useful for verifying which Roles have been assigned to a particular User. - Role Manager
Click the three dots in the top-right corner of the Roles table to access the Role Manager. This tool allows you to create, clone, edit, and delete User Roles. See “The Role Manager” for more information. - Roles Table
This table lists the User Roles that exist in the system, and the Users that have been assigned to each Role. The appearance of this table can be modified in a number of ways; see “Working with Tables” for more information. - Role
Roles are represented by gray rows in the Roles table. The number in parenthesis next to the Role’s name indicates the number of Users that have that Role. Click on a Role to expand or collapse its list of assigned Users. - User
Users are represented by white rows in the Roles table, found under the Role(s) to which they have been assigned. If a User holds multiple Roles, they will appear in the table multiple times.
Roles Table - Columns
The Roles table comprises the following columns:
- Role: The name of the Role.
- Name: The User’s name.
- Email: The User’s email address.
- Status: Indicates whether the User is currently able to log in (Active) or whether their access has been disabled (Inactive). This is determined by the “Disabled” flag in Texada SRM; see “Operator Codes” (SRM help file) for more information. Users may be automatically disabled after too many failed login attempts.
- Date Added: The date on which the User was created.
- Division: The Division(s) to which the User has been given access.
- Last Login: The date on which the User last logged in.
- Two Factor Authentication: Indicates whether or not two-factor authentication has been enabled for the User.
- User Type: Indicates the Texada products to which the User has been given access, as well as whether the User is a Super Admin.
The Instances Tab
This tab allows you to change the color and display name of your system’s Instances. This tab can only be accessed by Super Admin Users. For more information on Instances, see “About Instances”; for more information on Super Admins, see “About Super Admins”.
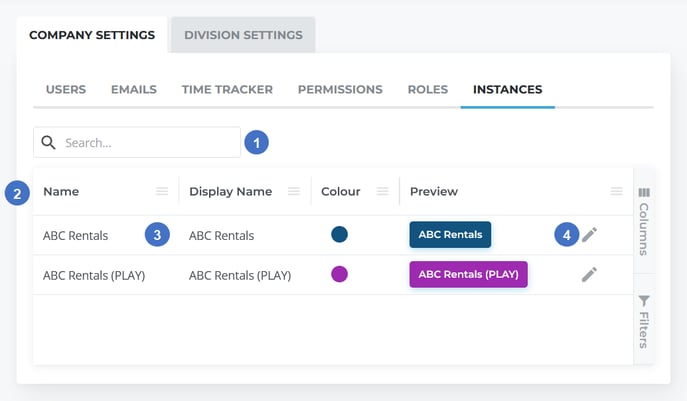
- Search Bar
Begin typing here to search the list of Instances by the text entered. - Instances Table
Contains a list of all the Instances in your system. The appearance of this table can be modified in a number of ways; see “Working with Tables” for more information. - Instance
Each of your system’s Instances is displayed in its own row in the table. - Edit Button
Click on the pencil icon next to an Instance to edit its details. See “Edit Instance” for more information.
Instances Table - Columns
The Instances table comprises the following columns:
- Name: The Instance’s name. This name is set by the Texada staff member who created the Instance; it must be unique, and cannot be changed from Texada Web.
- Display Name: The name of the Instance as it will appear in the User Menu. This name does not need to be unique and can be changed.
- Color: The color of the Instance’s button in the User Menu.
- Preview: A preview of the appearance of the Instance’s button in the User Menu, consisting of its Display Name against a background of the selected Color.
Edit Instance
Click on the pencil icon ![]() next to an Instance in the Instances table to edit its details.
next to an Instance in the Instances table to edit its details.
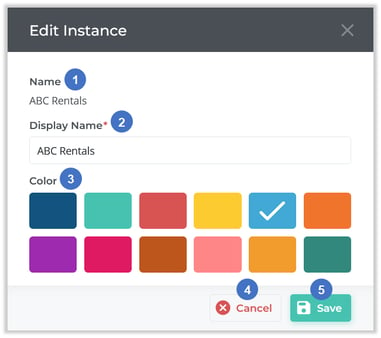
- Name
The Instance’s name. This name is set by the Texada staff member who created the Instance; it must be unique, and cannot be changed from Texada Web. - Display Name
The name of the Instance as it will appear in the User Menu. - Color
The color of the Instance’s button in the User Menu. - Cancel Button
Close the window without saving your changes. - Save Button
Save your changes and exit.