
An overview of the Ticket map in Texada Web.
Quick Reference
- The Ticket map allows you to view all of the Tickets in your system in one place. Tickets are displayed on a map alongside any Drivers using Texada Mobile, making it easy to assign Tickets to Drivers based on geographical location.
- To reach the Ticket map, navigate to Tickets → Map in the left side menu, or click the “Tickets Map” button on the Pickup Ticket list or Delivery Ticket list pages.
- Use the controls at the top of the map to filter Tickets by date, type, Driver, or status.
- Use the Type/Driver/Status display selector in the top-right corner of the map to change the appearance of the pins on the map based on different criteria.
- Click on a Ticket’s pin to view its basic details, then click “Open Ticket” to open its details in a new browser tab.
- The pin for each Ticket will appear either at the Ticket’s origin address or destination address, depending on the type of Ticket:
- Pickup tickets will appear at their origin address.
- Delivery tickets will appear at their destination address.
- Task tickets will appear as a set of paired pins - one at the origin address and one at the destination address.
Introduction
The Ticket map allows you to view all of the Tickets in your system - Pickups, Deliveries, and Tasks - in one place, on a visual map that makes it easy to understand where the bulk of your work is falling. The Ticket map is a useful tool for assigning Tickets to Drivers - since Drivers are also visible on the Ticket map, you can easily assign Tickets to nearby Drivers to improve efficiency.
To reach the Ticket map, navigate to Tickets → Map in the left side menu, or click the “Tickets Map” button on the Pickup Ticket list or Delivery Ticket list pages.
The Ticket Map
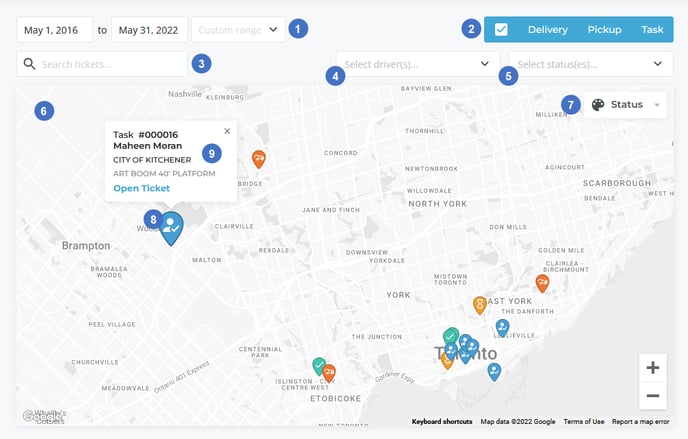
- Date Selector
Use these options to select a range of dates for which Tickets are displayed. Click on the start or end date to select a date from the calendar, or use the drop-down list to select a predetermined date range:- Today: The current day only.
- Yesterday: the previous day only.
- Last 7 Days: The last 7 days, from yesterday to the day 6 days prior to yesterday.
- Last 30 Days: The last 30 days, from yesterday to the day 29 days prior to yesterday.
- This Month: From the first day of the current month to the last day of the current month.
- Last Month: From the first day of the previous month to the last day of the previous month.
- Ticket Type Selector
Use these buttons to select which types of Tickets are displayed on the map: Deliveries, Pickups, Tasks, or any combination of these. Click each ticket type to toggle it on or off. Use the checkbox on the left of the selector to toggle all types on or off. - Search Bar
Begin typing into this field to filter displayed Tickets by the text entered. This will search by customer name and Ticket number. If no Tickets match your current search terms, you will receive a message that reads “Warning: no tickets were found with those filters.” Delete your text to remove the filter. - Driver Selector
This field allows you to filter displayed Tickets by their assigned Driver. Click on the selector to open a list of Drivers in your system, then click on the names of the Drivers whose tickets you want to display. Type into the search bar to search for a particular Driver. Click “Clear Selection” to deselect all Drivers and remove the filter. - Status Selector
This field allows you to filter displayed Tickets by status. Click on the selector to open a list of statuses, then select the statuses you wish to display. Type into the search bar to search for a status. Click “Clear Selection” to deselect all statuses and remove the filter. See “About Ticket Statuses in Texada Web and Texada Mobile” for more information on Ticket statuses. - Map
Tickets matching the current filters are displayed as pins on this map.- To pan the map, click and drag anywhere in the map window, or use the arrow keys on your keyboard.
- To zoom in and out, use the scroll wheel on your mouse, the “+” and “-” keys on your keyboard, or the “+” and “-” buttons in the bottom-right corner of the map.
- Type/Driver/Status Display Selector
This selector allows you to change the appearance of the pins on the map based on different criteria:- Type: This option color-codes pins based on their Ticket type: Delivery (red), Pickup (blue), and Task (orange).
- Driver: This option changes the symbol on each pin to the first letter of the assigned Driver’s name (for example, a Ticket assigned to John Ashton would be represented by the letter ‘J’). Each Driver will be assigned a random pin color to help distinguish between different Drivers’ pins.
- Status: This option color-codes pins based on their current status: Assigned (blue), In Progress (yellow), Loading/Unloading (orange), Completed (light green), and Closed (dark green).
- Ticket Pin
Each Ticket or Driver on the map is represented by a pin. The color and symbol of each pin provides information about the Ticket, and can be changed using the Type/Driver/Status selector in the top-right corner of the map. The location of each pin is determined by either the origin address or destination address of the Ticket, depending on the Ticket’s type:- Pickup tickets will appear at their origin address - the address of the work site from which the Assets are to be picked up.
- Delivery tickets will appear at their destination address - the address at which the Assets are to be delivered.
- Task tickets will appear as a set of paired pins - one at the origin address and one at the destination address. Clicking on a task Ticket pin will also highlight its paired pin.
- Ticket Details
Click a Ticket’s pin on the map to view its details, including Ticket number, Driver name, Customer name, and the Assets on the Ticket. Click “Open Ticket” to open that Ticket’s details page in a new browser tab. See “View and Edit the Details of a Ticket in Texada Web” for more information.
Note that, if at any point while viewing the map, your current filters and selected date range would result in over 100 Tickets being displayed, only the first 100 Tickets will be shown. When this occurs, you will receive a message that reads “Warning: only the first 100 tickets are shown. Use filters to view all tickets.”