
How to view and edit the details of a Pickup, Delivery, or Task Ticket in Texada Web.
Quick Reference
- A Ticket is a type of document indicating that Assets need to be moved between Locations. There are three different types of Tickets: Pickup Tickets, Delivery Tickets, and Task Tickets. Tickets of all three types are created and managed by dispatchers using Texada Web or SRM, and are fulfilled by Drivers using Texada Mobile.
- To view and edit the details of a Ticket in Texada Web, do one of the following:
- Pickup Tickets: Navigate to Tickets → Pickup in the left side menu, then click on the Ticket you wish to view.
- Delivery Tickets: Navigate to Tickets → Delivery in the left side menu, then click on the Ticket you wish to view.
- Task Tickets: Navigate to Tickets → Task in the left side menu, then click on the Ticket you wish to view.
- All Ticket types (via the Ticket Map): Navigate to Tickets → Map in the left side menu. Locate the pin of the Ticket you wish to view, click on it to view the Ticket’s basic information, then click “Open Ticket” to open its details page.
- All Ticket types (via the Ticket Scheduling page): Navigate to Tickets → Scheduling in the left side menu. Locate the Ticket you wish to view in the Ticket table and double-click it to open its details page. Or, locate the pin of the Ticket you wish to view in the map section at the bottom of the screen, click it to select it, then click the View Ticket button
 to open its details page.
- Once you have finished making changes to the Ticket, click the “Save” button in the bottom-right corner of the screen to save your changes. Note that you cannot edit Closed or Canceled Tickets.
Introduction
A Ticket is a type of document indicating that Assets need to be moved between Locations. There are three different types of Tickets: Pickup Tickets, Delivery Tickets, and Task Tickets. Tickets of all three types are created and managed by dispatchers using Texada Web or SRM, and are fulfilled by Drivers using Texada Mobile.
The following article describes how to view and edit existing Tickets of any type in Texada Web.
Viewing the Details of a Ticket in Texada Web
To view the details of a Ticket in Texada Web, do one of the following:
- Pickup Tickets: Navigate to Tickets → Pickup in the left side menu, then click on the Ticket you wish to view. See “The Pickup Tickets List” for more information.
- Delivery Tickets: Navigate to Tickets → Delivery in the left side menu, then click on the Ticket you wish to view. See “The Delivery Tickets List” for more information.
- Task Tickets: Navigate to Tickets → Task in the left side menu, then click on the Ticket you wish to view. See “The Task Tickets List” for more information.
- All Ticket types (via the Ticket Map): Navigate to Tickets → Map in the left side menu and locate the pin of the Ticket you wish to view. Click on the pin to view the Ticket’s basic information, then click “Open Ticket” to open its details page. See “The Ticket Map” for more information.
- All Ticket types (via the Ticket Scheduling page): Navigate to Tickets → Scheduling in the left side menu. Locate the Ticket you wish to view in the Ticket table and double-click it to open its details page. Or, locate the pin of the Ticket you wish to view in the map section at the bottom of the screen, click it to select it, then click the View Ticket button to open its details page. See “The Ticket Scheduling Page” for more information.
The Ticket Details Page
This page allows you to view all the details of a Ticket. Depending on the Ticket’s type and current status, you may also be able to add comments, attachments, or services, download or email a PDF version of the Ticket, and close or cancel it.
The image below shows the details page for a Pickup Ticket. Note that there are minor differences in the appearance of this page depending on Ticket type. The options available in the bottom bar will also be affected by the Ticket’s current status; the below image has been edited to display all possible options at once.
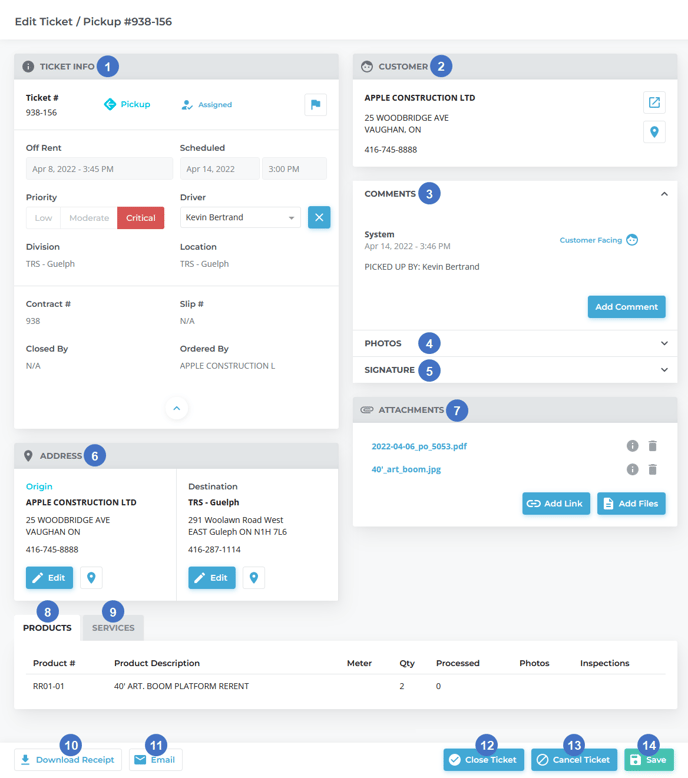
- Ticket Info Panel
Contains basic information about the Ticket, including Ticket number, type and status, scheduling dates, priority, assigned Driver, Division, and Location. If the Ticket is not yet in progress, you will be able to change the assigned Driver from this panel. - Customer Panel
Contains information about the Ticket’s Customer, including Site and contact information. - Comments Panel
Contains any comments left on the Ticket, either by a dispatcher using Texada Web / SRM or the assigned Driver using Texada Mobile. - Photos Panel
Contains any photos uploaded to the Ticket by the Driver in Texada Mobile. - Signature Panel
Contains the name and digital signature of the party who signed off on the delivery or pickup. - Address Panel
Contains the Origin and Destination Address of the Ticket. - Attachments Panel
Contains any additional files, images, or links that have been attached to the Ticket. - Products Tab
Contains information on the Products on the Ticket. - Services Tab
Contains information on any additional service fees included with the Ticket, such as pickup / delivery charges or refueling fees. - Download Receipt Button
Use to view and download a PDF version of the completed Ticket. This button will only appear for Pickup and Delivery Tickets with a status of Completed or Closed. - Email Button
Use to send a PDF version of the Ticket to the specified email address. This button will only appear for Pickup and Delivery Tickets with a status of Completed or Closed. - Close Ticket Button
Use to set the status of the Ticket to Closed. Tickets of any type and status can be closed in this manner, with the exception of flagged Tickets, which cannot be closed until the flag has been removed. - Cancel Ticket Button
Use this to cancel the Ticket. The availability and function of this button will change based on the Ticket’s type:- For Pickup and Delivery Tickets, this button will be available if the Ticket’s status is Created or Assigned. Clicking this button will set the Ticket’s status to Canceled.
- For Task Tickets, this button will be available if the Ticket’s status is Created, Assigned, In Progress, Loading, or Unloading. Clicking this button will completely delete the Ticket.
- Save Button
Use this to save any changes made to the Ticket. This button will not appear for Closed or Canceled Tickets, as they cannot be edited.
Additional information on the panels on this screen can be found below.
Ticket Info Panel
This panel contains basic information about the Ticket.
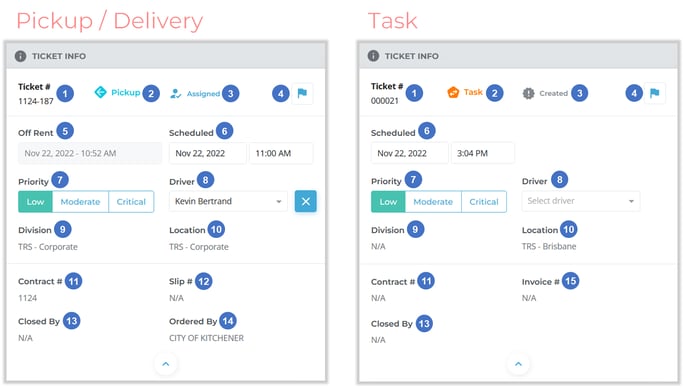
- Ticket #
The Ticket’s unique identifier in the system.- For Pickup and Delivery Tickets, this consists of two numbers connected by a hyphen (###-###), where the number before the hyphen is the Contract number of the Ticket’s parent Contract. For example, a Pickup Ticket for Contract #346 might have a Ticket number of 346-172.
- For Task Tickets, the Ticket number is not hyphenated, as Task Tickets do not have a parent Contract.
- Type
The Ticket’s type - Pickup, Delivery, or Task. - Status
The Ticket’s current status. See “About Ticket Statuses” for more information. - Flag
Indicates whether or not the Ticket has been flagged for attention. Click on the flag icon to flag or unflag the Ticket. In addition to being flagged manually, Tickets can also be flagged automatically when certain conditions are fulfilled - for example, when the Driver fulfilling the Ticket indicates that one or more Assets cannot be loaded. Flagged tickets will display a message below this icon indicating the origin of the flag, and will be highlighted in red on the Ticket List pages. Flagged Tickets cannot be closed. - Off Rent / Contract Out Date
The name and function of this field will change depending on the Ticket type:- For Pickup Tickets, this field will be called “Off Rent”, and will indicate the date on which the Assets on the Contract were marked as off rent and billing on the Contract was stopped.
- For Delivery Tickets, this field will be called “Contract Out”, and will indicate the beginning of the parent Contract’s rental period.
- This field will not appear for Task Tickets.
- Scheduled Date
The date and time for which completion of this Ticket has been scheduled. - Priority
The Ticket’s priority - Low (green), Moderate (orange), or Critical (red). Priority has no bearing on the Ticket’s properties, but serves as a quick visual indicator of which Tickets should be scheduled first. - Driver
The name of the Driver to whom the Ticket has been assigned.- To assign a Driver to the Ticket, click on the drop-down and select their name from the list. Assigning a Driver to a new Ticket will automatically update the Ticket’s status to Assigned. The Driver will also receive a notification of the assignment from Texada Mobile on their mobile device.
- To reassign the Ticket to a new Driver, select the new Driver’s name from the drop-down list. Note that some information may be lost if the previous Driver had already begun work on the Ticket.
- To unassign the current Driver from the Ticket, click the blue "X" next to the drop-down
 . Note that some information may be lost if the Driver had already begun work on the Ticket.
- Division
The Ticket’s Division. - Location
The Ticket’s Location. - Contract #
The Contract number of the Ticket’s parent Contract. Task Tickets are not required to have a Contract number. - Slip #
Pickup and Delivery Tickets only. An optional slip number that will be displayed on the printed and .pdf versions of the Ticket. - Closed By
Closed Tickets only. The name of the Web or SRM User who closed the Ticket. - Ordered By
Pickup and Delivery Tickets only. The name of the party who requested the pickup or delivery. Equal to the “Pickup / Delivery Ordered By” fields in Texada SRM. This is often, but not necessarily, the Customer’s name. - Invoice #
Task Tickets only. The Invoice on which the Ticket was charged. Pickup and Delivery Tickets do not have their own Invoice numbers, as they are charged on the same Invoice as their parent Contract.
Customer Panel
This panel contains information about the Customer for which the Ticket is being completed. Pickup and Delivery Tickets inherit the Customer of their parent Contract. You can select a Customer when creating a Task Ticket, but this is not required. Once a Ticket is created, its associated Customer cannot be changed; as such, the information in this panel is read-only.
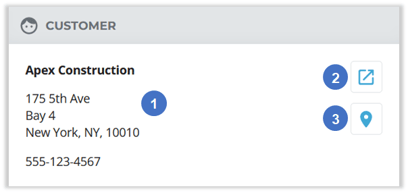
- Customer Information
The Customer’s name, address, and contact information. - View Customer Details Button
Click to open the Customer’s details page in a new browser tab. See “View and Edit a Customer in Texada Web” for more information. - View Customer on Map Button
Click to open the Customer’s address in Google Maps in a new browser tab.
Comments Panel
This panel allows you to view comments left on the Ticket, both by dispatchers using Texada Web / SRM and by the Ticket’s assigned Driver using Texada Mobile.
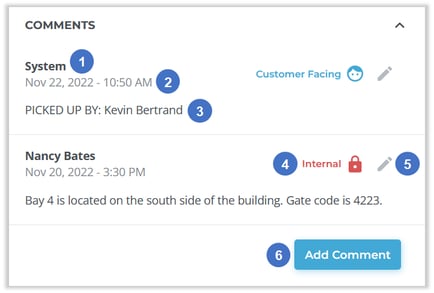
- Commenter Name
The name of the dispatcher or Driver who posted the comment. System-generated comments will be labeled “System”. - Timestamp
The date and time at which the comment was posted. - Comment Body
The contents of the comment. Comment bodies are limited to 250 characters. - Comment Visibility
Indicates whether the comment is Customer-facing or internal only. Customer-facing comments will be included on the printed and .pdf versions of the Ticket. - Edit Comment
Click the pencil icon next to a comment to edit it.
 - Add Comment Button
Click to add a new comment.
The Photos Panel
This panel (left) contains any images uploaded to the Ticket by the Driver in Texada Mobile. Click on an image to open a slideshow of images (right).
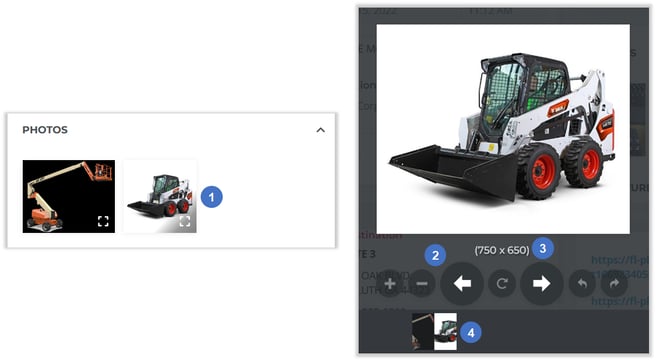
- Image
Images uploaded to the Ticket by the Driver are displayed here. Click on an image to open it in a slideshow. - Slideshow Controls
Use the buttons at the bottom of the slideshow to control it. Use the plus + and minus - buttons or the mouse wheel to zoom in and out. Use the left and right arrows to navigate through the slideshow, and the curved arrow buttons to rotate the image by 90 degrees clockwise or counterclockwise. Use the refresh button to reset the image to its default zoom and rotation. - Image Dimensions
The width and height of the currently-displayed image, in pixels. - Additional Images
Click on an image thumbnail at the bottom of the slideshow to display it.
Signature Panel
This panel allows you to view the signature of the Customer who signed off on the Ticket’s completion. Customer signatures are collected using Texada Mobile. Pickup Tickets are signed at the time the Assets are picked up from the Customer’s work Site, while Delivery Tickets are signed at the time the Assets are delivered to the Site.
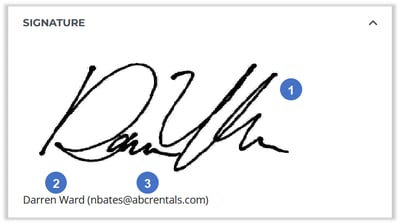
- Customer Signature
The Customer’s signature. - Customer Name
The name of the signing party. - Confirmation Email Address
The email address(es) to which the signature confirmation email was sent.
Address Panel
This panel contains information on the Origin and Destination Addresses of the Ticket.
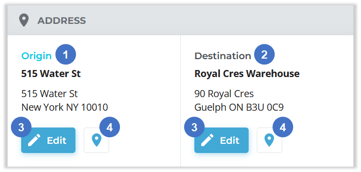
- Origin Address
The address from which the Assets on the Ticket are being picked up.- For Pickup Tickets, this defaults to the address of the Customer Site on the parent Contract.
- For Delivery Tickets, this defaults to the address of the parent Contract’s Location.
- Task Tickets do not have a default Origin Address.
- Destination Address
The address to which the Assets on the Ticket will be delivered.- For Pickup Tickets, this defaults to the address of the parent Contract’s Location.
- For Delivery Tickets, this defaults to the address of the Customer Site on the parent Contract.
- Task Tickets do not have a default Destination Address.
- Edit Address
Click to edit the Origin or Destination Address. See “Edit the Origin or Destination Address of a Ticket in Texada Web” for more information. - Open in Google Maps
Click the pin icon to view the Origin or Destination Address in Google Maps. This will open Google Maps in a new browser tab. It is highly recommended to use this feature to ensure that Google Maps is able to recognize the Origin and Destination Addresses and provide accurate directions to the Driver.
Attachments Panel
This panel contains any URLs or files that have been attached to the Ticket.
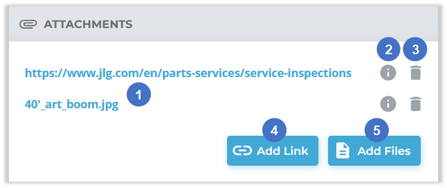
- Attachments
Attachment filenames and URLs are listed here. Click on an attachment to open it in a new browser tab. - More Information
Hover your mouse over the “i” symbol next to an attachment to view the username of the User who uploaded the attachment, as well as the date on which it was added to the Ticket.
 - Delete Attachment
Click the bin icon next to an attachment to delete it.
 - Add Link Button
Click to add a new URL attachment to the Ticket. URLs must be valid in order to be attached; the easiest way to ensure this is to navigate to the desired page in your browser, then copy and paste the URL from the address bar. - Add Files Button
Click to add new file attachments to the Ticket. Clicking this button will open your computer’s file explorer, allowing you to select files to upload. You can attach multiple files at once by ctrl+clicking or clicking and dragging to select multiple files.
Products Tab
This tab contains information on the Products included in the Ticket. Products cannot be added to or removed from a Ticket once it has been created, so the information in this panel is read-only.
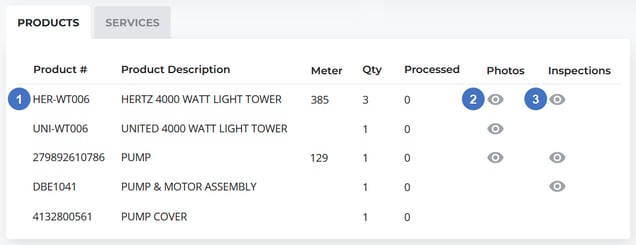
- Product
The information included for each Product is as follows:- Product #: The Product’s number.
- Product Description: The Product’s description.
- Meter: The Product’s most recent meter reading.
- Qty: The quantity of the Product out on the Contract.
- Processed: The quantity of the Product that has been processed (picked up) by a Driver. This number is updated whenever a Driver loads Products onto their truck in Texada Mobile.
- Photos
Click on the eye symbol in the Photos column to view a slideshow of any photos of the Product that have been uploaded by the Driver in Texada Mobile.
 - Inspections
Click on the eye symbol in the Inspections column to view any Inspection forms associated with the Product for this Ticket. See “About Inspections” for more information.
Services Tab
This tab allows you to add additional services to the Ticket, such as pickup, refueling, or cleaning services. Pickup and Delivery Tickets share their list of services with their parent Contract, and fees incurred by these services are charged on the same Invoice as the parent Contract. Task Tickets have their own list of services, and these services are charged on the same Invoice as the Ticket itself.
Services are managed via the Service Codes utility in Texada SRM, at System Maintenance → Configure System Settings → Accounting → Service Codes. See “Service Codes” (SRM help file) for more information.
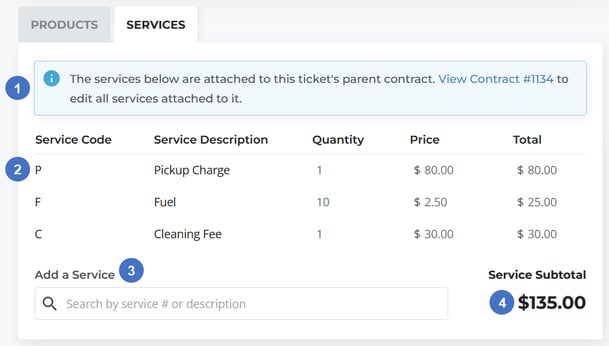
- Parent Contract Notification
If the Ticket has a parent Contract, this notification will appear to inform you that the services listed below are shared between the Ticket and its parent Contract. Click on the Contract number to open the parent Contract. - Service
The information included for each service is as follows:- Service Code: The service’s unique code.
- Service Description: The service’s description.
- Quantity: The quantity of the service purchased.
- Price: The price per unit of the service.
- Total: The total cost of the service. Equal to Quantity * Price.
- Add a Service
Click on the search bar to open a list of services, then begin typing to filter the list and click on a service to add it to the Ticket. - Service Subtotal
The total cost of all services on the Ticket. Equal to the sum of Totals for each individual service.