-
Top Searched Articles
-
Product Updates
-
Support & Troubleshooting
-
Onboarding Programs
-
Equipment CRM
-
Service Management
-
SRM
-
Handle
-
Analytics
-
E-Commerce
- Getting Started
- New Administration Panel
- Administration Panel
- Administration Panel - CMS
- Administration Panel - Products, Categories, and Attributes
- Administration Panel - Users
- Administration Panel - Requests
- Customer Access Portal
- Customer Access Portal - Rentals
- Customer Access Portal - Invoices
- eCommerce Websites
- eCommerce Websites - Ordering
- Integrations
-
Texada Mobile
-
Payments
-
Texada Web
-
Rental Asset Management
-
Order Fulfillment
-
Power Systems Projects
-
Equipment Quoting
-
Condition Monitoring Portal
-
Equipment Monitoring Toolkit
-
Parts and Service Quoting
-
Service Agreement Quoting
-
Equipment CRM - Additional Tools
The Rental Returns Page
An overview of the Rental Returns page in Texada Web.
Quick Reference
- The Rental Returns page in Texada Web allows you to browse the Products in your system that are currently out on Contract, and process rental returns for those Products.
- To reach the Rental Returns page, navigate to Returns → Rental Returns in the left side menu.
- To process a Return for a Product, select it by clicking on its row in the Rental Returns table, then click the “Process Return” button in the bottom-right corner of the screen.
Introduction
A Contract is a binding document between a renter and their customer containing the details of the rental or sale. The Rental Returns page in Texada Web allows you to browse the Products in your system that are currently out on Contract, and process rental returns for those Products.
To reach the Rental Returns page, navigate to Returns → Rental Returns in the left side menu.
The Rental Returns Page
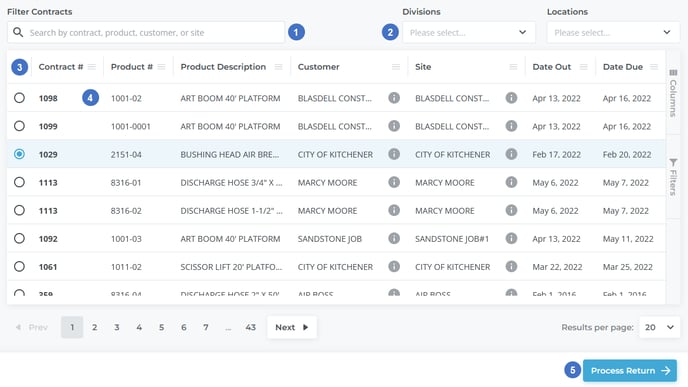
The Rental Returns page primarily consists of a list of Products in your system that are currently out on Contract. From this list, you can select a Contract for which you wish to process a return.

- Search Bar
Begin typing into this field to filter the list of Products by the text entered. This will search by Contract #, Product #, Product Description, Customer name, Customer address, Site name, Site address, and Vendor Product Number. - Division/Location Selectors
Use these selectors to filter the list of Products by specific Divisions and/or Locations. - Product List
This table contains a list of Products in your system that are currently out on rent. Each row in the table represents a Product; by default, Products are grouped by Contract #. This means that Contracts containing multiple Products will appear in the table multiple times. This table can be customized in a number of ways; see “Working with Tables” for more information. - Product
Each Product currently out on rent has its own row in the table.- Click anywhere on a Product’s row to select that Product. You can then process a rental return for the Contract to which that Product belongs by clicking the “Process Return” button.
- Hover your mouse over the information symbol
 next to the Customer or Site fields to view the Customer or Site address, respectively.
- Process Return Button
After selecting a Product from the list, click this button to process a rental return for the Contract to which that Product belongs. See “Process a Return in Texada Web” for more information.
Rental Returns Table - Columns
Each row in the Rental Returns table corresponds to a Product that is currently out on Contract. This table comprises the following columns:
- Contract #: The Contract number of the Contract the Product is currently assigned to.
- Product #: The Product’s number.
- Product Description: A brief description of the Product.
- Customer: The name of the Customer to which the Contract belongs. Hover your mouse over the information symbol
 to view the Customer’s address.
 - Site: The name of the work site at which the rented Product is being used. Hover your mouse over the information symbol
 to view the site’s address.
 - Date Out: The start date of the rental period, i.e. the date on which the Product was rented out and the Contract began billing.
- Date Due: The end date of the rental period, i.e. the date on which the Product is expected to be returned.
