
How to process a Rental Return or an In-Yard Return in Texada Web.
Quick Reference
- A Return should be performed for a Contract once the rental period has ended and one or more of the Products out on rent have been returned by the customer.
- Processing a Return has the following effects in the system:
- Returned Products will be marked as “available” in Inventory.
- An Invoice will be generated for the returned Products.
- If all Products on the Contract are returned, the Contract will be closed.
- There are 2 different types of Return:
- Rental Return: The ‘standard’ Return type, Rental Returns are initiated from the Rental Returns page in Texada Web.
- In-Yard Return: In-Yard Returns are initiated in Texada Mobile, and are used when a rented Product is returned directly to the yard as opposed to the counter. Once they have been created in Texada Mobile, In-Yard Returns are processed from the In-Yard Returns page in Texada Web.
- To process a Return in Texada Web:
- If your Return is a Rental Return:
- Navigate to Returns → Rental Returns in the left side menu.
- Select a Product to return and click “Process Return”.
- If your Return is an In-Yard Return:
- Navigate to Returns → In-Yard Returns in the left side menu.
- Select a Return to process and click on it to view its details, then click “Process Return” in the pop-up window.
- On the Process Return screen, select which Products are being returned and click “Review Return”.
- On the Review Return screen, review the details of the Return. Edit rental rates and discount percentages if desired, then click “Generate Invoice” to finalize the Return.
- Review the generated Invoice and process a payment against it if desired.
- If your Return is a Rental Return:
Introduction
Once a Contract’s rental period has ended, and rented Products have been delivered or picked up from the Customer’s work site, it is time to perform a Return. Performing a Return on a Product tells the system that the Product has been returned into inventory, and causes an Invoice for the rental to be generated.
There are 2 different types of Return:
- Rental Return: The ‘standard’ Return type, Rental Returns are initiated from the Rental Returns page in Texada Web.
- In-Yard Return: In-Yard Returns are initiated in Texada Mobile, and are used when a rented Product is returned directly to the yard as opposed to the counter. Once they have been initiated in Texada Mobile, In-Yard Returns are processed from the In-Yard Returns page in Texada Web.
The primary difference between Rental Returns and In-Yard Returns is in how they are initiated: Rental Returns are initiated in Texada Web, while In-Yard Returns are initiated in Texada Mobile. Once they have been initiated, both types of Return are completed in Texada Web.
The following article will describe the process of completing both types of Return in Texada Web.
Initiate a Rental Return
To initiate a Rental Return in Texada Web, follow the steps below.
- Navigate to the Rental Returns page.
Log in to Texada Web and navigate to the Rental Returns page at Returns → Rental Returns. For more information on this page, see “The Rental Returns Page”. - Select a Product to return and click “Process Return”.
Locate the Product you wish to return and select it by clicking on its row in the Rental Returns table. Then, click the “Process Return” button in the bottom-right corner of the page. Note that you are only able to select one Product to return on this page; if you want to return multiple Products on the same Contract, you will have the option to do so on the following screen.
- From this point forward, the process of completing your Return is the same as that for an In-Yard Return. See “Complete a Return” for more information.
Initiate an In-Yard Return
To initiate an In-Yard Return in Texada Web, follow the steps below. Note that In-Yard Returns must be created in Texada Mobile before they can be processed in Texada Web; to learn how to create an In-Yard Return in Texada Mobile, see “Process an In-Yard Return in Texada Mobile”.
- Navigate to the In-Yard Returns page.
Log in to Texada Web and navigate to the In-Yard Returns page at Returns → In-Yard Returns. For more information on this page, see “The In-Yard Returns Page”. - Click on the Return you want to process, then click “Process Return”.
Once you’ve located the Return you want to process, click on it to open its details in a pop-up window. Then, click the “Process Return” button in the bottom-right corner of the window to begin processing the Return.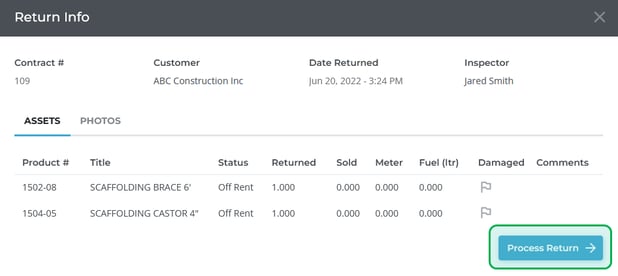
- From this point forward, the process of completing your Return is the same as that for a Rental Return. See “Complete a Return” for more information.
Complete a Return
Once you have initiated a Rental Return or In-Yard Return, the remaining steps are the same for both Return types. To complete a Rental Return or In-Yard Return, follow the steps below.
- Select Products to return and modify Contract information.
On the Process Return screen, you are able to review the details of the Contract and select which Products to return. You may return anywhere from a single Product to all the Products on the Contract at once. If multiple Products are returned at the same time, they will also be billed on the same Invoice.
Once you are satisfied with the information on this screen, use the “Review Return” button to proceed to the next step.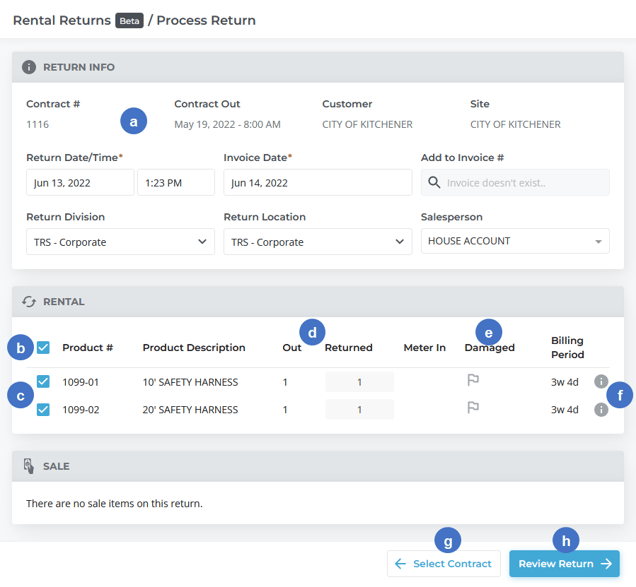
-
- Return Info Panel
This panel contains information on the Contract and Return. Many of the fields in this panel can be edited. - Select all Products Checkbox
Check this box to select all Rental Products to be returned. - Select Product Checkbox
Check the box next to each Product to indicate that it is being returned. - “Out” and “Returned” Columns
These two columns indicate the quantity of each Product that was rented out on the Contract and that is currently being returned, respectively. By default, the quantity returned will be equal to the quantity out. This number can be edited if you wish to return fewer than the number of Products rented. - Damaged Indicator
Click the flag icon on a Product’s row to indicate that the Product was damaged while out on rental. You will be prompted to enter a reason code for the damage. These reason codes are managed in Texada SRM, at System Maintenance → Configure System Settings → Operations → Rental Return Product Codes. - Billing Period Information Icon
Hover your mouse over the symbol on a Product’s row to see more detailed information on its billing period.
 - Select Contract Button
Use this button to cancel the return and navigate back to the Rental Returns page. - Review Return Button
Once you are satisfied with the information on this screen, use this button to proceed to the Review Return screen.
- Return Info Panel
- Review Return information and edit rental fees.
On the Review Return screen, you are able to review all of the information you have submitted so far. You can also modify your Products’ rental fees prior to generating an Invoice.
Once you are satisfied with the information on this screen, click “Generate Invoice” to finalize the Rental Return and generate an Invoice.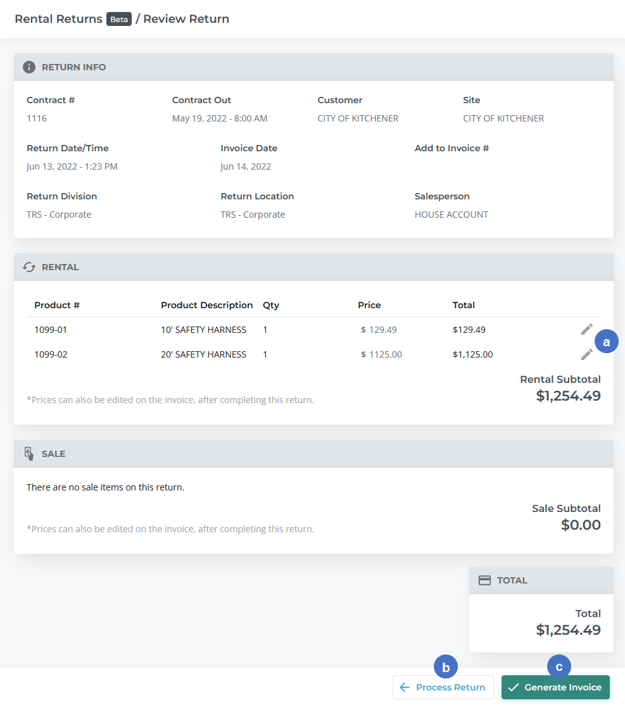
- Edit Rental Item Details Button
Click the pencil icon next to a Product’s row to view and edit its rental details, including its total rental price. See “Rental Item Details” for more information.
 - Process Return Button
Use this button to return to the previous screen. - Generate Invoice Button
Once you are satisfied with the information on this screen, click this button to finalize the Rental Return and generate an Invoice.
- Edit Rental Item Details Button
- Review and Pay Invoice
Once you click “Generate Invoice” on the Review Return screen, the Rental Return will be completed, and returned Products will be marked as available in Inventory. If all outstanding Products on the Contract were returned, the Contract will also be closed. Finally, an Invoice will be generated for the amount indicated on the Review Return screen. You will automatically be redirected to this Invoice once the return is complete, and prompted to add a payment for the outstanding balance if one exists. At this point, you are free to submit a payment for the Invoice or to cancel the process and collect payment later.
Rental Item Details
Clicking the pencil icon ![]() next to a Product’s row on the Review Return screen will open the Rental Item Details window. This window allows you to review and edit meter information and rental costs for the Product. By using this window, you can adjust the amount on the Invoice that will be generated when the Rental Return is complete.
next to a Product’s row on the Review Return screen will open the Rental Item Details window. This window allows you to review and edit meter information and rental costs for the Product. By using this window, you can adjust the amount on the Invoice that will be generated when the Rental Return is complete.
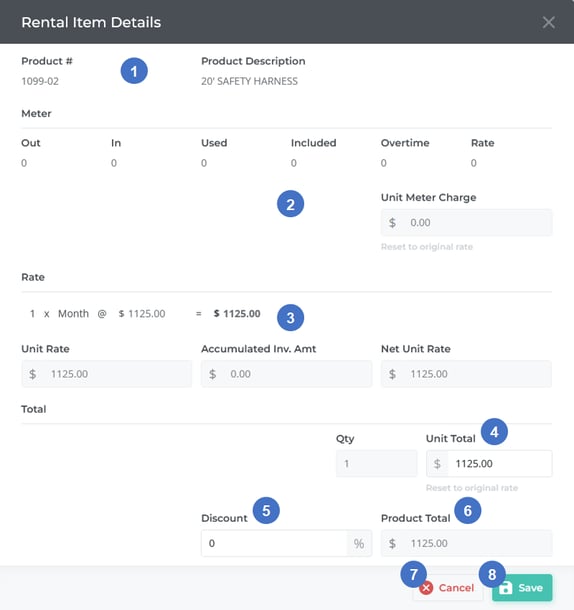
- Product # and Description
The product number and description of the Product you are editing. - Meter Information
For metered Products, this section displays information about the Product’s meter readings and usage costs, as well as the final meter charge for the Product. - Rate Information
This section contains information on the Product’s rental rates, including a breakdown of the rates that were charged (hourly/daily/weekly/monthly) to arrive at the Unit Rate. - Unit Total
The total rental cost per unit. By default, this value is based on the Product’s rental rates as shown in the Rate section of the window. It can also be manually edited to adjust the cost of rental. If you have edited this value and wish to restore the default cost, use the “Reset to original rate” option found directly below this field. - Discount
The percentage discount currently applied to this Product’s rental cost. Discounts can be set per Customer as well as at the time the Contract is created. This value can also be edited from this window to adjust rental cost. - Product Total
The total rental cost for this Product. This value is equal to Unit Total * Qty * (100-Discount)%. If you have modified the Unit Total or Discount values, the Product Total will appear as “Save to refresh”. Click the “Save” button to recalculate this value. - Cancel Button
Use this to close the window without saving your changes. - Save Button
Use this to save your changes, recalculate the Product Total, and close this window.