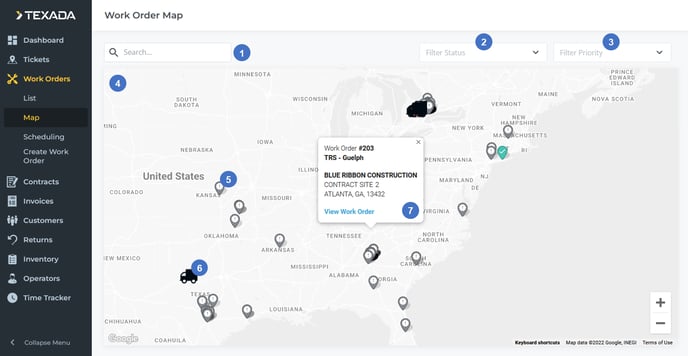
An overview of the Work Order Map in Texada Web.
Quick Reference
- A Work Order is a document indicating that an Asset requires servicing, either for repairs or routine maintenance.
- Existing Work Orders can be viewed in two different places in Texada Web, via the Work Order List or the Work Order Map.
- To reach the Work Order Map, navigate to Work Orders → Map in the left side menu. Both Work Orders and Mechanics who have enabled location services for Texada Mobile are displayed here.
- How to control the Work Order Map:
- Use the search bar, status filter, and priority filter at the top of the screen to filter displayed Work Orders.
- To pan the map, click and drag anywhere in the map window, or use the arrow keys on your keyboard.
- To zoom in and out, use the scroll wheel on your mouse, the “+” and “-” keys on your keyboard, or the “+” and “-” buttons in the bottom-right corner of the map.
- Hover your mouse over a Work Order’s pin on the map to view details for that Work Order. Click “View Work Order” to open the Work Order Info Panel, which provides additional information and allows you to edit the Work Order or assign a Mechanic to it.
Introduction
A Work Order is a document indicating that an Asset requires servicing, either for repairs or routine maintenance. Work Orders can be created in Texada SRM, Web, and Mobile, and are assigned to Mechanics for completion.
Existing Work Orders can be viewed in two different places in Texada Web, via the Work Order List or the Work Order Map. The following article describes the functionality of the Work Order Map.
To reach the Work Order Map, navigate to Work Orders → Map in the left side menu.
The Work Order Map

- Search Bar
Begin typing here to filter Work Orders by the text entered. This will search by Work Order # and Customer Name. To remove the filter, click the ‘X’ to the right of the text box or delete the filter text. - Status Filter
Use this to filter displayed Work Orders by status. Click on the drop-down to open the list of statuses, then click on each status to toggle it on or off. Once one or more statuses have been selected, click the ‘X’ next to each status to remove it from the filter, or click the ‘X’ next to the number of selected statuses to clear the filter and display all Work Orders. For more information on Work Order statuses, see “About Work Order Statuses in Texada Web and Texada Mobile”. - Priority Filter
Use this to filter displayed Work Orders by priority. Click on the drop-down to open the list of priorities, then click on each priority level to toggle it on or off. Once one or more options have been selected, click the ‘X’ next to each priority to remove it from the filter, or click the ‘X’ next to the number of selected options to clear the filter and display all Work Orders. - Work Order Map
Work Orders that meet the current search and filter criteria will appear as pins on the map. The locations of Mechanics with location tracking enabled are also displayed.- To pan the map, click and drag anywhere in the map window, or use the arrow keys on your keyboard.
- To zoom in and out, use the scroll wheel on your mouse, the “+” and “-” keys on your keyboard, or the “+” and “-” buttons in the bottom-right corner of the map.
- Work Order Pin
Work Order pins are displayed on the map at the address of the Customer’s Site. The color and icon of each pin is determined by the Work Order’s current status. Hover your mouse over a pin to view details for that Work Order. - Mechanic Pin
Mechanics with location services enabled in Texada Mobile are displayed as truck icons on the map. The location of each Mechanic’s pin is determined by the location of their mobile device and is updated every five minutes. Hover your mouse over a Mechanic’s pin to view their name. - Work Order Information
Hover your mouse over a Work Order pin to view details for that Work Order, including its number, Location, Customer name, and Customer address. Click “View Work Order” to open that Work Order’s Info Panel, which provides additional information and allows you to edit the Work Order and assign a Mechanic to it. See “The Work Order Scheduling Page - Work Order Info Panel” for more information.
