
An overview of the Work Order Scheduling page in Texada Web.
Quick Reference
- The Work Order Scheduling page allows you to view outstanding Work Orders and assign them to Mechanics for completion.
- Unassigned Work Orders are listed on the left side of the page. Mechanics and their assigned Work Orders are listed on the right.
- Use the ‘Division’ and ‘Location’ drop-downs at the top of the page to view Work Orders for that Division/Location.
- To assign, move, or unassign a Work Order, click and drag it using the six dots
 at the left of its row:
- To assign a Work Order to a Mechanic, drag and drop it over that Mechanic’s name.
- To move a Work Order between Mechanics, drag it out from under the previous Mechanic’s name and drop it over the new Mechanic’s name.
- To unassign a Work Order, drag it out from under the Mechanic’s name and drop it back into the list of unassigned Work Orders.
- Double-click a Work Order to view more detailed information.
- The tools located above the two tables offer various options for searching, sorting, and exporting Work Order and Mechanic information.
Introduction
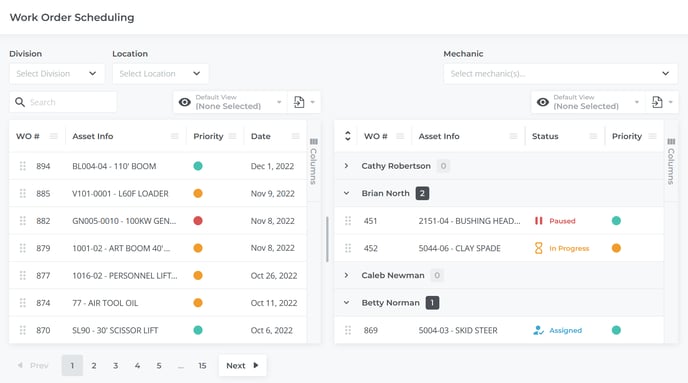
The Work Order Scheduling page.
The Work Order Scheduling page allows you to view all of your existing Work Orders, assigned and unassigned, across your various Divisions and Locations. It also allows you to assign these Work Orders to Mechanics for completion.
This page is split vertically into two halves:
- The left side of the page contains the Work Orders table and its controls. This table allows you to search, sort, and view the details of all unassigned Work Orders.
- The right side of the page contains the Mechanics table and its controls. This table contains a list of available Mechanics, and allows you to view and modify the Work Orders that have been assigned to them.
To adjust the relative size of the two tables, click on the thick vertical bar between the two tables and drag it horizontally.
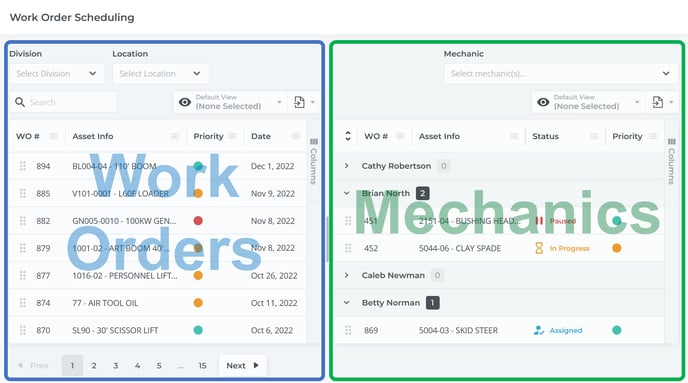 The left side of this page contains the Work Orders table and its controls; the right side contains the Mechanics table. You can assign or unassign Work Orders by dragging them between the two tables.
Assigning Work Orders
Work Orders can be assigned, unassigned, and moved between Mechanics by clicking and dragging them using the six dots ![]() on the left side of their row:
on the left side of their row:
 Click and drag on the highlighted area to move a Work Order around.
- To assign a Work Order to a Mechanic, click and drag it from the Work Orders table to the Mechanic’s name in the Mechanics table.
- To move a Work Order between Mechanics, click and drag it from under the previous Mechanic’s name to the new Mechanic’s name.
- To unassign a Work Order, click and drag it from the Mechanics table back to the Work Orders table. Note that if the Work Order was assigned to multiple Mechanics, it will not reappear in the Work Orders table until all Mechanics have been unassigned from it.
Work Orders can also be assigned via that Work Order’s Info Panel. See “Work Order Info Panel” for more information.
Work Orders Table
Found on the left side of the page, the Work Orders table contains a detailed list of all your existing Work Orders for the selected Division/Location, and allows you to manage these Work Orders in various ways, including searching, sorting, viewing additional details, and assigning Work Orders to Mechanics.
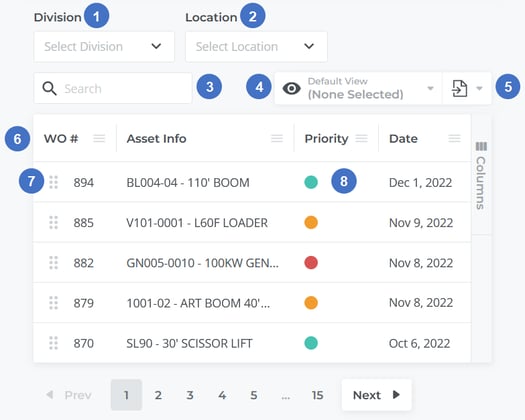
- Division Selector
Use to change which Division you are viewing Work Orders for. Note that this will also affect the Mechanics table. - Location Selector
Use to change which Location you are viewing Work Orders for. Note that this will also affect the Mechanics table. - Search Bar
Use to search for a Work Order by WO #, Asset Info, or Customer name. - View Manager
Use to load, save, and modify views. See “The View Manager” for more details. - Export Button
Use to export Work Order information. See “Exporting the Contents of a Table” for more details. - Work Orders Table
This table contains a list of all the unassigned Work Orders for the current Division / Location. You can adjust the appearance of this table in a number of ways; see “Working With Tables” for more details. - Draggable Area
The six dots at the far left of each row indicate that Work Order’s draggable area. Click and drag a Work Order from this location to assign it to a Mechanic. - Work Order
Double-click anywhere on a Work Order’s row to open its Info Panel. See “Work Order Info Panel” for more details.
Work Orders Table – Columns
The Work Orders table comprises the following columns:
- WO #: Work Order #. The Work Order’s unique ID.
- Asset Info: A combination of the ‘Asset Description’ and ‘Asset #’ columns.
- Asset Description: A brief description of the Asset assigned to the Work Order.
- Asset #: The ID of the Asset assigned to the Work Order.
- Priority: The priority of the Work Order - low (green), moderate (yellow), or critical (red).
- Date: The date the Work Order was created.
- Customer: The name of the Customer to which the Work Order applies.
- Asset Status: The status of the Asset assigned to the Work Order.
- Flagged: Whether this Work Order has been flagged for attention.
Mechanics Table
Found on the right side of the page, the Mechanics table shows a list of all Mechanics to which Work Orders can be assigned. Work Orders that have already been assigned to a Mechanic will appear under that Mechanic’s name. Using this table, you can move Work Orders between Mechanics, or unassign them by returning them to the Work Orders table.
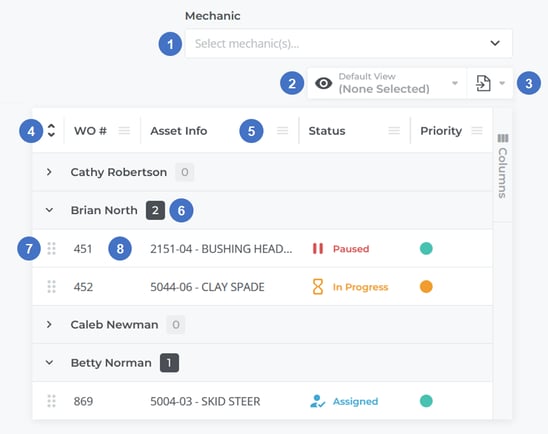
- Search Bar
To search for a particular Mechanic, begin typing his or her name into the search bar, or select it from the drop-down list. - View Manager
Use to load, save, and modify views. See “The View Manager” for more details. - Export Button
Use to export Mechanic information. See “Exporting the Contents of a Table” for more details. - Expand All/Collapse All Toggle
Click this button to view or hide all assigned Work Orders. - Mechanics Table
This table contains a list of all the Mechanics available for the current Division / Location. You can adjust the appearance of this table in various ways; see “Working With Tables” for more details. - Mechanic’s Name
Click on a Mechanic’s name to view/hide their currently-assigned Work Orders. - Draggable Area
The six dots at the far left of each row indicate that Work Order’s draggable area. Click and drag a Work Order from this location to move it between Mechanics, or to unassign it. - Work Order
Double-click anywhere on a Work Order’s row to open its Info Panel. See “Work Order Info Panel” for more details. If a Work Order has been assigned to multiple Mechanics, its row will appear in the table multiple times, once under each assigned Mechanic.
Mechanics Table – Columns
The Mechanics table comprises the following columns:
- WO #: Work Order #. The Work Order’s unique ID.
- Asset Info: A combination of the ‘Asset Description’ and ‘Asset #’ columns.
- Asset Description: A brief description of the Asset assigned to the Work Order.
- Asset #: The ID of the Asset assigned to the Work Order.
- Status: The status of the Work Order - created, assigned, paused, closed, or completed.
- Priority: The priority of the Work Order - low (green), moderate (yellow), or critical (red).
- Date: The date the Work Order was created.
- Scheduled: The date and time at which the Work Order is scheduled to begin.
- Scheduled End: The date and time at which the Work Order is scheduled to be completed.
- Customer: The name of the Customer to which the Work Order applies.
- Asset Status: The status of the Asset assigned to the Work Order.
- Flagged: Whether this Work Order has been flagged for attention.
Work Order Info Panel
The Info Panel for a Work Order can be accessed by double-clicking anywhere on its row in the Work Orders or Mechanics tables. The Info Panel provides more detailed information on a Work Order, and allows you modify these details directly or jump to its edit page.
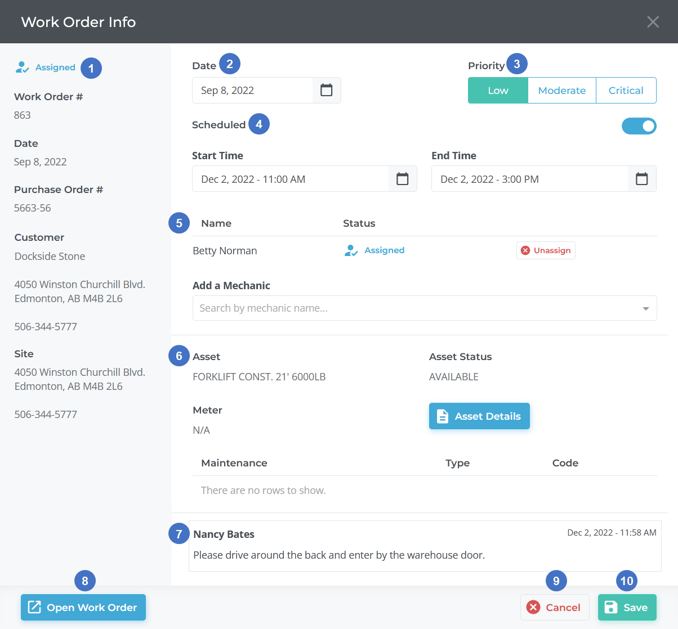
- Information Sidebar
This sidebar provides a quick overview of the Work Order’s details, including its WO #, date, purchase order #, Customer name, address and contact information, and site information. - Date Selector
Use to modify the Work Order’s date. - Priority Selector
Use to modify the Work Order’s priority. - Schedule Information
Use to indicate whether or not the Work Order has been scheduled, and if so, what are the target start and end times. Enable the Scheduled toggle to reveal the Start Time and End Time fields. Only Work Orders that have been assigned to a Mechanic can be scheduled; if you enable the Scheduled toggle then attempt to save the Work Order without selecting a Mechanic, a message will appear that reads “Please assign at least one Mechanic to the Work Order before scheduling it.” - Mechanic Information
This section contains information on the Mechanic(s) that have been assigned to the Work Order. Note that multiple Mechanics can be assigned to a single Work Order, provided the “Multiple mechanics” option is enabled under Division Settings.- To add a Mechanic to the Work Order, click the ‘Add a Mechanic’ drop-down or start typing the Mechanic’s name, then click on their name once you have located it in the list.
- To unassign a Mechanic from the Work Order, click the ‘Unassign’ button next to their name.
- Asset and Maintenance Information
This section contains information on the Asset assigned to the Work Order, including its name, status, meter, and maintenance information. Click on the ‘Asset Details’ button to open the Asset’s details page in a new browser tab. - Comments
Any comments left on the Work Order are displayed here. - Open Work Order Button
Click this button to open the Work Order’s edit page in a new browser tab. - Cancel Button
Click to close the Info Panel without saving any changes. You can also accomplish this by clicking anywhere outside the panel. - Save Button
Click to save all changes and close the Info Panel.