
How to view, edit, email and print an existing Invoice in Texada Web.
Quick Reference
- An Invoice is a commercial document issued by a seller to a buyer containing the details of a sale or rental transaction.
- To view the details of an Invoice in Texada Web, navigate to the Invoice List page at Invoices → List. Locate the Invoice you want to view and click on its row in the table.
- Click the “View PDF” button in the bottom-left corner of the Invoice details page to open a PDF version of the Invoice. From here, you can download or print the Invoice:
- To download your Invoice, click the download
 button. Depending on your browser’s settings, you may be prompted to select a location for the downloaded file, or it may be automatically downloaded to your Downloads folder.
 - To print your Invoice, click the print
 button. Select your printing options and number of copies, then click “Print” to print the Invoice.
- To download your Invoice, click the download
- Click the “Email” button in the bottom-left corner of the Invoice details page to email a PDF copy of the Invoice to a Customer. Enter the Customer’s email address, then click “Send” to email the Invoice.
- Click the “Edit” button in the bottom-right corner of the Invoice details page to edit the Invoice. Click “Save” to save your changes or “Cancel” to exit without saving.
Introduction
An Invoice is a commercial document issued by a seller to a buyer containing the details of a sale or rental transaction. In Texada Web, existing Invoices can be viewed and edited via the Invoice List page.
View an Invoice
To view the details of an Invoice in Texada Web, navigate to Invoices → List in the left side menu. Locate the Invoice you want to view and click on its row to open its details page. This page will be read-only by default, allowing you to view, but not edit, the details of the Invoice.
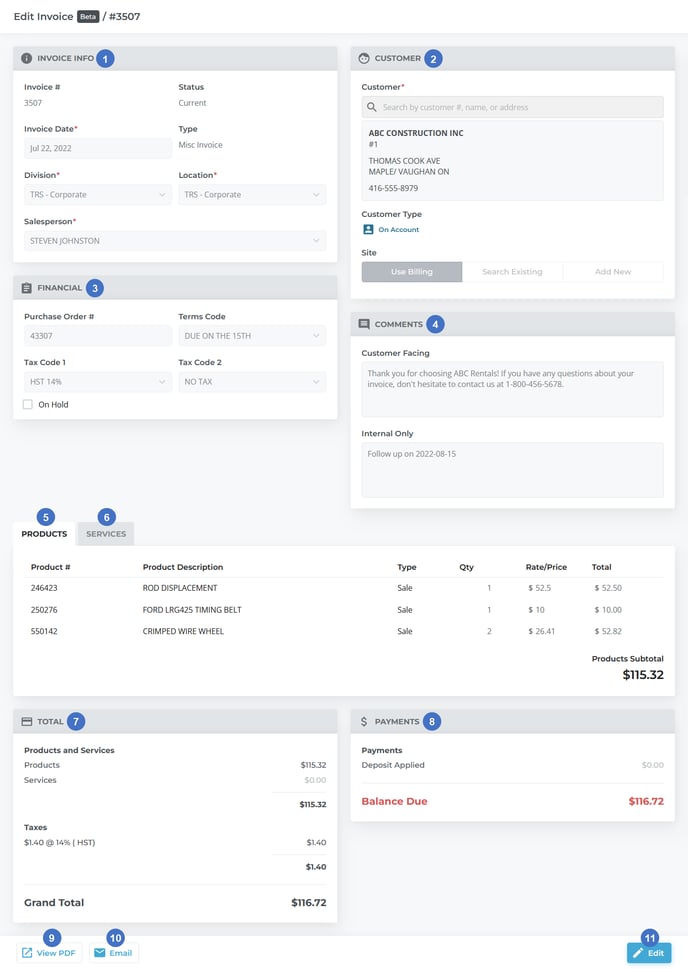
- Invoice Info Panel
Contains basic information about the Invoice, including its date, location, and the name of the salesperson who finalized the sale. - Customer Panel
Contains information about the Customer being charged, including whether they are a Cash Customer or an On Account Customer. - Financial Panel
Contains Purchase Order #, payment terms, and tax codes. - Comments Panel
Contains internal and customer-facing comments. Customer-facing comments will be included on the PDF and printed versions of the Invoice. - Products Tab
Contains the list of products that the Customer is purchasing. - Services Tab
Contains the list of additional services, such as cleaning, refueling, or dismantling services, that the Customer is purchasing. - Totals Panel
Contains totals for the cost of all products, services, and taxes on the Invoice. - Payments Panel
Contains information on any payments already made against the Invoice, as well as the Balance Due (equal to the Grand Total minus any existing payments). - View PDF Button
Use this to view and print the PDF version of the Invoice. See “View, Download, and Print an Invoice PDF” for more information. - Email Button
Use this to email a PDF version of the Invoice to the Customer. See “Email an Invoice PDF” for more information. - Edit Button
Click to begin editing the Invoice. See “Edit an Invoice” for more information.
The Invoice details screen shares most of its elements in common with the Invoice creation screen. For more information on the fields present on this screen, please see “Create an Invoice in Texada Web”.
View, Download, and Print an Invoice PDF
To view the PDF version of an Invoice, click the  button in the bottom-left corner of the Invoice details page. Note that this button will not be visible while editing the Invoice; you will need to either save or cancel your changes in order to view the Invoice PDF.

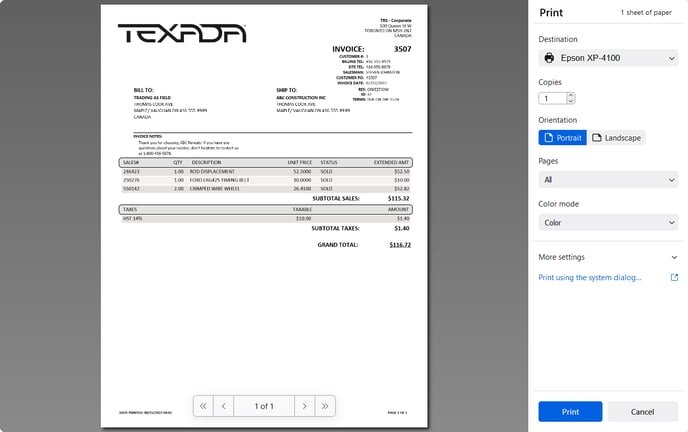
The PDF version of an Invoice can be thought of as the ‘final’ or ‘paper’ version of the Invoice. This is the version of the Invoice that will be downloaded, printed, or emailed to the Customer. It contains billing and shipping information, information such as the Purchase Order # and invoice date, and a list of all the items that were rented or purchased.
Before downloading, printing, or emailing a PDF Invoice, ensure that all of the information displayed on the Invoice is correct. Note that any customer-facing comments left on the Invoice will be included above the item list - make sure that no sensitive or inappropriate information is displayed!
Once you are satisfied with the appearance of the PDF Invoice, you can download or print it using the controls at the top of the screen. Note that the appearance and location of these controls will vary depending on your Internet browser and operating system.
Download
To download your Invoice, click the download ![]() button. Depending on your browser’s settings, you may be prompted to select a location for the downloaded file, or it may be automatically downloaded to your Downloads folder.
button. Depending on your browser’s settings, you may be prompted to select a location for the downloaded file, or it may be automatically downloaded to your Downloads folder.
To print your Invoice, click the print ![]() button. Depending on your browser and printer settings, you will be prompted to select a printer as well as additional options such as size and number of copies. Once you have selected the desired options, click “Print” to print your Invoice.
button. Depending on your browser and printer settings, you will be prompted to select a printer as well as additional options such as size and number of copies. Once you have selected the desired options, click “Print” to print your Invoice.
Email an Invoice PDF
To email an Invoice PDF to a Customer, Click the  button in the bottom-left corner of the Invoice details page. Note that this button will not be visible while editing the Invoice; you will need to either save or cancel your changes in order to view the Invoice PDF.
.png?width=427&name=Email%20PDF%20(Construction).png)
- If the email address you entered was invalid, you will receive a message that reads “Please enter valid email addresses.”
- If the email was successful, you will receive a message that reads “Invoice successfully emailed. #: [Invoice #]”. An email resembling the image below will be sent to the address specified.
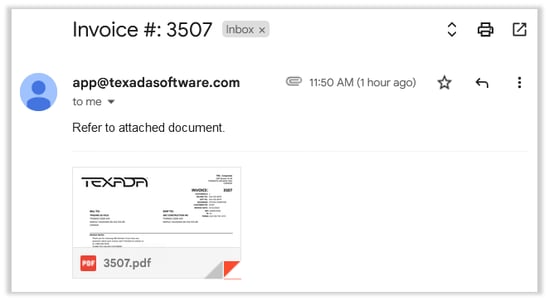
Invoice emails will be sent from the Outgoing Email address you have specified for Texada Web under Company Settings → Emails. If you have not configured Texada Web with an outgoing email address, Invoice and other system emails will be sent from app@texadasoftware.com. For instructions on how to set up an outgoing email address, see “Configure Texada Web to Send System Emails”.
Edit an Invoice
To edit an Invoice, click the  button in the bottom-right corner of the Invoice details screen. You will know that editing has begun when the fields on this screen are unlocked for editing, and the Edit button is replaced by two new buttons, Save and Cancel.
You are now able to make your desired edits to the Invoice. Note that not all elements of an existing Invoice can be edited, and some require the proper permissions to edit.
Once you are finished with your edits:
- Click
 to save all of your changes and lock the fields again. Upon a successful save, you will receive a message that reads “Invoice successfully updated. #[Invoice number]”.
 - Click
 to cancel editing without saving your changes.