
How to manually create a new Invoice in Texada Web.
Quick Reference
- An Invoice is a commercial document issued by a seller to a buyer containing the details of a sale or rental transaction.
- In Texada SRM/Web, Invoices are automatically generated when certain criteria are met - for example, when a Rental Return or Work Order is completed. Invoices can also be created manually via the Create Invoice screen.
- To manually create a new Invoice in Texada Web:
- Navigate to Invoices → Create Invoice in the left side menu.
- Enter all of the details of the Invoice, including the date, Division and Location, Customer information, purchase order and tax information, and which products and services are being purchased.
- Once you are satisfied with the Invoice details, save the Invoice by clicking either the Create Invoice, Add Payment, or Send for Payment buttons. The Create Invoice and Add Payment buttons will save the Invoice and prompt you to enter a payment. The Send for Payment button will save the Invoice and prompt you to enter an email address for the Customer. This address will be emailed a PDF copy of the Invoice as well as a link to pay the Invoice online.
Introduction
An Invoice is a commercial document issued by a seller to a buyer containing the details of a sale or rental transaction. In Texada SRM/Web, Invoices are automatically generated when certain criteria are met - for example, when a Rental Return or Work Order is completed. Invoices can also be created manually.
The following article will detail the process of manually creating an Invoice in Texada Web.
Creating an Invoice
To create a new Invoice in Texada Web, navigate to Invoices → Create Invoice in the left side menu. This will open the Create Invoice screen, where you can fill out the details of the Invoice:
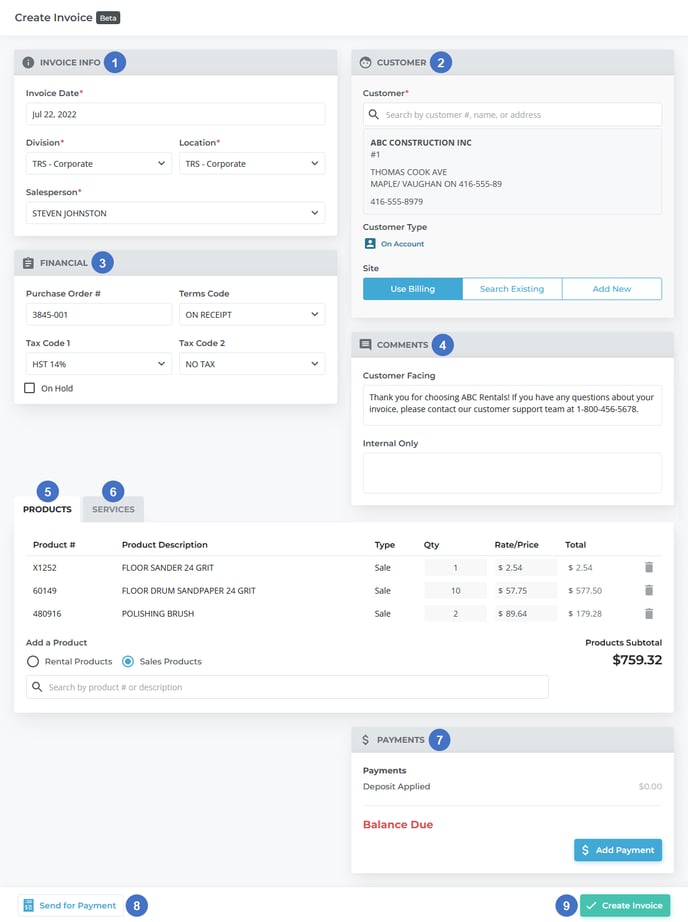
- Invoice Info Panel
Contains basic information about the Invoice, including its date, location, and the name of the salesperson who finalized the sale. - Customer Panel
Contains information about the Customer being charged, including whether they are a Cash Customer or an On Account Customer. - Financial Panel
Contains Purchase Order #, payment terms, and tax codes. - Comments Panel
Contains internal and customer-facing comments. Customer-facing comments will be included on the PDF and printed versions of the Invoice. - Products Tab
Contains the list of products that the Customer is purchasing. - Services Tab
Contains the list of additional services, such as cleaning, refueling, or dismantling services, that the customer is purchasing. - Payments Panel
Contains payment information and the Add Payment button. - Send for Payment Button
Use this to email a copy of the Invoice to the Customer in order to request payment. The email will contain a link the Customer can use to pay the Invoice online. For more information, see “Send an Invoice for Payment in Texada Web”. Clicking this button will also save the Invoice. - Create Invoice Button
Once you have entered the details of the Invoice, use this button to save the Invoice.
Required fields are marked with a red asterisk ![]() .
.
Once you have entered all relevant information for the Invoice, use the “Create Invoice” button to save the Invoice. Once the Invoice has been created, you will automatically be prompted to submit payment. See “Pay an Invoice in Texada Web” for more information.
Created Invoices can be viewed via the Invoice List. See “The Invoice List” for more information.
Detailed information on the individual panels within the Create Invoice screen can be found below.
Invoice Info Panel
Use this panel to enter basic information about the Invoice.
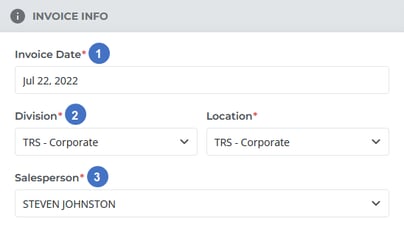
- Invoice Date
The Invoice’s posting date. By default, this is set to the current date (i.e. the date the Invoice was created), but this can be manually changed. - Division and Location
The Division and Location to which the Invoice applies. - Salesperson
The salesperson responsible for closing the sale for which this Invoice is being made.
Customer Panel
Use this panel to enter information about the Customer to whom the Invoice is being charged. Site information is also included in this panel.
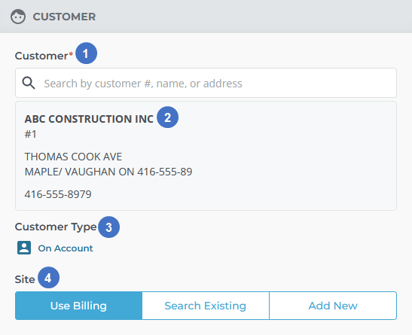
- Customer Search
Begin typing into this field to locate and select a Customer from the list of existing Customers. Note that a Customer must already exist in the system in order to associate them with a new Invoice. For information on creating a new Customer, see “Create a Customer in Texada Web”. - Customer Information
Once a customer has been selected, their basic information will appear below the search bar. Note that this information cannot be edited directly from the Create Invoice screen. - Customer Type
Once a Customer has been selected, their Customer type (Cash vs. On Account) will be displayed here. For more information on Cash Customers and On Account Customers, see “Cash Customers & On Account Customers” (SRM help file). - Site Selector
Use this to select the site to which this Invoice applies. Once a site has been chosen, its site number and address will be displayed below the selector. A number of options are available:- Use Billing: Use the primary (billing) address saved to the Customer’s profile. This is the same address that appears in this panel under the Customer’s name.
- Search Existing: Search through existing sites to find the appropriate site. If you select this option, two additional options will appear:
- Customer: Search through this Customer’s existing sites.
- Global: Search the list of global sites.
- Add New: If the desired site is not yet in the system, use this option to create a new site and associate it with this Invoice. See “Adding a New Site” for more details.
Adding a New Site
When you select “Add New” under Site in the Customer panel, the following pop-up will appear, allowing you to enter the details of the new site and associate it with the Invoice:
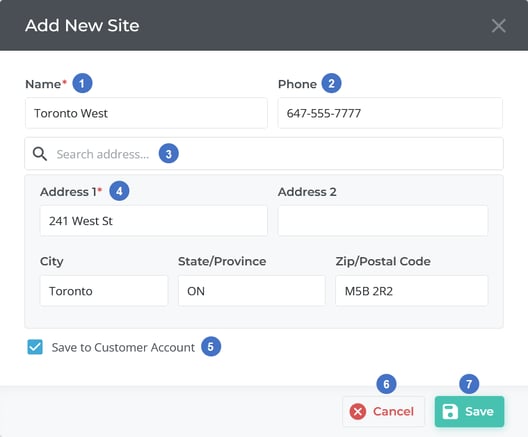
- Site Name
The name of the new site. - Phone
A phone number for an on-site contact person. - Search Bar
Begin typing into this search bar to search a list of valid addresses for the site in question. Once you have located the site’s address, select it to automatically fill out the form with the available information. It is highly advisable to use this search bar whenever possible, as it will ensure the site information is as accurate as possible. - Address Information
Once a site has been selected from the search results, its address information will appear here. Alternatively, address information can be entered directly into these fields. - Save to Customer Account Toggle
Check this box if you want to save this new site to the Customer’s profile. If this option is not selected, this site will only be associated with the current Invoice, and will not be saved. - Cancel Button
Close this window without saving any changes. - Save Button
Save this new site information to the Invoice and close this window. If “Save to Customer Account” is selected, this new site will also be saved to the Customer’s profile at this time (even if the Invoice is never created).
Financial Panel
This panel contains the payment terms and tax codes applicable to the Invoice. The Invoice can also be marked as On Hold from this panel.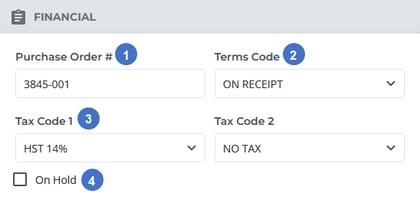
- Purchase Order #
The purchase order number associated with this Invoice. If your client has provided you with a purchase order number for this Invoice, it can be entered here for the purposes of cross-referencing the Invoice with the original purchase order. - Terms Code
Available for On Account Customers only. Use this field to select the payment terms for the Invoice; for example, due on receipt or due on the 15th of the following month. Terms codes are defined in Texada SRM, under System Maintenance → Configure System Settings → Customer Management → Terms Codes. For more information, see “Terms Codes” (SRM help file). - Tax Codes
The tax codes applicable to the Invoice. Up to 2 tax codes can be selected. Tax codes are defined in Texada SRM, under System Maintenance → Configure System Settings → Accounting → Tax Codes. For more information, see “Tax Codes” (SRM help file). - On Hold Toggle
Check this box to put the Invoice on hold. Putting an AR Invoice on hold will prevent it from being posted during the Daily Close process. Putting an AP Invoice on hold will prevent it from being posted when running the Post AP Invoices utility, and will also prevent it from being paid if it has already been posted. For more information, see “Hold/Release Current Invoices” (SRM help file).
Comments Panel
Use this panel to capture any additional information about the Invoice not covered elsewhere.
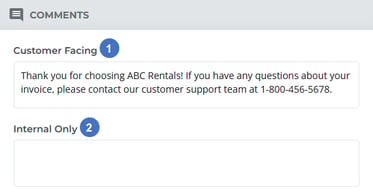
- Customer-Facing Comments
Comments entered here will be visible both to rental company staff in SRM/Web, and on the PDF Invoice available to the Customer. - Internal Only
Comments entered here will only be visible to rental company staff in SRM/Web.
Products Tab
Use this tab to select the Products purchased on this Invoice.
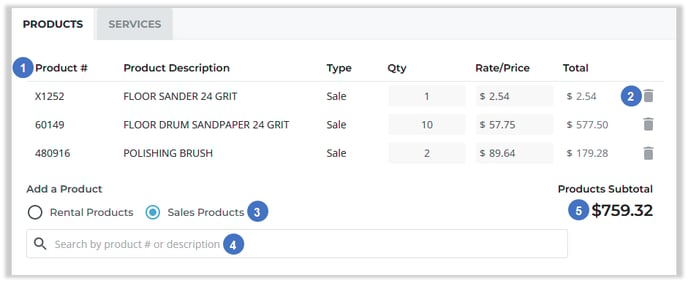
- Product Information
This table contains information on the Products (rental and sale) that have been added to this Invoice.- Product #: The unique identifier of the Product.
- Product Description: The Product’s description.
- Type: Whether this Product is being rented or sold. Note that rentals cannot be performed via Invoice creation; any Product added to your Invoice will be sold, not rented. If you wish to rent out a Product, you can do so by creating a Contract instead.
- Qty: The quantity purchased. If the Product is a bulk Product, this field will be editable.
- Rate/Price: The Product’s sale price. This field is editable. Using this field to change a Product’s price will only affect the current Invoice; the Product’s original price will continue to be used by default for all future Invoices.
- Total: The total cost of purchasing this Product. Equal to Qty * Rate/Price.
- Remove Product
Click the bin icon to remove a Product from the Invoice. - Rental Products/Sales Products Toggle
Use this to switch between adding Rental and Sale Products to the Invoice. The type of Products that appear when using the search bar is determined by this toggle. Note that rentals cannot be performed via Invoice creation, so any Rental Products added to the Invoice will instead be sold to the Customer. - Search Bar
Begin typing in this field to search for Products to add to the Invoice. This will search by Product #, Description, and Vendor Product Number. - Products Subtotal
The total pre-tax cost of all the Products included in the Invoice. This is equal to the sum of all totals for each individual Product. Note that Customer-level discounts do not apply when creating Invoices manually; the Rental or Sales Discount % on the Customer’s account will have no effect on this total.
Services Tab
Use this tab to select additional services to be added to the Invoice, such as refueling, relocating, or dismantling services.
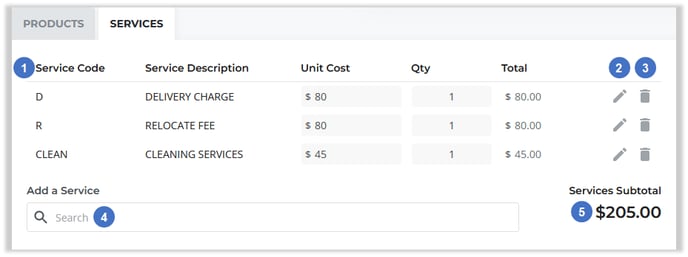
- Service Information
This table contains information on the services that have been added to this Invoice.- Service Code: The unique identifier for the service.
- Service Description: The service’s description.
- Unit Cost: The per-unit cost of the service.
- Qty: The quantity of the service ordered. This field will be editable if the “Prompt for Quality” option is selected for the service in Texada SRM. See “Service Codes” (SRM help file) for more information.
- Total: The total cost of the service. Equal to Unit Cost * Qty.
- Edit Service
Click the pencil icon to edit the details of a service. See “Edit Service Details” for more information. - Remove Service
Click the bin icon to remove a service from the Invoice. - Search Bar
Begin typing into this field to search for services to add to the Invoice. The services available in this list can be edited via the Service Codes screen in Texada SRM. See “Service Codes” (SRM help file) for more information. - Services Subtotal
The total pre-tax cost of all services included in the Invoice. This is equal to the sum of all totals for each individual service. Note that Customer-level discounts do not apply when creating Invoices manually; the Rental or Sales Discount % on the Customer’s account will have no effect on this total.
Edit Service Details
Clicking the pencil icon ![]() next to a service in the Services tab will open the Edit Service Details window, allowing you to modify some of the information for that service.
next to a service in the Services tab will open the Edit Service Details window, allowing you to modify some of the information for that service.
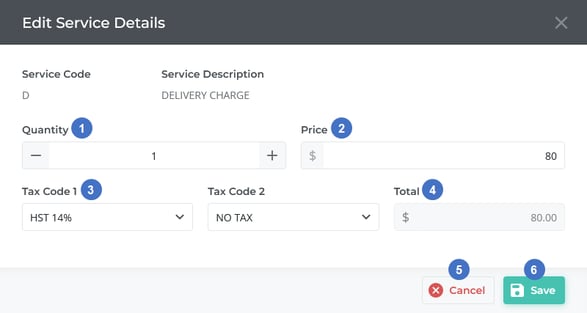
- Quantity
Use the - and + buttons to decrease or increase the quantity of the service ordered, or enter an amount directly into the field. - Price
The price per unit of the service. - Tax Codes
The tax codes applicable to the service. Up to 2 tax codes can be selected. - Total
The total pre-tax cost of this service. Equal to Quantity * Price. Note that as this is a pre-tax total, it will not be affected by selecting different tax codes. - Cancel Button
Use this to close the window without saving your changes. - Save Button
Use this to save your changes and close this window.
Payments Panel
This panel contains the total balance due and can be used to add a payment to the Invoice. Note that because the balance due is first calculated when the new Invoice is saved, it will be blank during Invoice creation.
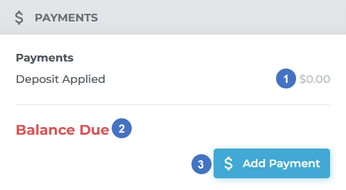
- Deposit Applied
The dollar amount of any deposits applied to the Invoice will be displayed here. This will be $0.00 for new Invoices. - Balance Due
The total balance due for the Invoice. This will be blank for new Invoices, and will be calculated as soon as the “Add Payment” or “Create Invoice” buttons are clicked. - Add Payment Button
Use this to add a payment to the Invoice. As payments cannot be added to Invoices that have not yet been created, clicking this button will also save the Invoice. For more information on paying Invoices, see “Pay an Invoice in Texada Web”.