
How to use the Damage Matrix Process to create and manage damage matrices for Asset inspections.
Quick Reference
- The Damage Matrix Process in the Texada WorkFlow web application allows you to create damage profiles for your equipment. These profiles, called damage matrices, are used when completing inspections in the WorkFlow mobile application: the damages the inspector is able to report are determined by the matrices established in the Damage Matrix Process.
- To reach the Damage Matrix Process, navigate to Damages Setup → Damage Matrix V3 using the navigation menu. Tips for navigating this Process:
- Use the buttons at the top of this screen to reload the list of damage matrices, upload a new damage matrix file, or validate a damage matrix file.
- Check or uncheck the checkboxes under the “Active” column then click “Apply” to enable or disable damage matrices.
- Check the checkboxes under the “Validate” column then click “Validate” to check your damage matrices for errors.
- Download or delete a damage matrix file by clicking the appropriate icon under the “Download” or “Delete” columns.
- Damage matrices are created and stored as Microsoft Excel (.xlsx) files. Tips for managing these files:
- Each row in a damage matrix file corresponds to a specific type of damage that can be sustained by a piece of equipment.
- Each column of a damage matrix represents a variable that can be used to distinguish one type of damage from another. These columns are predefined and must be included in a specific order.
- The “Areas” section of a damage matrix file can consist of any number of columns, with each column corresponding to a part of your equipment that might sustain damage. These damage areas must be built out with the assistance of Texada staff, as they are also used in mobile inspection diagrams.
- To download a sample Damage Matrix Template, click the button below:

Introduction
The Damage Matrix Process in the Texada WorkFlow web application allows you to create damage profiles for your equipment. These profiles, called damage matrices, indicate the types of damage the different models of equipment in your system might sustain. For example, a boom lift might suffer from leaking hydraulic lines; a backhoe might have a cracked bucket; and a rental car may have punctured or deflated tires.
When completing an inspection in the WorkFlow mobile application, the damages the inspector is able to report are determined by the matrices established in the Damage Matrix Process. For this reason, creating accurate and comprehensive damage matrices is a crucial component of performing effective equipment inspections with WorkFlow.
The following article provides an overview of the Damage Matrix Process, as well as a guide for creating suitable damage matrix files.
The Damage Matrix Process
The Damage Matrix Process allows you to upload and manage damage matrix files. To reach this process, log in to the Texada WorkFlow web application, then navigate to Damages Setup → Damage Matrix V3 using the navigation menu.
In order to access the Damage Matrix Process, the DAMAGES_ADMIN permission must be enabled for your User. If you don’t see the Damages Setup option in the navigation menu, contact your WorkFlow administrator or Texada support for assistance.
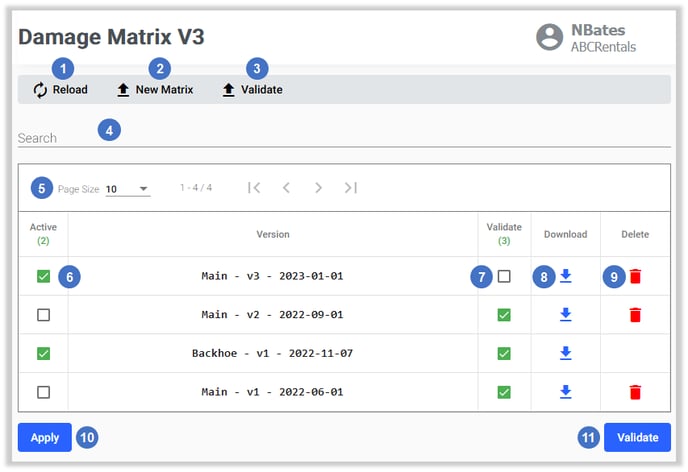
- Reload Button
Click to refresh the damage matrices table. - New Matrix Button
Click to upload a new damage matrix file. This will open the below window prompting you to drag and drop a file or select a file from your computer. Damage matrix files must be saved in Microsoft Excel (.xlsx) format and have specific formatting requirements. See “Create a Damage Matrix File” for more information.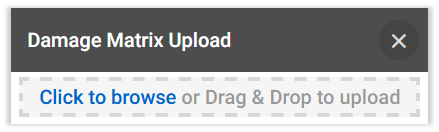
- Validate Button (Upload and Validate)
Click to upload a damage matrix file and validate whether it is formatted correctly. Once you have selected a file, the system will automatically validate it and return a message indicating the result. See “Validate a Damage Matrix File” for more information. - Search Bar
Begin typing to filter the list of damage matrices by the text entered. - Damage Matrices Table
Contains a list of all the damage matrices that have been uploaded to the system. For more information on navigating and managing this table, see “Working with Tables in Texada WorkFlow”. - Active Checkbox
Check the checkbox on the left side of a damage matrix’s row to mark it as active. Active matrices will contribute to the reporting options available when completing inspections; inactive matrices will remain in the system but will have no effect. Once you have activated and deactivated matrices as desired, click the “Apply” button (10) to save your changes. - Validate Checkbox
Check the checkbox under the “Validate” column to mark a matrix for validation. By selecting one or more matrices, then clicking the “Validate” button (11), you can validate uploaded matrices for correctness. See “Validate a Damage Matrix File” for more information. - Download Button
Click the blue arrow-1.png?width=20&height=24&name=Download%20Icon%20WorkFlow%20(Blue)-1.png) under the “Download” column to download a damage matrix as an .xlsx file. This is useful for downloading, modifying, then re-uploading an existing matrix. Depending on your browser settings, you may be prompted to select a location for the downloaded file, or it may be automatically downloaded to your Downloads folder.
under the “Download” column to download a damage matrix as an .xlsx file. This is useful for downloading, modifying, then re-uploading an existing matrix. Depending on your browser settings, you may be prompted to select a location for the downloaded file, or it may be automatically downloaded to your Downloads folder. - Delete Button
Click the red bin icon under the “Delete” column to delete a damage matrix. Deleting a damage matrix in this way will cause any prior Inspections using this matrix to be lost, so it is recommended to exercise caution when using this feature and not to delete any matrices that have been used on Inspections in the past. If you no longer wish to use a damage matrix, it is recommended to deactivate it using the Active checkbox (6) rather than deleting it.
 - Apply Button
Click to apply any pending matrix activations / deactivations (per the “Active” checkbox). This button is only visible when pending changes exist. - Validate Button (Validate Selected)
Click to validate the selected matrices for correctness (per the “Validate” checkbox). This button is only visible when you have selected one or more matrices to be validated. See “Validate a Damage Matrix File” for more information.
Create a Damage Matrix File
Damage matrices are created and stored as Microsoft Excel (.xlsx) files. The purpose of these files is to catalog all the types of damage that might be sustained by your equipment. To download a sample damage matrix, click the button above. You can use this file to build out your own damage matrices.
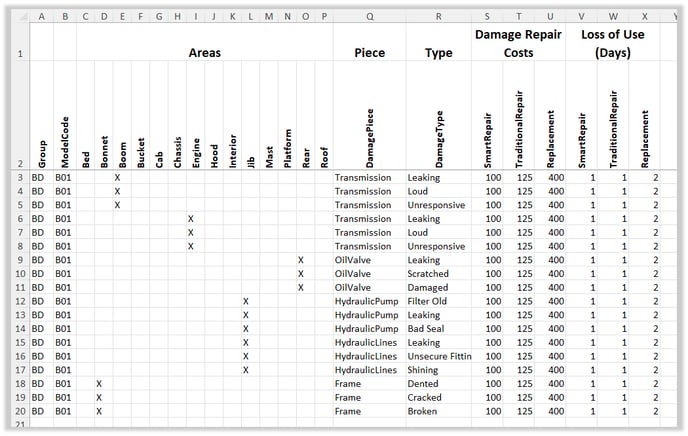 A sample damage matrix file.
Damage matrix files may appear complicated, but no matter how many different types of equipment you service, they always follow the same basic format.
Each row in a damage matrix corresponds to a specific type of damage that can be sustained by a piece of equipment. For example, row 9 in the image above indicates that the oil valve located in the rear section of Products with group BD and model B01 can suffer a damage type of “Leaking”.
Each column of a damage matrix represents a variable that can be used to distinguish one type of damage from another: which part of which product can sustain the damage, what kind of damage it is, and what the estimated repair or replacement costs are. The table below provides a breakdown of these columns.
Because the “Areas” section of the file (columns C-P in the example above) can occupy any number of columns, the column numbers in the table below will not exactly match those of your own damage matrix files. This is expected, and your file will be valid as long as it contains all of the below sections in the order they are described here.
|
Column |
Section |
Name |
Description |
|
A |
Group |
Group |
The Product’s Group. This is the alphanumeric code that appears in the “Group” field for a Product in the Asset Management Process. |
|
B |
Model |
ModelCode |
The Product’s Model. This is the alphanumeric code that appears in the “Model” field for a Product in the Asset Management Process. |
|
C-P |
Areas |
[User-defined] |
The Areas of your Products which may sustain damage. This section can consist of any number of columns, with each column corresponding to a possible damage Area such as “Boom”, “Carriage”, “Hood”, “LeftFrontDoor”, “RightFrontDoor”, etc. These damage Areas must be developed alongside a member of Texada staff, as they are also used in the inspection diagrams associated with each Product: when completing an inspection in the WorkFlow mobile app, you are able to tap different sections of the inspection diagram to indicate where damage was sustained. These tappable sections are linked to the Areas in your damage matrix files. At the time of implementation, your client services representative will assist you in building out a list of damage Areas. If you have any questions about this process, please contact Texada support. When adding a new row to your damage matrix file, place an uppercase “X” in the cell under a damage Area to indicate that the damage corresponds to that Area. For example, in the image above, the “X” in cell 18-D indicates that the damage described in row 18 applies to the “Bonnet” damage Area. Rows with no “X” will be ignored by the system. Each row may only contain one “X”. |
|
Q |
Piece |
DamagePiece |
The part of the Product that has sustained damage. This column allows you to indicate the specific part of a damage Area that might have been damaged. For example, a “Wheel” Area might include the DamagePieces “Tire”, “Tread”, “Rim”, “Hub”, and “Lugs”. |
|
R |
Type |
DamageType |
The type of damage that has been sustained by the DamagePiece. This column allows you to specify the type of damage that a DamagePiece has suffered. For example, a “Tire” DamagePiece might have possible DamageTypes of “Punctured”, “Cut”, or “Deflated”. |
|
S |
Damage Repair Costs |
SmartRepair* |
The estimated cost of performing a smart repair on this type of damage. |
|
T |
TraditionalRepair* |
The estimated cost of performing a traditional repair on this type of damage. |
|
|
U |
Replacement* |
The estimated cost of replacing the damaged part entirely. |
|
|
V |
Loss of Use (Days) |
SmartRepair* |
The estimated number of days it will take to complete a smart repair on the damaged part. |
|
W |
TraditionalRepair* |
The estimated number of days it will take to complete a traditional repair on the damaged part. |
|
|
X |
Replacement* |
The estimated number of days it will take to replace the damaged part. |
* The number and names of the different repair types in the table above (smart repair, traditional repair, and replacement) can be customized for your system.
The below image illustrates the relationship between the Damage Matrix .xlsx file, the Asset Management screen, and inspections in the Texada WorkFlow mobile app. Click to see the full-size image.

The Group and Model columns correspond to the Product’s basic information per the Asset Management Process. The Areas columns correspond to the different selectable areas on the inspection diagram. The Piece, Type, and Damage Repair Costs columns correspond to the Piece, Type, and Severity drop-downs in the WorkFlow mobile app.
Validate a Damage Matrix File
There are two different ways to validate a damage matrix file to ensure that it is formatted correctly:
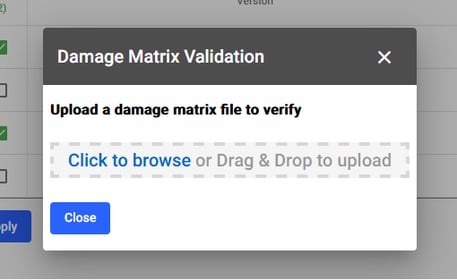
- To validate a file before uploading it, click the Validate button
 near the top of the screen, then drag and drop a file into the window or click “Click to browse” to select a file from your device. Once you have selected a file, the system will automatically check it for errors.
-
To validate one or more files after uploading them, check the checkboxes under the “Validate” column for the files you want to validate, then click the Validate button
 in the bottom-right corner of the screen. The system will check all of the selected files for errors.
Validation Results
The table below lists the responses you can expect to see when performing validation on a damage matrix file.
Note that the system only performs validation on rows that have an “X” under one of the Areas columns, since rows that are missing an “X” will not appear on any mobile inspections.
|
Result |
Meaning |
|
No errors found |
The uploaded/selected file(s) have no formatting or data errors and are ready to be used as damage matrices. |
|
Invalid Damage Matrix |
The uploaded/selected file(s) have formatting or data issues and cannot be used as damage matrices in their present state. This basic error will be followed by additional messages providing details on the errors found. |
|
Duplicated row: DamageMatrixData (row details) |
This error indicates the row specified in parenthesis is a duplicate of another row in the same file. |
|
DamageMatrixData (row details) has error: empty model |
This error indicates that the row specified in parenthesis is missing a ModelCode value. |
|
DamageMatrixData (row details) has error: empty piece |
This error indicates that the row specified in parenthesis is missing a DamagePiece value. |
|
DamageMatrixData (row details) has error: empty type |
This error indicates that the row specified in parenthesis is missing a DamageType value. |