
An overview of the Asset Management tool in Texada Mobile.
Quick Reference
- The Asset Management feature of Texada Mobile gives mobile Users a number of important tools for managing Assets on the road. To reach this tool, open the User Menu by tapping the hamburger icon
 in the top-left corner of the screen, then tap “Asset Management”. From here, you can either begin typing into the search bar to filter the list of Assets, or scan an Asset’s barcode by tapping the barcode icon
  .
. - The Asset Management screen is divided into three tabs:
- Info: Contains basic information about the Asset, including its serial number, fuel type, Maintenance Schedule information, and current status.
- Inspections: Contains the Inspection history of the Asset and allows you to fulfill new standalone Inspections.
- Work Orders: Contains the Work Order history of the Asset and allows you to create new Work Orders.
Introduction
The Asset Management feature of Texada Mobile gives mobile Users a number of important tools for managing Assets on the road. This feature allows you to:
- View the details of an Asset, including its fuel type, serial number, Maintenance Schedule information, and current status;
- View the inspection history of an Asset;
- Submit a new standalone Inspection for an Asset;
- View the Work Order history of an Asset;
- Create a new Work Order for an Asset.
Asset Management
To reach the Asset Management tool:
- Log in to Texada Mobile and open the User Menu (tap the hamburger icon in the top-left corner of the screen).
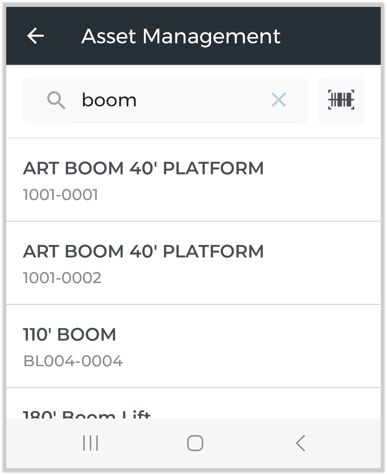
- Tap “Asset Management” to open the Asset search screen. You have two options for locating the Asset you would like to manage:
- Begin typing into the search bar to search the list of Assets by the text entered. This will filter Assets by Product # and Description.
- If you have access to the Asset’s barcode, tap the barcode icon to the right of the search bar to open your device’s camera and scan it. Align the barcode with the red horizontal line in the center of your device’s camera. The barcode will be scanned automatically as soon as it is recognized, and the search bar will be populated with the barcode’s contents.
- Once you have located the Asset you would like to manage, tap it to open the Asset Management screen.
The Asset Management Screen
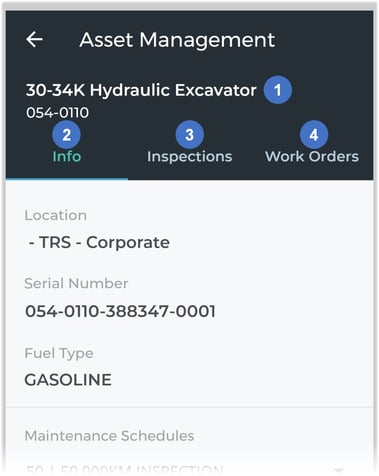
- Asset Description and Product #
The Asset’s Description and Product #. - Info Tab
Tap to switch to the Info tab. This tab contains basic information about the Asset, including its serial number, fuel type, Maintenance Schedule information, and current status. - Inspections Tab
Tap to switch to the Inspections tab. This tab contains the Inspection history of the Asset and allows you to fulfill new standalone Inspections. - Work Orders Tab
Tap to switch to the Work Orders tab. This tab contains the Work Order history of the Asset and allows you to create new Work Orders.
Info Tab
This tab contains basic information about the Asset.
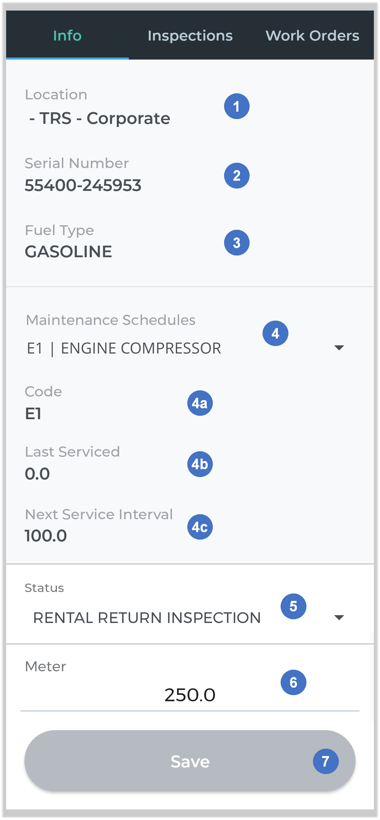
- Location
The Asset’s Location. - Serial Number
The Asset’s serial number. This comes from the Serial # field on the Asset’s Asset Tag in Texada SRM. - Fuel Type
The Asset’s fuel type. This is determined by the Fuel Type field in the Asset’s Make / Model and Re-Order Information window in Texada SRM. The list of possible fuel types is also managed in Texada SRM, at System Maintenance → Configure System Settings → Operations → Fuel Types. - Maintenance Schedules Selector
Tap on the drop-down to view the list of Maintenance Schedules associated with the Asset’s Product Group. The Maintenance Schedules associated with each Group are managed in Texada SRM, at System Maintenance → Configure System Settings → Operations → Groups → Maintenance Schedule.
Select a Maintenance Schedule to view its Code, Last Serviced, and Next Service Interval values.- Code
The schedule’s Maintenance Code. Maintenance codes are managed in Texada SRM, at System Maintenance → Configure System Settings → Operations → Repair/Maintenance Codes. - Last Serviced
The interval at which the Asset was last serviced in accordance with this Maintenance Schedule. Depending on the Maintenance Schedule’s type, this may be measured in days or in meter units. - Next Service Interval
The interval at which the Asset is next due to be serviced. This may be measured in days or in meter units.
- Code
- Status Selector
The Asset’s current status. Tap on the drop-down to select a new status. Status codes are managed in Texada SRM, at System Maintenance → Configure System Settings → Operations → Product Status Codes. - Meter
The Asset’s current meter reading. This field will only appear for metered Assets. Tap to update the meter reading. Note that it is not possible to submit a lower reading than the existing value in Texada Mobile. This can be done from the Rental Inventory utility in Texada SRM. - Save Button
If you have updated the Asset’s status or current meter reading, tap this button to save your changes. This button will only be enabled if pending changes exist.
Inspections Tab
This tab contains the Inspection history of the Asset and allows you to submit new standalone Inspections.
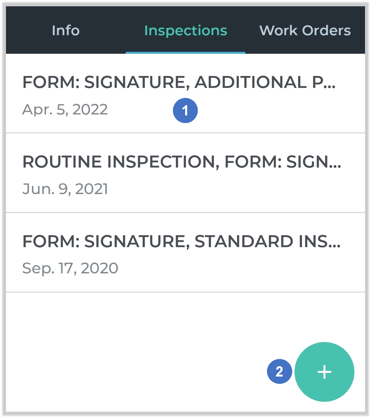
- Inspection
The Inspection history of the Asset is shown here. Tap on an Inspection to review it. - Create Inspection
Tap the green plus button to create a new standalone Inspection for the Asset. See “Complete an Inspection in Texada Mobile” for more information.
Work Orders Tab
This tab contains the Work Order history of the Asset and allows you to create new Work Orders.
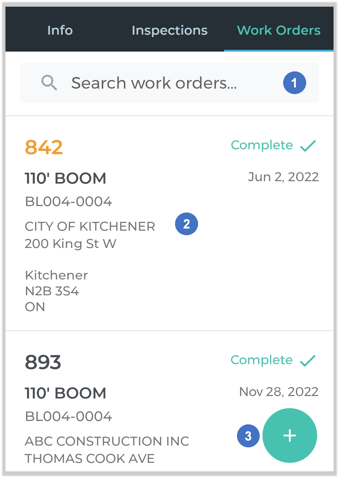
- Search Bar
Begin typing to filter the list of Work Orders by the text entered. This will search by Work Order #, Customer name, and Site address. - Work Order
The Work Order history of the Asset is shown here. Tap on a Work Order to review it. See “View and Edit a Work Order in Texada Mobile” for more information. - Create Work Order
Tap the green plus button to create a new Work Order for the Asset. See “Create a Work Order in Texada Mobile” for more information.