
In This Article
Introduction
A Project is a record of a large-scale construction project which has the potential to generate multiple sales and service opportunities over a period of time. The following article will cover how to create new Project records in Equipment CRM, as well as how to edit existing Projects.
Create a Project
There are two ways to create a Project in Equipment CRM: from the Project List and from a Dodge project.
From the Project List
To create a Project from the Project List, follow the steps below.
- Log in to Equipment CRM (Sales Rep or Executive) and select On The Go → Projects from the top navigation menu.
- Click the New Project button
 in the top-right corner of the screen to open the Create Project window.
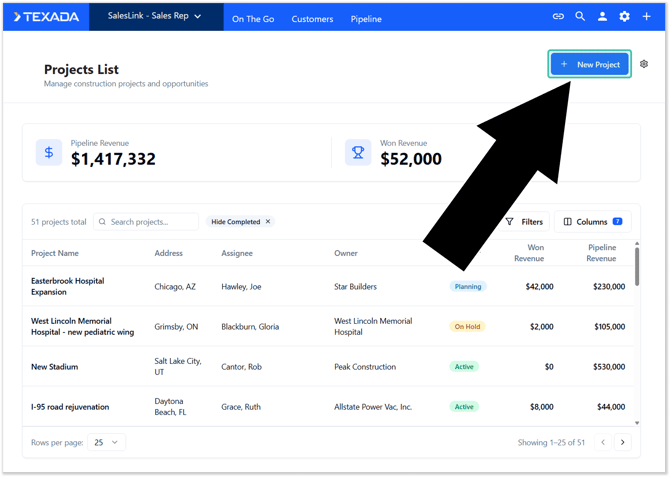
- Fill out the details for your project, then click “Create Project”.
From a Dodge Project
Creating an Equipment CRM Project based on a Dodge project allows you to pre-fill information from the Dodge project, including its Primary Stage, Primary Project Type, and Ownership Type. See “Project Settings - Dodge Project Mappings” to learn how Dodge project fields can be mapped into Equipment CRM.
To create a Project based on a Dodge project, follow the steps below.
- Log in to Equipment CRM (Sales Rep or Executive) and navigate to the Dodge Report screen by selecting Pipeline → Dodge Report from the top menu.
- Click the “Create Project” button
 next to the Dodge project on which you want your Equipment CRM Project to be based. This will open the Create Project window with information from that Dodge project pre-filled.
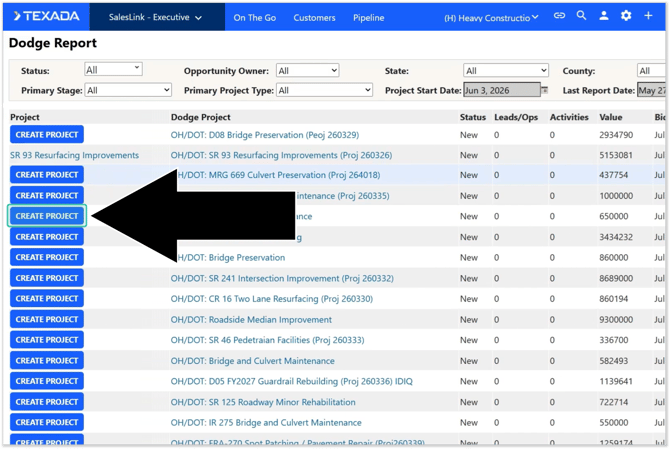
- Fill out the remaining details for your project, then click “Create Project”.
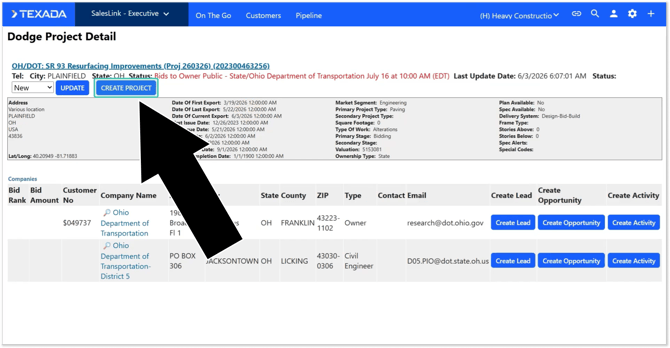
If you see a hyperlinked Project name instead of the “Create Project” button, an Equipment CRM Project based on the selected Dodge project has already been created. Dodge projects can only be associated with one Equipment CRM Project at a time.
The “Create Project” button can also be found in the top-left corner of the Dodge Project Detail page. This button functions identically to the one in the Dodge Report.
Edit a Project
To edit a Project’s details, follow the steps below.
- Log in to Equipment CRM (Sales Rep or Executive) and navigate to the Project List by selecting On The Go → Projects from the top navigation menu.
- Locate the Project you’d like to edit and click on it to open the Project Details page.
- Click the Edit button
 in the top-right corner of the Project Information panel. This will open the Edit Project Details window.
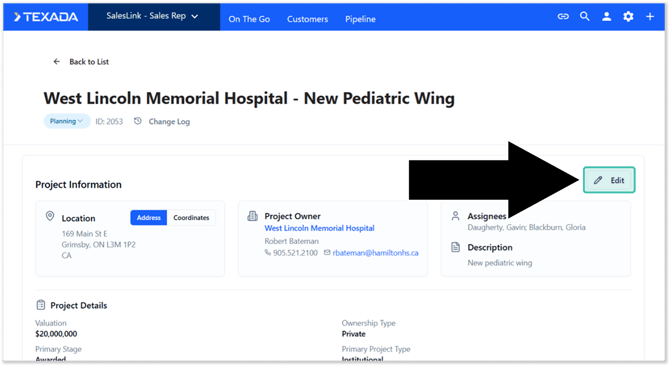
- Make your edits as desired. Once you are finished, click “Save Changes”.
The Create Project / Edit Project Details Window
The Create Project / Edit Project Details window is used whenever you create a new Project or edit an existing Project. Note that the appearance of this window will vary slightly depending on which action you’re performing.
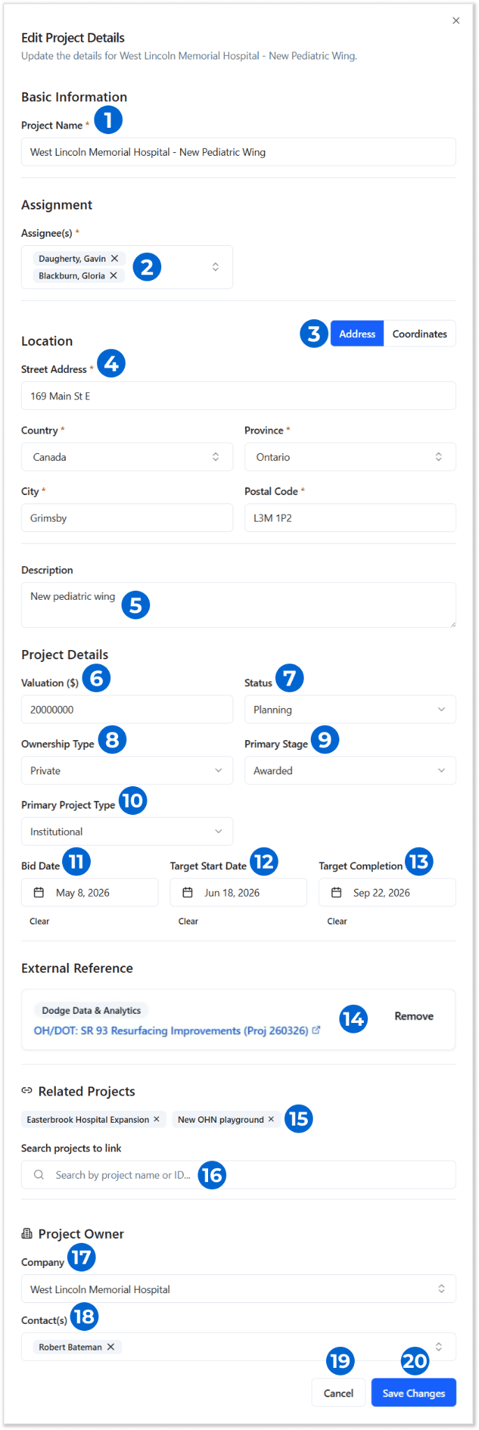
- Project Name
The Project’s name. - Assignees
The Equipment CRM user(s) currently assigned to this Project. Begin typing into this box to search for an Equipment CRM user to assign to the Project. Click the “x” icon next to an existing assignee to unassign them from the Project. - Address / Coordinates Toggle
Use these buttons to toggle between viewing the Project’s location as a street address or as latitude/longitude coordinates. - Project Location
The Project’s location. This can be expressed as a street address or as a set of coordinates. In Address mode, the labelling of the “Province/State” and “Postal Code/Zip Code” fields will change based on the value of the Country field. - Description
A brief description of the Project. - Valuation
The Project’s total valuation. - Status
The Project’s current status. Project statuses can be managed via the Settings menu, under Manage Dropdowns → Project Status. - Ownership Type
The Project’s ownership type (private, public, governmental, etc.) Ownership types can be managed via the Settings menu, under Manage Dropdowns → Ownership Type. - Primary Stage
The Project’s primary stage (pre-construction, bidding, completed, etc.) Primary stages can be managed via the Settings menu, under Manage Dropdowns → Primary Stage. - Primary Project Type
The Project’s primary project type (commercial, residential, industrial, etc.) Primary project types can be managed via the Settings menu, under Manage Dropdowns → Primary Project Type. - Bid Date
The Project’s bid deadline date. Click the “Clear” button below this field to empty it. - Target Start Date
The Project’s target start date. Click the “Clear” button below this field to empty it. - Target Completion
The Project’s target completion date. Click the “Clear” button below this field to empty it. - External Reference
The Dodge project associated with this Project, if any.
If this Project was created from a Dodge project, the name of that project will be listed here. Click on the Dodge project’s name to view its details. Click the “Remove” button to disassociate the Dodge project from this Project.
If this Project is not yet associated with a Dodge project, a search bar will be displayed. Begin typing into this search bar to search the list of Dodge projects, then select one to associate it with this Project. - Related Projects
Other Equipment CRM Projects related to the current Project are listed here. Click the “x” icon next to a related Project to disassociate it from the current Project. - Search Projects to Link
Begin typing into the search bar to search the list of Equipment CRM Projects, then click on a Project to associate it with the current Project. - Project Owner - Company
Begin typing into the search bar to search the list of Customers in Equipment CRM, then click on a Customer to designate them as the owner of this Project. This must be an existing Customer in Equipment CRM. - Project Owner - Contacts
Begin typing into the search bar to search the list of contacts at the Project Owner company, then select one or more contacts to designate them as th primary contacts for this Project. Click the “x” icon next to a contact to disassociate them from the Project. - Cancel Button
Click to close the Edit Project Details window without saving your changes. - Create Project / Save Changes Button
Click to save your changes and close the window.