How to add a Part to a Work Order in Texada Mobile.
Quick Reference
- A Work Order is a document indicating that an Asset needs servicing, either for repairs or routine maintenance. In Texada Mobile, Mechanics can add billable items to a Work Order to track the resources consumed during the repair. These billable items fall into three categories: Parts, Labor, and Services.
- To add a new Part to a Work Order in Texada Mobile:
- Log in to Texada Mobile and open the Work Order to which you want to add a Part. Tap “Items” at the top of the screen to open the Items tab.
- Tap the blue plus icon
 next to the Parts header to add a new Part. If Maintenance Codes are enabled for your system, multiple Parts headers will exist - make sure you have selected the one that corresponds to your desired Maintenance Code.
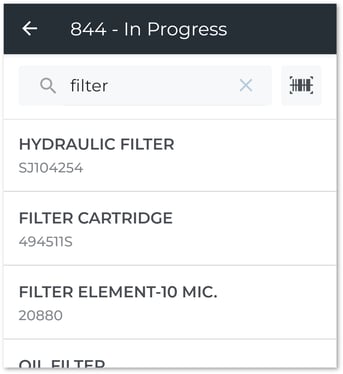
 - Begin typing into the search bar to filter the list of Parts, then tap on a Part to select it. You can also tap the barcode icon
 to open your device’s camera and scan the Part’s barcode.
 - Fill out the information for the Part, then tap the “Save” button to add it to the Work Order.
- When adding a Part to a Work Order, two different amount fields are available:
- Issued: The number of Parts consumed on the Work Order. Issuing Parts on a Work Order will remove them from inventory.
- Requested. The number of Parts that are needed to complete the Work Order but are not available. Adding a Part to a Work Order with a Requested amount will post a new entry to the Requested Parts List page in Texada Web, informing dispatchers of your request. Once the request has been fulfilled, the Requested amount should be reduced to 0.
- To remove a Part from a Work Order:
- Open the Work Order you want to edit and switch to the Items tab.
- Locate the Part you want to edit and tap on it to view its details.
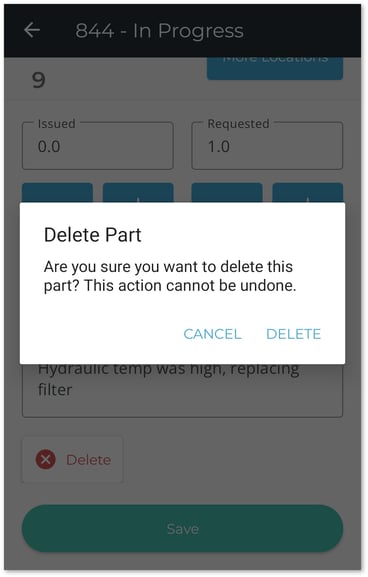
- Scroll down to the bottom of the details screen and tap the Delete button
 .
. - A warning message will appear prompting you to confirm that you want to remove the Part from the Work Order. Tap “DELETE” to confirm.
Introduction
A Work Order is a document indicating that an Asset needs servicing, either for repairs or routine maintenance. Once a Work Order has been created in Texada SRM, Web, or Mobile, it is assigned to a Mechanic for completion. The Mechanic then completes and submits the Work Order using Texada Mobile.
In Texada Mobile, Mechanics can add billable items to a Work Order to track the resources consumed during the repair. These billable items fall into three categories: Parts, Labor, and Services.
The following article will detail the process of adding a Part to a Work Order in Texada Mobile.
Add a Part to a Work Order
- Log in to Texada Mobile and open the Work Order to which you want to add a Part. See “Browsing Work Orders in Texada Mobile” and “View and Edit a Work Order in Texada Mobile” for more information.
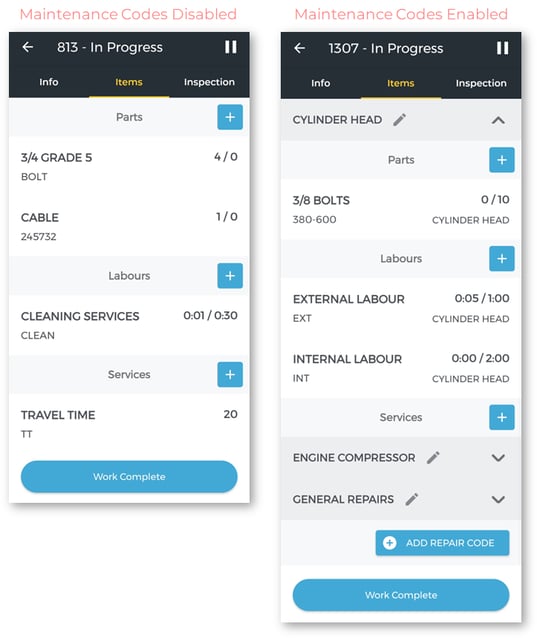
- Tap “Items” at the top of the screen to open the Items tab. Note that the appearance of this tab will vary depending on whether the “Prompt for Maintenance Codes on W.O. Details” option in Texada SRM has been enabled:
- If this option is enabled, billable items will be organized by Maintenance Code, with each code having its own Parts, Labor, and Services sub-categories. In this case, each Part is added under a particular Maintenance Code instead of the Work Order as a whole. Tap the down arrow
 next to a Maintenance Schedule to expand it and add billable items.
 - If this option is disabled, the Items tab will only contain the Parts, Labor, and Services categories, and all Parts will be added under the Work Order itself.
- If this option is enabled, billable items will be organized by Maintenance Code, with each code having its own Parts, Labor, and Services sub-categories. In this case, each Part is added under a particular Maintenance Code instead of the Work Order as a whole. Tap the down arrow
- Tap the blue plus icon next to the Parts header to add a new Part. If Maintenance Codes are enabled, make sure you are adding the Part under the desired Maintenance Code.
- Begin typing into the search bar to filter the list of Parts, then tap on a Part to select it. If you have the Part in front of you, you can also tap the barcode icon to open your device’s camera and scan the Part’s barcode.
- Fill out the information for the Part, then tap the “Save” button to add it to the Work Order. See below for more information on the individual fields on this screen.
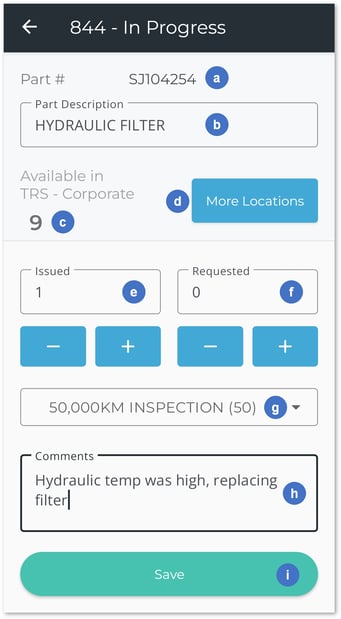
- Part #
The Part’s number. This field is read-only. - Part Description
The Part’s description. This field is read-only. - Amount Available in my Location
The number of this Part available at your current Location (i.e. the Location of the Work Order). If you attempt to issue Parts in an amount greater than what is currently available, you will receive an “Insufficient Quantity Available” warning when you tap the Save button. - More Locations Button
Tap to view a breakdown of this Part’s availability at other Locations. While it is not possible to add a Part from another Location to a Work Order, this feature can provide insight as to where the desired Part can be found. - Amount Issued
The number of this Part that has been issued (consumed) on the Work Order. Use the plus and minus buttons to increase or decrease the amount, or tap the text field to enter an amount directly. It is possible to enter partial quantities, such as 0.5, this way. This is useful for Parts such as oil or lubricant for which it is possible to consume partial quantities.
When issuing a serialized Part, you will be prompted to select the serial number for the issued Part, and the Amount Issued will be set to 1.
When issuing a Part with a Cost Type of “Prompt”, you will be prompted to enter the cost for the issued Part.
Once you have finished adding the Part to the Work Order, the Amount Issued will be subtracted from the Quantity On Hand to indicate that the issued Parts have been consumed and are no longer available. For example, if you have 100 filters in inventory and issue 3 of them on a Work Order, the number in inventory will be updated to 97. - Amount Requested
The number of this Part that has been requested in order to complete the Work Order. Use the plus and minus buttons to increase or decrease the amount, or tap the text field to enter an amount directly. It is possible to enter partial quantities, such as 0.5, this way. This is useful for Parts such as oil or lubricant for which it is possible to consume partial quantities.
When requesting a serialized Part, the Amount Requested will be set to 1.
Adding an Amount Requested for a Part indicates that you have identified a need to use this Part on the Work Order, but did not have sufficient quantity available to complete your work. This will create a new entry on the Requested Parts List page in Texada Web, informing dispatchers of your request. When a dispatcher reviews and fulfills the request, a comment will be left on the Work Order to inform you that the Part is available and work can continue. - Maintenance Code
The Maintenance Code under which this Part will be added. This field is only visible if Maintenance Codes are enabled. - Comments
Any additional comments about the Part. - Save Button
Tap to save your changes and add the Part to the Work Order.
- Part #
Amount Requested and Amount Issued
When adding a Part to a Work Order, two different amount fields are available: Issued and Requested. The amount Issued represents the number of Parts consumed on the Work Order, while the amount Requested represents the number of Parts that are needed to complete the Work Order but are not available.
Adding a Part to a Work Order with a Requested amount will post a new entry to the Requested Parts List page in Texada Web, informing dispatchers of your request. Once that request has been fulfilled, a comment will be left on the Work Order informing you that the Part is available. This will not affect the Issued or Requested amounts: you will need to update these amounts manually.
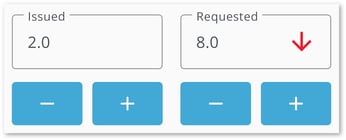
To update these amounts, open the Work Order and switch to the Items tab. Locate the Part you want to edit and tap on it to view its details (step 5 above). Tap the plus button ![]() under “Issued” to increment the number of Issued Parts. This will automatically decrement the number of Requested Parts, as indicated by a red down arrow
under “Issued” to increment the number of Issued Parts. This will automatically decrement the number of Requested Parts, as indicated by a red down arrow ![]() in the Requested box:
in the Requested box:
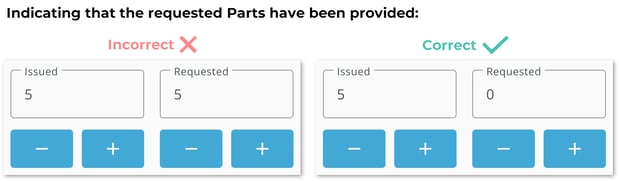
A Requested amount for a Part indicates an outstanding request for Parts: as long as the Requested amount is greater than 0, the Mechanic is still waiting on additional Parts to complete the Work Order. This means that once the required Parts have been provided, the Mechanic should always reduce the Requested amount to 0. A common mistake is to leave the Requested amount as-is while incrementing the Issued amount, but this creates the mistaken impression that more Parts are still required.
Remove a Part from a Work Order
- Open the Work Order you want to edit and switch to the Items tab.
- Locate the Part you want to edit and tap on it to view its details.
- Scroll down to the bottom of the details screen and tap the Delete button
 .
. - A warning message will appear prompting you to confirm that you want to remove the Part from the Work Order. Tap “DELETE” to confirm.