
An overview of the Time Tracker page in Texada Web.
Quick Reference
- The Time Tracker is a feature of Texada Web and Texada Mobile that allows users of these programs to track the amount of time they have spent in the system.
- The Time Tracker page in Texada Web allows you to review and edit Time Tracker entries logged by other users, as well as record new ones.
- To reach the Time Tracker page, select the Time Tracker option in the left side menu.
- Use the controls at the top of the page to sort, filter and export Time Tracker entries:
- Use the date selectors to filter entries by their Start Time.
- Select an Operator from the drop-down, or click on an Operator’s name in the summary section, to only view entries for that Operator.
- Click “Export” to export the Time Tracker table.
- Click the “Add New” button to log a new entry in the Time Tracker table.
- Click on the pencil icon
 next to an entry’s Start Time or End Time to edit it.
 - Click the bin icon
 next to an entry to delete it.
Introduction
The Time Tracker is a feature of Texada Web and Texada Mobile that allows users of these programs to track the amount of time they have spent in the system. This feature can provide valuable insights on user activity for the purposes of payroll or analytics. For more information on the Time Tracker, see “About the Time Tracker”.
The Time Tracker page in Texada Web allows you to review and edit Time Tracker entries that have been logged by other users, as well as record new ones. To reach the Time Tracker page, select the Time Tracker option in the left side menu.
The Time Tracker Page
![]()
- Date Selector
Use this selector to filter entries in the Time Tracker table by the dates entered. Any entries whose Start Time falls between the two dates selected here will be displayed in the table below. For example, if June 10th to June 15th is selected, any entries whose Start Time falls between 12:00am June 10th and 11:59pm June 15th will be displayed. Note that only the Start Time is taken into account; entries ending, but not starting between the two dates will not be included.
Click on the start and end dates to edit each date individually, or use the drop-down list to select from predetermined ranges of dates:- Today: From the current date to the current date.
- Yesterday: From the previous date to the previous date.
- Last 7 Days: From 7 days ago to the current date.
- Last 30 Days: From 30 days ago to the current date.
- This Month: From the first day of the current month to the last day of the current month.
- Last Month: From the first day of the previous month to the last day of the previous month.
- Operator Selector
Select an Operator’s name from this drop-down to only view entries logged by that Operator. If an Operator’s name is grayed out, it means that Operator has no entries logged for the current time period. - Export Button
Use this button to export the contents of the Time Tracker table as an .xlsx or .csv file. The data included in the file you receive will be based on the current appearance of the Time Tracker table. See “Exporting the Contents of a Table” for more information. - Add New Button
Use this button to record a new entry in the Time Tracker table. See “Add a New Time Tracker Entry” for more information. - Operator Summary
This section displays the names of the Operators who have at least one entry logged for the current time period. The number next to each name is the total time logged for that Operator for the current time period. For example, in the image above, Laurie Green has a total of 5 hours and 30 minutes logged for the dates of May 17, 2022 to June 15, 2022.
Click on an Operator’s name in this section to only display Time Tracker entries for that Operator. - Time Tracker Table
This table displays all of the Time Tracker entries that match the current date range and filtering options. The appearance of this table can be modified in a number of ways; see “Working with Tables” for more information. - Time Tracker Entry
Each entry logged by an Operator in Texada Web or Mobile appears as a row in the Time Tracker table. Entries can be edited from this screen; see “Edit a Time Tracker Entry” for more information.
Time Tracker Table - Columns
The Time Tracker table comprises the following columns:
- Avatar: The Operator’s profile avatar or initials.
- Operator: The Operator’s name.
- Start Time: The entry’s start date and time. This value can be edited by clicking the pencil icon next to it; see “Edit a Time Tracker Entry” for more information.
- End Time: The entry’s end date and time. This value can be edited by clicking the pencil icon
next to it; see “Edit a Time Tracker Entry” for more information.
- Hours: The length of the shift, represented in fractions of an hour. For example, 4.25 hours is equivalent to 4 hours and 15 minutes.
- Duration: The length of the shift, represented in hours and minutes.
- Manage: Contains any buttons or icons that allow you to modify the entry, such as the bin icon
for deleting an entry from the table, or the Confirm and Cancel buttons when creating a new entry.
Add a New Time Tracker Entry
To add a new entry to the Time Tracker table, follow the steps below.
- Click the “Add New” button in the top-right corner of the screen. This will insert a new row at the top of the Time Tracker table with editable Operator, Start Time, and End Time fields.

- Select an Operator from the drop-down list.
- Select a Start Time. You can click on the calendar icon
 to select a date from the calendar, or edit it directly in the text field. The Start Time must be earlier than the End Time.
 - Select an End Time. You can click on the calendar icon to select a date from the calendar, or edit it directly in the text field. The End Time must be later than the Start Time.
- Click “Confirm” to save the new record. The Time Tracker table will refresh, automatically calculating the “Hours” and “Duration” values for the record.
Edit a Time Tracker Entry
Existing entries in the Time Tracker table can be edited in the following ways:
- Edit Start or End Time
Click the pencil icon next to the Start Time or End Time fields to edit them. Click on the calendar icon to select a new date from the calendar, or edit it directly in the text field. Once you are finished, click “Confirm” to save your changes or “Cancel” to cancel.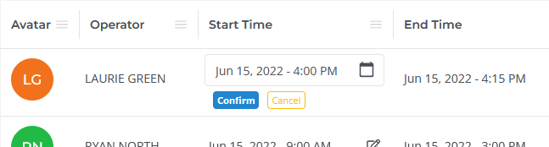
- Delete an Entry
Click the bin icon under the Manage column to delete a Time Tracker entry. After clicking the bin icon, click “Confirm” to confirm deletion or “Cancel” to cancel.