
How to submit an In-Yard Return in Texada Mobile.
Quick Reference
- An In-Yard Return is a Return that is initiated by a yard worker using Texada Mobile, then processed by a counter worker using Texada Web. In-Yard returns are used when Products are returned directly to the rental yard instead of the counter.
- To submit an In-Yard Return in Texada Mobile:
- Log in to Texada Mobile and tap the In-Yard Returns icon
 at the bottom of the screen.
 - Enter a Customer name, Contract number, Product name, or Product number into the search bar to locate the Customer for which you’d like to perform a Return. Tap on a Customer’s name to select it.
- Select the Assets the Customer is returning. Tap on an Asset’s name to manually return it, including entering the quantity returned, indicating damage, leaving additional comments, and taking photos of the Asset. Tap on the checkbox next to an Asset’s name to auto-return it, i.e. to return the full quantity of the Asset without entering additional information.
- Once you have selected all of the Assets being returned, tap the “Proceed with Return” button.
- Review the Assets being returned and tap “Next”.
- Fill out signature information for the Return, then pass your mobile device to the customer and have them sign off on the Return. Tap “Complete” once you are finished to submit the Return to Texada Web.
- Log in to Texada Mobile and tap the In-Yard Returns icon
Introduction
An In-Yard Return is a Return that is initiated by a yard worker using Texada Mobile, then processed by a counter worker using Texada Web. In-Yard returns are used when Products are returned directly to the rental yard instead of the counter. For more information, see “Rental Returns and In-Yard Returns”.
The following article will detail the process of filling out and submitting an In-Yard Return in Texada Mobile.
Submit an In-Yard Return
- Initiate an In-Yard Return
Log in to Texada Mobile and tap the In-Yard Returns iconat the bottom of the screen. - Select a Customer
Begin typing into the search bar to locate the Customer for which you are performing a Return. This will search by Customer name, Contract number, Product name, and Product number. You can also tap the barcode icon to the right of the search bar to scan the barcode of the Asset being returned. Tap on a Customer’s name to select it.
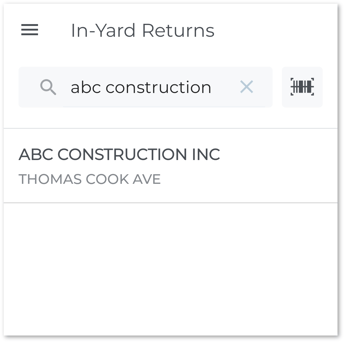
- Select Assets to Return
The following screen consists of a list of all the Assets currently out on rent with the selected Customer, organized by Contract (left). The fraction to the right of each Asset indicates the number of that Asset that has already been returned / the total number of that Asset included on the Contract.
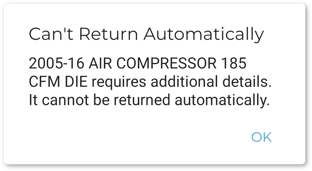
Tap on an Asset’s name to return it (step 4). Tap the checkbox next to an Asset’s name to auto-return it, i.e. to return the full quantity of the Asset without taking pictures or leaving comments. Some Assets, such as metered Assets, cannot be auto-returned. Attempting to auto-return such an Asset will result in a “Can’t Return Automatically” pop-up (right).
Multiple Assets can be returned at once, even Assets that were out on different Contracts. Once you have selected all of the Assets the Customer is returning, tap the “Proceed with Return” button to finalize the Return (step 5).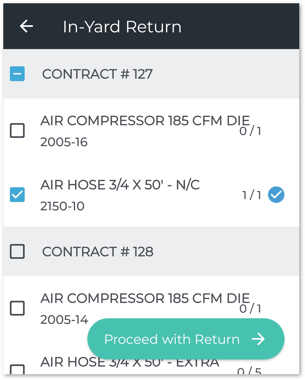
- Return an Asset
Tap on an Asset’s name in the list to return it. This will give you the opportunity to take pictures of the Asset, select the quantity of the Asset being returned, indicate whether the Asset has been damaged, and update its meter readings, if applicable. Once you have filled out all the relevant information for the Asset, tap the “Return Item” button to return to the Asset list (step 3).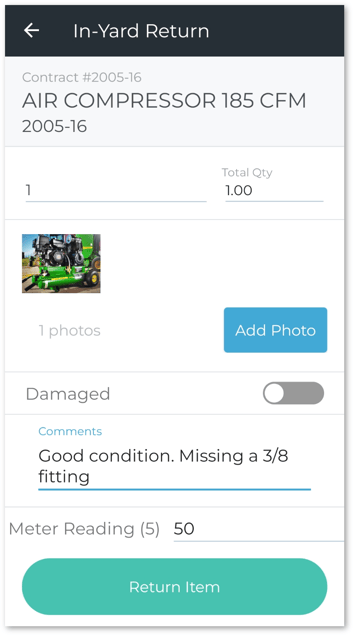
- Review Return
Tapping the “Proceed with Return” button from the Asset list will open the following review screen, containing a list of all the Assets being returned. Tap the back arrow in the top-left corner of the screen to return to the Asset list, or tap “Next” to continue.
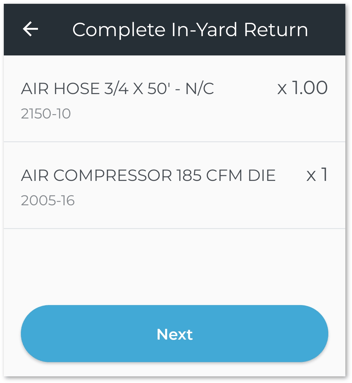
- Sign and Submit
The following screen allows the customer to sign off on the Return, with the option of emailing a copy of the signature to one or more recipients. See “Electronically Sign a Document in Texada Mobile” for more information.
Once the customer has signed off on the Return, tap “Complete” to submit it. - Process Return in Texada Web
Once you have submitted an In-Yard Return in Texada Mobile, it can be reviewed and completed via the In-Yard Returns page in Texada Web. See “Process a Return in Texada Web” for more information.