Everything you need to know about User Roles and permissions in Texada Web.
Quick Reference
- User Roles and permissions allow you to control which features your Users are able to access throughout Texada SRM, Web, and Mobile.
- A permission is an individual permission that allows a User to view, modify, create or delete a certain value – for example, “View Invoice” or “Create Asset”.
- A User Role is a set of permissions that can be assigned to a User – for example, “Administrator”, “Counter Operator”, or “Mechanic”.
- Roles are assigned on a per-Division basis. Users with access to multiple Divisions can have different Roles, and thus different permissions, for each Division.
- Users can have multiple Roles per Division.
- The permissions granted by User Roles are additive. A User’s final permission set is equal to the sum of the permissions granted by each Role.
- Every Texada system comes with a number of predefined User Roles called User Role Templates. These Templates have permissions selected by Texada staff and cannot be modified or deleted. They can be assigned to Users as-is or cloned via the Role Manager.
- There are multiple places throughout Texada Web where User Roles and permissions can be managed:
- The Role Manager: Allows you to create, clone, edit, and delete User Roles.
- The Create/Edit User screen: You can modify a User’s assigned Roles while creating or editing their User profile.
- The Company Settings page (Permissions tab): Displays the permissions awarded by each Role. Roles can also be edited from this screen.
- The Company Settings page (Roles tab): Displays the Users currently assigned to each Role.
Introduction
 A User Role is a logical grouping of permissions. By assigning Roles to your Users, you can control which features of Texada’s products they are able to access.
A User is any person who is able to login and use one or more of Texada’s products, including Texada Web, Mobile, and SRM. Depending on their role within the company, different Users throughout your organization may need to interact with Texada’s products in different ways. For example, dispatchers may need access to the Inventory and Ticketing modules, while mechanics need access to Work Orders.
Controlling Users’ access in accordance with their role is an important part of keeping your system organized and secure. By ensuring that Users only have access to the tools relevant to them, you can reduce confusion, prevent errors, and protect sensitive information.
A User’s permissions determine what that User is able to view, modify, create and delete. Permissions are grouped into sets called User Roles, which can be assigned to Users on a per-Division basis to control which features they can access in Texada SRM, Web, and Mobile.
The following article provides an overview of User Roles and permissions, as well as a list of screens in Texada Web where Roles and permissions can be managed.
Permissions
A permission is an individual permission granted to a User that allows them to view a certain value or take a certain action in Texada SRM, Web, and/or Mobile. For example, the “View Invoice” permission allows the User to view, but not edit, Customer Invoices, while the “Create Asset” permission allows the User to view, edit, and create Assets.
Permissions are not granted individually, but are rather bundled together under various User Roles. In order to grant a permission to a User, you will need to create a User Role with that permission, then assign that Role to the desired User.
Simplified View and Advanced View
Texada Web features two different views for managing permissions: Simplified View and Advanced View. When managing permissions from the Role Manager or Create / Edit User screen, you can switch between Simplified and Advanced views by clicking the “Advanced” toggle near the top-right corner of the window.

Simplified View
- In this view, most permissions are organized into four levels of increasing access, with each level including the levels before it. For example, a User with Delete access for a certain document type is also able to create, edit, and view documents of that type. The four access levels are:
- View: The User can view this element, but not edit it.
- Edit: The User can edit this element.
- Create: The User can create new instances of this element.
- Delete: The User can delete instances of this element.
- While most permissions use the four access levels described above, some permissions have alternative structures:
-
- Enabled/Disabled: Top-level permissions – i.e. permissions that correspond to an option in the navigation menu, such as ‘Counter’, ‘Inventory’, and ‘Operator’ – only have two options available, Enabled and Disabled.
-
- Numeric Value: Some permissions take a numeric value as input. For example, the “Rental Discount” permission takes a numeric value representing the maximum rental discount that can be applied to a Customer.
Advanced View
- This view is designed to closely emulate the structure of the Security Role Permissions utility in Texada SRM. In this view, all permissions only have two options, Enabled and Disabled.
In both Simplified and Advanced views, Disabling a top-level permission will hide that menu option from the User, preventing them from accessing the related module. For example, disabling the ‘Contracts’ permission will hide the Contracts option from the menu, both in Texada Web and Texada SRM.
User Roles
A User Role is a set of permissions that can be assigned to a User to give them access to various features throughout Texada SRM, Web, and Mobile. For example, the “Counter” Role might give a User access to the Contracts, Quotes, and Reservations modules; the “Mechanic” Role might enable a User to view and complete Work Orders.
When working with User Roles, keep the following in mind:
- Roles are fully customizable. Provided you have sufficient permissions, you can clone, create, edit, and delete User Roles via the Role Manager. Note that User Role Templates cannot be modified or deleted; see “User Role Templates” for more information.
- Roles are assigned on a per-Division basis. This means that Users with access to multiple Divisions can have different Roles, and thus different permissions, for each Division.
- Users are not limited to one Role per Division: multiple Roles can be assigned to a single User for a single Division.
- The permissions granted by User Roles are additive. This means that, if a User is assigned multiple Roles at a single Division, their final permissions for that Division will be equal to the sum of the permissions granted by each individual Role.
User Role Templates
Every Texada system comes with a number of predefined User Roles called User Role Templates. These Templates have permissions selected by Texada staff and are designed to serve as a jumping-off point for creating your own User Roles: you can assign them to your Users as-is, or clone them via the Role Manager to create new Roles.
User Role Templates cannot be modified or deleted.
The User Role Templates included in every Texada system are as follows:
|
|
|
Managing Roles and Permissions
The following section will outline the various places where Roles and permissions can be viewed and managed.
The Role Manager: Create, clone, edit, and delete User Roles
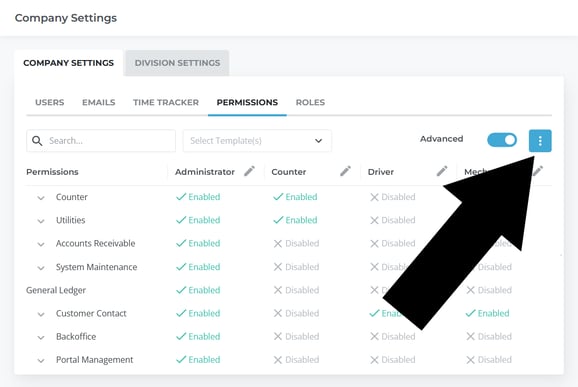
This tool allows you to modify the permissions associated with each User Role. It also allows you to clone, create, and delete User Roles.
The Role Manager can be accessed by clicking the three vertical dots ![]() found on screens pertaining to User permissions, including the Company Settings screen and the create/edit User screen.
found on screens pertaining to User permissions, including the Company Settings screen and the create/edit User screen.
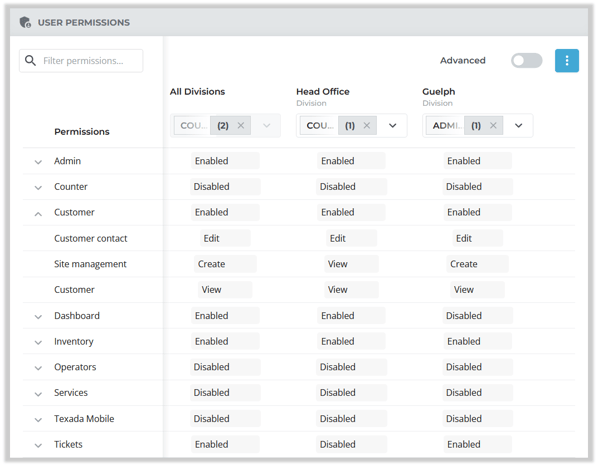
The Create/Edit User Screen: Modify a User’s assigned Roles
You can modify a User’s assigned Roles while creating or editing their User profile. Scroll down to the “User Permissions” panel at the bottom of the screen to view and modify the User’s Roles for each Division.
To create a new User in Texada Web, navigate to the User Menu (click on your name in the top-right corner of Texada Web) → Settings → Company Settings → Users → Create User.
To edit a User profile in Texada Web, navigate to the User Menu (click on your name in the top-right corner of Texada Web) → Settings → Company Settings → Users, then click on the User’s name.
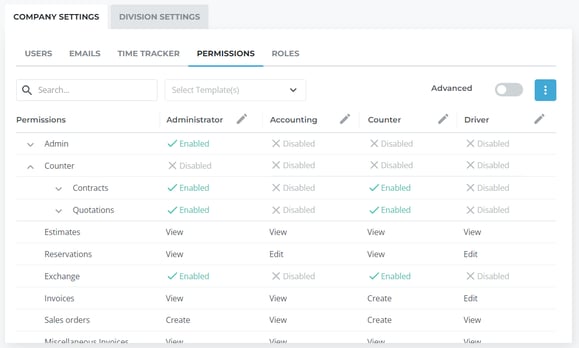
Company Settings (Permissions tab): Review and edit User Roles
The Permissions tab of the Company Settings screen allows you to see which permissions are associated with the various User Roles. You can also jump directly to editing a User Role by clicking on the pencil icon ![]() next to its name.
next to its name.
To reach this screen, navigate to the User Menu (click on your name in the top-right corner of Texada Web) → Settings → Company Settings → Permissions.
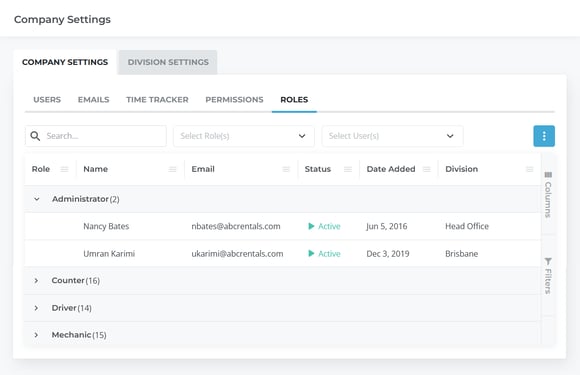
Company Settings (Roles tab): See which Users are assigned to each Role
The Roles tab of the Company Settings screen allows you to see which Users are assigned to which User Roles. You can search both by Role and by User, making this a useful tool for troubleshooting why a User does or does not have a certain permission.