
An overview of the Inventory Process in the Texada WorkFlow web application.
Quick Reference
- The Inventory Process is designed to be used alongside the Inventory (Free Scan) Process in the Texada WorkFlow mobile application. Specifically, it allows you to review Free Scan inventory counts created by your mobile Users - both in-progress and complete.
- Use the search terms at the top of the screen to filter inventory batches by the terms entered. Click “Search” to apply your search terms, and “Reset” to clear all terms.
- The Batches table in the bottom-left corner of the screen lists all of the Free Scan inventory counts in the system. Click on a batch to view its items.
- The Items table in the bottom-right corner of the screen lists all of the items counted in the currently-selected batch.
Introduction
The following article will provide an overview of the Inventory Process in the Texada WorkFlow web application. This Process is designed to be used alongside the Inventory (Free Scan) Process in the Texada WorkFlow mobile application. Specifically, it allows you to review Free Scan inventory counts created by your mobile Users - both in-progress and complete.
For more information on inventory counts, see “Complete an Inventory Count”.
To reach the Inventory Process, log in to the Texada WorkFlow web application and select a Station from the navigation menu. Then, select “Inventory” from the Process list.
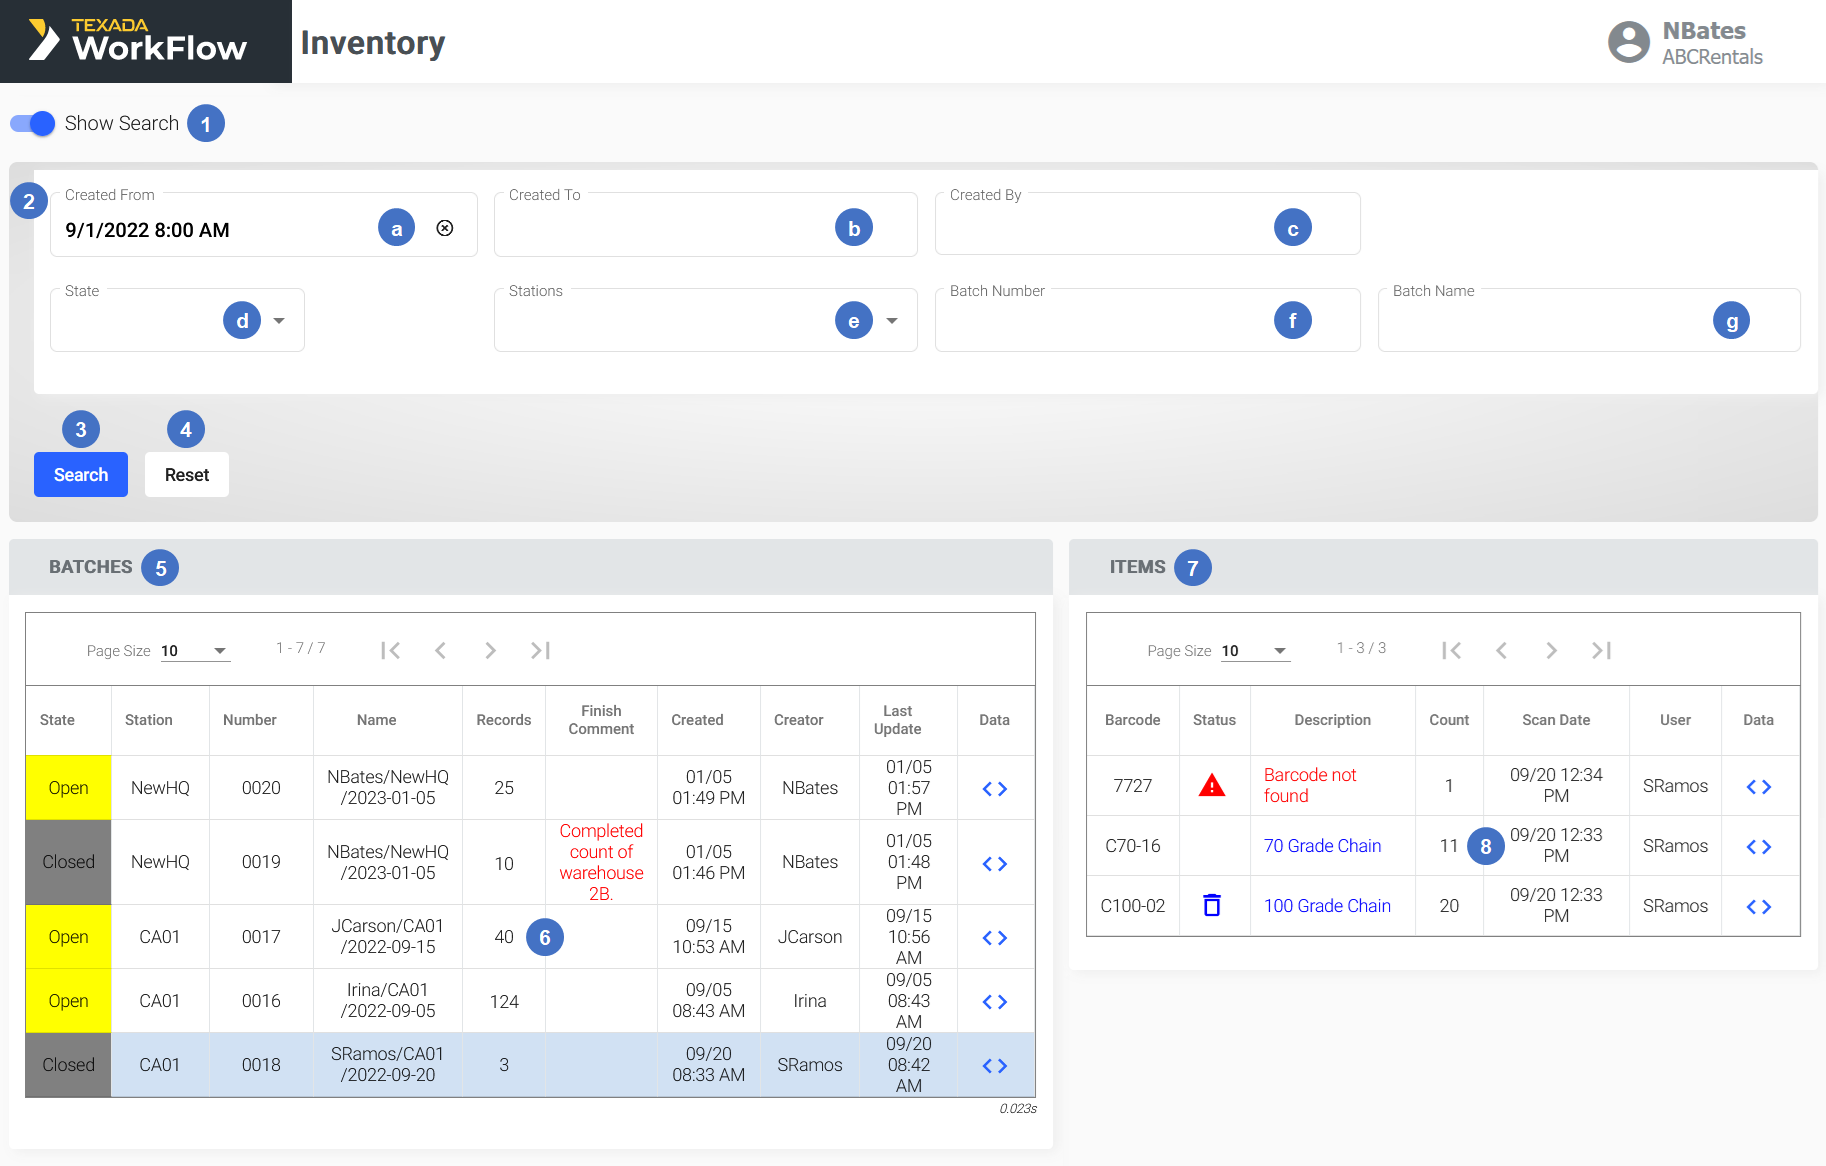
The Inventory Process
 Click to view the full-sized image.
- Show Search Toggle
Click to show or hide the search feature. - Search Terms
Enter search terms into one or more of these fields to filter inventory batches by the criteria entered. You can enter multiple search criteria at once, in which case the system will only display batches that match all of the selected criteria. The available search criteria are:- Created From: Display batches created after the selected date.
- Created To: Display batches created before the selected date.
- Created By: Enter a username to display batches created by that User.
- State: Display batches with the selected status.
- Stations: Select one or more Stations to display batches for those Stations.
- Batch Number: Filter batches by batch number.
- Batch Name: Filter batches by batch name.
- Search Button
Click to apply the current search terms and refresh the Batches table. - Reset Button
Click to clear all of the currently-entered search terms. After clicking this button, click the Search button to refresh the Batches table and display all batches. - Batches Table
Contains all of the inventory batches that match the current search criteria. For information on how to navigate and use this table, see “Working with Tables in Texada WorkFlow”. - Batch
Each inventory batch that matches the current search criteria will appear as a row in the Batches table. Click on a batch to display its contents in the Items table. - Items Table
Contains all of the items included in the currently-selected inventory batch. For information on how to navigate and use this table, see “Working with Tables in Texada WorkFlow”. - Item
Each item in the currently-selected inventory batch appears as a row in the Items table.
Batches Table - Columns
The Batches table comprises the following columns:
- State: The batch’s current status - Open, Scheduled, Closed, or Turnaround. The list of possible states may vary based on your system’s configuration.
- Station: The Station for which this inventory count was completed.
- Number: The batch’s number. This is the unique identifier for the batch.
- Name: The batch’s name. Batch names are automatically generated when the batch is created. This is usually in the format [Creator]/[Station]/[yyyymmddhh:mm], where “yyyymmddhh:mm” is the Created date and time.
- Records: The number of items included in the batch.
- Finish Comment: The closing comment left by the User who completed the inventory count, if any.
- Created: The date and time on which the batch was created.
- Creator: The username of the mobile User who created the batch.
- Last Update: The date and time on which the batch was last updated.
- Export: Click the download button
.png?width=20&height=24&name=Download%20Icon%20WorkFlow%20(Blue).png) next to a batch to download it as a Microsoft Excel (.xlsx) file.
next to a batch to download it as a Microsoft Excel (.xlsx) file. - Data: Click the angle brackets button
 next to a batch to view all of the information in that batch as raw data. This can be useful for troubleshooting purposes.
Items Table - Columns
The Items table comprises the following columns:
- Barcode: The item’s barcode number.
- Status: The item’s status as it pertains to the inventory count.
- A blue bin symbol
 indicates that the item was added to the inventory count, then later deleted by the User.
 - A red triangle
 indicates an item that was not recognized by the system.
- A blue bin symbol
- Description: The item’s description.
- Count: The quantity of items counted. For non-bulk items, this will always be 1 - each instance of the item will appear in its own row in the Items table.
- Scan Date: The date and time on which the item was scanned.
- User: The username of the User who scanned the item.
- Data: Click the angle brackets button next to a batch to view all of the information in that batch as raw data. This can be useful for troubleshooting purposes.