How to create a new Work Order in Texada Mobile.
Quick Reference
- A Work Order is a document indicating that an Asset is in need of servicing, either for repairs or routine maintenance. Work Orders are created in Texada SRM, Web, or Mobile, then assigned to a Mechanic for completion.
- To create a new Work Order in Texada Mobile:
- Open Texada Mobile and tap the Work Orders icon
 at the bottom of the screen to open the Work Order list.
 - Tap the green plus icon
 in the bottom-right corner of the screen.
 - Search for and select the Asset for which you want to perform a Work Order.
- If the Asset you selected already has existing Work Orders, you will be provided with a list of these Work Orders. You can either select one to view it and potentially start working, or tap “Next” to continue with creating a new Work Order for the Asset.
- Search for and select a Customer to attribute the Work Order to.
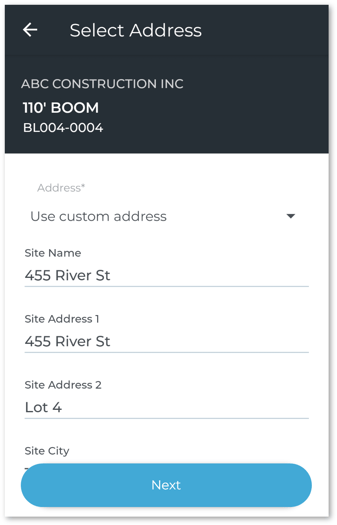
- Select the address at which the Work Order is taking place. You can either select one of the Customer’s existing Site addresses or enter a custom address. Once you are done, tap “Next” to continue.
- Enter the information for your Work Order and tap “Done” to create it.
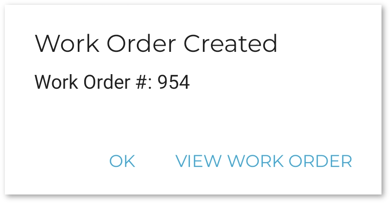
- Tap “View Work Order” to view the details for your new Work Order.
- Open Texada Mobile and tap the Work Orders icon
Introduction
A Work Order is a document indicating that an Asset is in need of servicing, either for repairs or routine maintenance. Work Orders are created in Texada SRM, Web, or Mobile, then assigned to a Mechanic for completion.
The following article will detail the process of creating a new Work Order in Texada Mobile.
Create a Work Order
- Open the Work Order List
Log in to Texada Mobile and tap the Work Orders icon at the bottom of the screen to open the Work Order list. - Start a new Work Order
Tap the green plus icon in the bottom-right corner of the screen to create a new Work Order.
- Select an Asset
On the Select Asset screen, begin typing into the search bar to search the list of Assets and locate the Asset you’d like to perform a Work Order on. Tap on an Asset to select it. You can also tap the barcode icon to the right of the search bar to open your device’s camera and scan an Asset’s barcode.
When you select an Asset, the system will automatically check if any open Work Orders already exist for that Asset. If an existing Work Order is found, you will be taken to the Existing Work Orders screen (step 4). Otherwise, you will be taken to the Select Customer screen (step 5).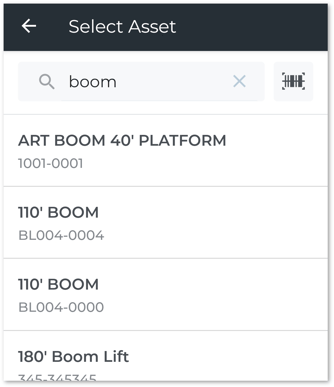
- Review existing Work Orders
If an open Work Order already exists for the Asset you selected, you will be taken to the Existing Work Orders screen. From this screen, you have three options to progress:- Tap on an existing Work Order to view its details and start working if you are the assigned Mechanic.
- Tap the back arrow
 in the top-left corner of the screen to return to the Select Asset screen (step 3) and choose a different Asset.
 - Tap the “Next” button in the bottom-right corner of the screen to proceed with creating a new Work Order for this Asset (step 5).

- Select a Customer
On the Select Customer screen, begin typing to search the list of Customers and select the Customer for which the Work Order is being performed. Tap on a Customer to select it.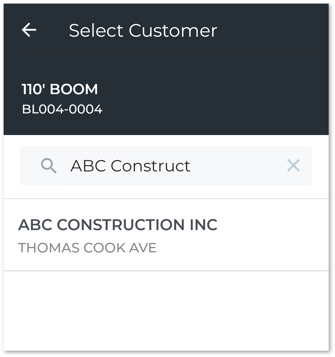
- Select an Address
On the following screen, you will select the address at which the Work Order is being performed. Using the “Address” drop-down, you can either select the address of an existing Customer Site, or enter a custom address. Once you are finished, tap “Next” to proceed to the Create Work Order screen.- Use Customer’s billing location: Use the Customer’s primary (billing) address.
- Use custom address: Enter your own address information.
- Customer Site: Existing Customer Sites are listed below the first two options. Select a Site to use its address for the Work Order.
- Create Work Order
On the Create Work Order screen, enter the information for your new Work Order. Once you are finished, tap the “Done” button to create your Work Order. A detailed breakdown of the fields on this screen can be found below.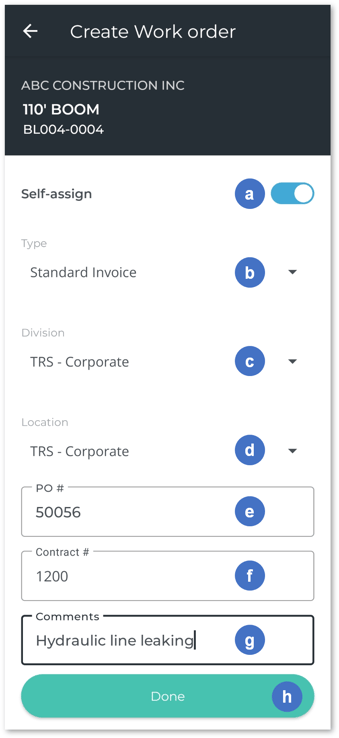
- Self-assign Toggle
Enable this toggle to assign the Work Order to yourself upon its creation. If this toggle is not enabled, the Work Order will be created as an open Work Order. - Work Order Type
Select from one of the four Work Order posting types: Standard Invoice, Customer Damage, Customer Repair, and Internal Work Order. See “About Work Order Posting Types” for more information. - Division
The Work Order’s Division. - Location
The Work Order’s Location. - PO #
The Purchase Order associated with the Work Order, if any. - Contract #
The Contract associated with the Work Order, if any. - Comments
Any additional comments about the Work Order. This will be saved to the Work Order as an internal comment, visible in Texada Mobile and Texada Web. - Done Button
Tap this button once you are finished to create the Work Order.
- Self-assign Toggle
- Complete
If Work Order creation was successful, you will see the following message confirming the Work Order’s number. Tap “View Work Order” to view its details; see “View and Edit a Work Order in Texada Mobile” for more information.