
How to assign a Work Order to a Mechanic and schedule it for completion.
Quick Reference
- A Work Order is a document indicating that an Asset needs servicing, either for repairs or routine maintenance. Once a Work Order has been created in Texada SRM, Web, or Mobile, it can be assigned to a Mechanic for completion, and optionally scheduled to be completed at a specific time.
- Completed Work Orders can only be assigned and scheduled via the Edit Work Order page, as their status must first be reverted to “In Progress”. Closed Work Orders cannot be assigned or scheduled.
- To assign and schedule a Work Order via the Work Order List:
- Navigate to Work Orders → List in the left side menu.
- Locate the Work Order you wish to edit and click on it to open the Edit Work Order page.
- To assign the Work Order, select one or more Mechanics from the Mechanics panel.
- To schedule the Work Order, enable the Scheduled Time toggle in the Work Order Info panel, then enter a Start Time and End Time.
- Click the Save button in the bottom-right corner of the screen to save your changes.
- To assign and schedule a Work Order via the Work Order Map:
- Navigate to Work Orders → Map in the left side menu.
- Locate the Work Order you want to edit on the map. Click on its pin to view its information, then click “View Work Order” to open the Work Order Info panel.
- To assign the Work Order, select one or more Mechanics under “Add a Mechanic”.
- To schedule the Work Order, enable the Scheduled Time toggle, then enter a Start Time and End Time.
- Click the Save button in the bottom-right corner of the panel to save your changes.
- To assign and schedule a Work Order via the Work Order Scheduling page:
- Navigate to Work Orders → Scheduling in the left side menu.
- To assign a Work Order, click the six dots
 to the left of its row in the Work Orders table and drag it under the name of a Mechanic in the Mechanics table.
 - To schedule a Work Order, double-click its row to open the Work Order Info panel. Enable the Scheduled Time toggle, then enter a Start Time and End Time.
Introduction
A Work Order is a document indicating that an Asset needs servicing, either for repairs or routine maintenance. Work Orders can be created in Texada SRM, Web, and Mobile. Once a Work Order has been created, it can be assigned to a Mechanic for completion, and optionally scheduled to be completed at a specific time. Assigning a Work Order to a Mechanic will send a notification of the assignment to their mobile device. You can assign multiple Mechanics to the same Work Order.
The following article will detail the process of assigning and scheduling a Work Order in Texada Web. This can be done in the following three locations:
Via the Work Order List
To assign and schedule an existing Work Order via the Work Order List:
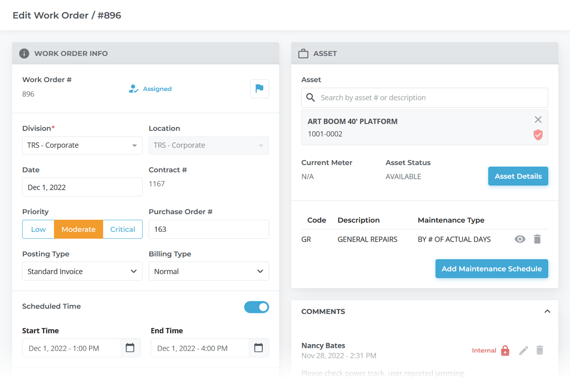
- Navigate to Work Orders → List in the left side menu.
- Locate the Work Order you wish to edit and click on it to open the Edit Work Order page.
- If the status of the Work Order you want to edit is Completed, you will need to click the Edit button
 in the bottom-right corner of the screen before making any changes. Closed Work Orders cannot be edited.
Assign
- Scroll down to the Mechanics panel and click on the search bar to open the list of Mechanics. Start typing to filter the list, then click on a Mechanic’s name to assign them to the Work Order. You can assign multiple Mechanics to the Work Order this way. To unassign a Mechanic from the Work Order, click the Unassign button
 next to their name.
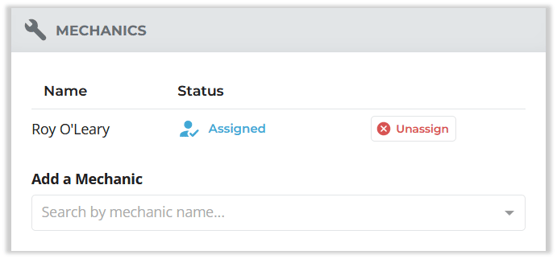
- Click Save
 to save your changes.
Schedule
- In the Work Order Info panel, locate and enable the Scheduled Time toggle. This will reveal the Start Time and End Time fields.
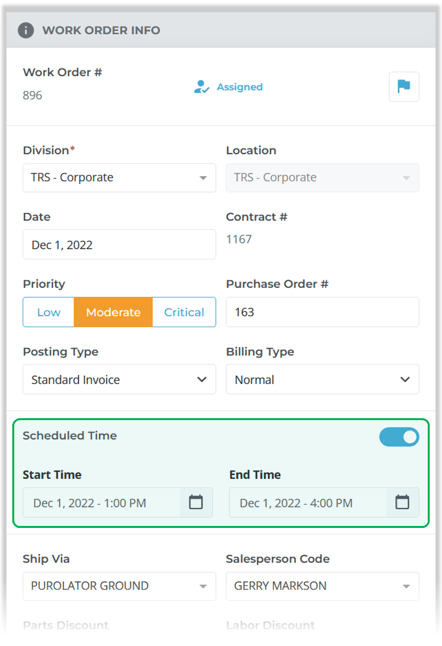
- Enter the desired start and end times of the Work Order into the Start Time and End Time fields. You can enter a date and time directly, or click on the calendar icon
 to select a date and time from the calendar.
 - Click Save to save your changes. You can only schedule a Work Order if it has also been assigned to at least one Mechanic.
Via the Work Order Map
To assign and schedule an existing Work Order via the Work Order Map:
- Navigate to Work Orders → Map in the left side menu.
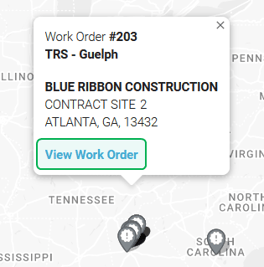
- Locate the Work Order you want to edit on the map. Click on its pin to view its information, then click “View Work Order” to open the Work Order Info panel.
If the status of the Work Order you want to edit is Completed, you will not be able to assign or schedule the Work Order from the Work Order Info panel. Click the Open Work Order button ![]() in the bottom-left corner of the panel to open the Edit Work Order page and edit the Work Order from there.
in the bottom-left corner of the panel to open the Edit Work Order page and edit the Work Order from there.
Assign
- In the Work Order Info panel, click on the drop-down list under “Add a Mechanic” to open the list of Mechanics. Start typing to filter the list, then click on a Mechanic’s name to assign them to the Work Order. You can assign multiple Mechanics to the Work Order this way. To unassign a Mechanic from the Work Order, click the Unassign button next to their name.
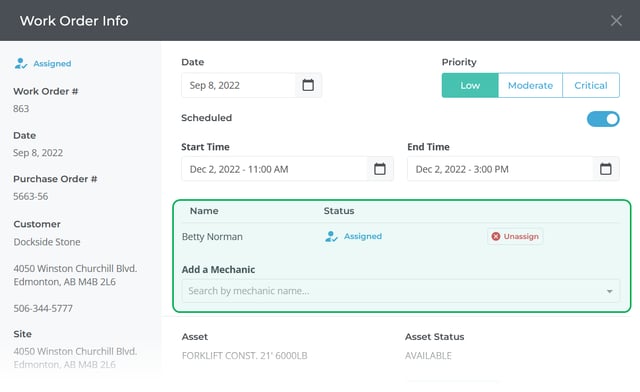
- Click Save to save your changes.
Schedule
- In the Work Order Info panel, locate and enable the Scheduled toggle. This will reveal the Start Time and End Time fields.
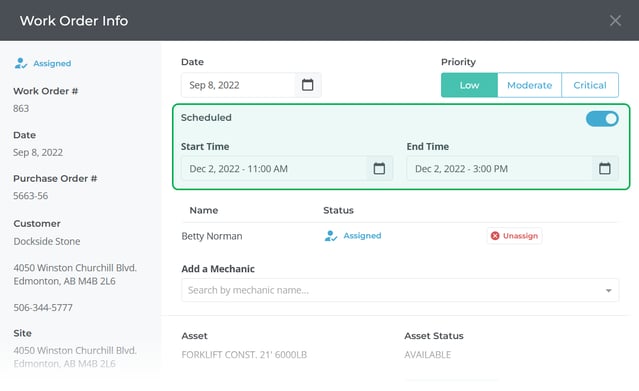
- Enter the desired start and end times of the Work Order into the Start Time and End Time fields. You can enter a date and time directly, or click on the calendar icon to select a date and time from the calendar.
- Click Save to save your changes. You can only schedule a Work Order if it has also been assigned to at least one Mechanic.
Via the Work Order Scheduling Page
To assign and schedule an existing Work Order via the Work Order Scheduling page:
- Navigate to Work Orders → Scheduling in the left side menu.
- Locate the Work Order you wish to edit in the Work Orders table on the left side of the screen.
Assign
- Click the six dots
 next to the Work Order you wish to assign and drag it under the name of a Mechanic in the Mechanics table. This will assign the Work Order to that Mechanic.
 - To unassign a Work Order, drag it out from under the Mechanic’s name and return it to the Work Orders table. To reassign a Work Order to a different Mechanic, drag it out from under the original Mechanic’s name and drop it under the new Mechanic’s name.
Schedule
- Double-click the Work Order to open the Work Order Info panel.
- In the Work Order Info panel, locate and enable the Scheduled toggle. This will reveal the Start Time and End Time fields.
- Enter the desired start and end times of the Work Order into the Start Time and End Time fields. You can enter a date and time directly, or click on the calendar icon to select a date and time from the calendar.
- Click Save to save your changes. You can only schedule a Work Order if it has also been assigned to at least one Mechanic.