
How to access, view and edit the details of an Asset in Texada Web.
Quick Reference
- To view the details of an Asset in Texada Web:
- Navigate to the Assets page at Inventory → Assets.
- Locate the Asset you wish to view.
- Click anywhere on the Asset’s row in the Assets table. This will open the Asset Details page.
- In addition to displaying basic information about an Asset, the Asset Details page contains four tabs that provide insights into that Asset’s history:
- The Work Order History tab contains a list of all Work Orders, present and past, associated with the Asset.
- The Contract History tab contains a list of all Contracts associated with the Asset.
- The Inspection History tab contains a record of all the inspections that have been completed for the Asset.
- The Maintenance Schedule tab contains a record of the recurring maintenance tasks that have been assigned to the Asset.
- From the Asset Details page, click the “Edit Asset” button at the top of the screen to navigate to the Edit Asset page. This page allows you to view and edit more detailed information about the Asset.
Introduction
An Asset is a piece of heavy equipment, such as a scissor lift or compressor, which can be sold or rented out as part of a Contract. The following article describes how to review and edit the details of an Asset that has already been created in the system.
Viewing the Details of an Asset in Texada Web
To view the details of an Asset in Texada Web:
- Navigate to the Asset list at Inventory → Assets.
- Locate the Asset you wish to view. For more information on navigating the Asset list, see “The Asset List Page”.
- Click anywhere on the Asset’s row in the Assets table. This will open the Asset Details page.
The Asset Details Page
This page allows you to view all of the details of a particular Asset at-a-glance, including its basic information, Work Order history, Contract history, Inspection history, and maintenance records.
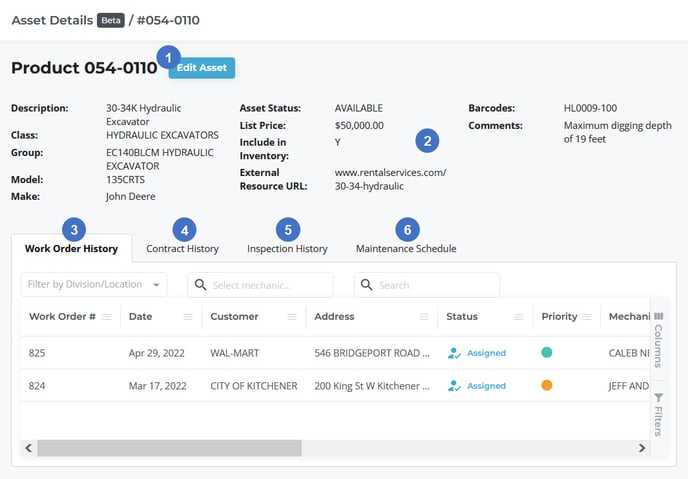
- Edit Asset Button
Click this button to open the Edit Asset screen, where you can view and edit more detailed information on the Asset. - Asset Details
An overview of the Asset’s details can be found here, including its Product Class and Group, its make and model, and its current status. To view more detailed information, click the “Edit Asset” button. - Work Order History Tab
This tab contains a log of all the Work Orders, past and current, with which this Asset is associated. - Contract History Tab
This tab contains a log of all the Contracts, past and current, with which this Asset is associated. - Inspection History Tab
This tab contains a log of all the inspections that have been completed for this Asset. - Maintenance Schedule Tab
This tab contains a log of all the maintenance tasks that have been completed for this Asset.
Work Order History Tab
This tab displays a log of all the Work Orders associated with this Asset.

- Division/Location Filter
Click this drop-down to open a list of divisions and locations in your system, then click on an item to only show Work Orders for that division or location. You can select up to one division and one location to filter by. - Mechanic Search Bar
Begin typing into this search bar, then select a mechanic’s name from the drop-down list to view Work Orders completed by this mechanic. - Search Bar
Begin typing into this search bar to filter Work Orders by the text entered. This will search by Work Order #, Customer, Mechanic, and Asset #. - Work Order History Table
This table contains records of each Work Order completed for this Asset. See “Working with Tables” for information on adjusting this table. - Work Order
Each Work Order (completed or in progress) associated with this Asset will appear as a row in the table. Click on a Work Order to open its details in another browser tab. See “Edit the Details of a Work Order in Texada Web” for more information.
Contract History Tab
This tab displays a log of all the Contracts associated with this Asset.
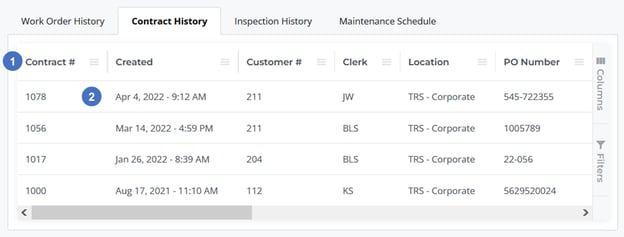
- Contract History Table
Contracts associated with this Asset are displayed in this table. See “Working with Tables” for information on adjusting this table. - Contract
Each Contract associated with this Asset will appear as a row in the table. Click on a Contract to open its details in another browser tab. See “View and Edit a Contract in Texada Web” for more information.
Inspection History Tab
This tab displays a history of all the inspections that have been completed for this Asset. Note that only inspections completed via the Asset Management feature in Texada Mobile will be displayed here; inspections completed as part of a Work Order can be found on that Work Order’s details page.
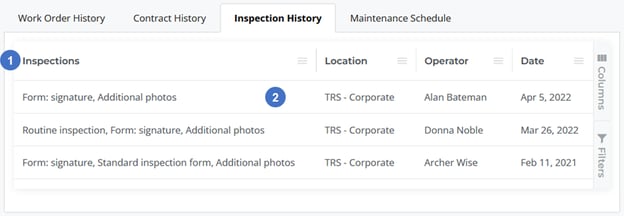
- Inspection History Table
Inspections that have been completed for this Asset are displayed in this table. See “Working with Tables” for information on adjusting this table. - Inspection
Each inspection that has been completed for this Asset will appear as a row in the table. The “Inspections” column contains a summary of the inspection form(s) completed as part of the inspection, as well as whether a signature was received or additional photos attached. Click on an inspection’s row to open the inspection window; see “Inspection Window” for more details.
Inspection Window
Clicking on an inspection in the Inspection History tab will open the inspection window. This pop-up contains additional information about the inspection in question.

- Inspection Summary
This panel contains a summary of the inspection, including the Asset # and description. - Inspection Details
This panel contains the details of the completed inspection, including a breakdown of the mechanic’s responses to each of the inspection questions. Note that the contents of this panel will vary based on the inspection form. - Additional Photos
Photos attached to the inspection are displayed here. Click on a photo to view all photos as a slideshow. - View PDF Button
Click this button to open the inspection as a printable PDF document. - Exit Button
Click this button to close the window and return to the Inspection History tab. This can also be accomplished by clicking the “X” in the top-right corner of the window, or clicking outside the window.
Maintenance Schedule Tab
This tab displays any maintenance schedules applied to the Asset. Managed in Texada SRM, maintenance schedules allow you to automatically track when maintenance is due for an Asset, and produce reports on equipment in need of servicing. For more information, see “Maintenance Schedule” (SRM help file).
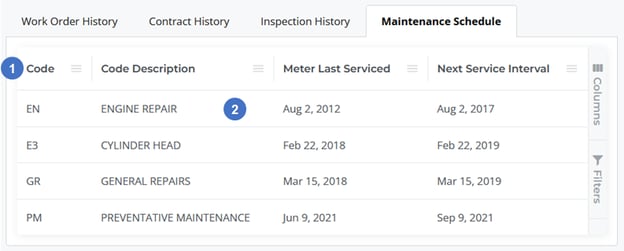
- Maintenance Schedule Table
Maintenance items for this Asset are displayed in this table. See “Working with Tables” for information on adjusting this table. - Maintenance Item
Individual maintenance items will appear as rows in the table.
Edit Asset Page
The Edit Asset page can be reached by clicking the “Edit Asset” button on the Asset details page. This page allows you to view and edit detailed information about the Asset.
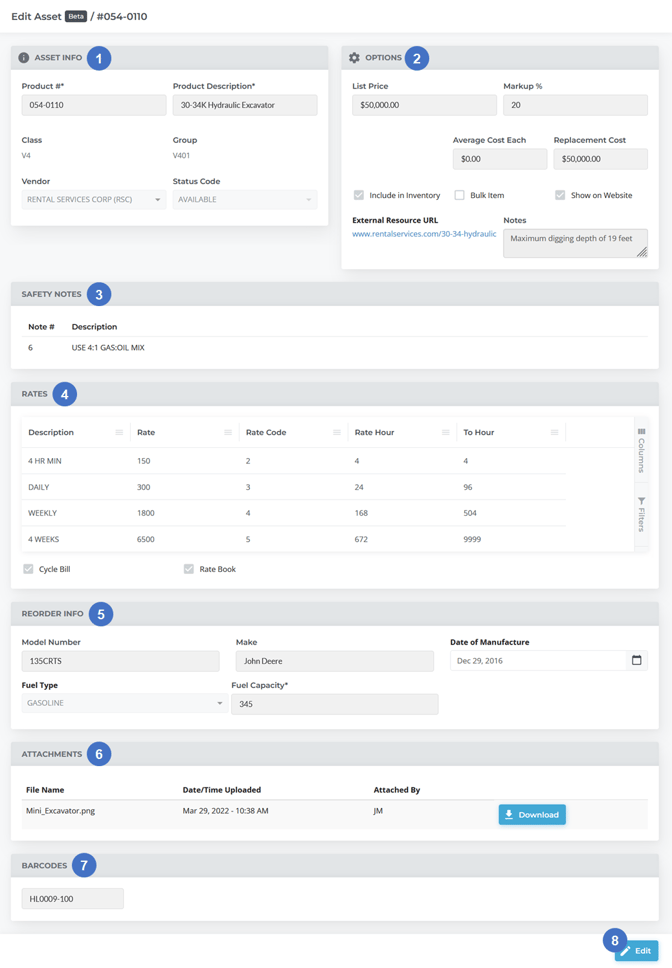
- Asset Info Panel
Contains basic information about the Asset, such as product number and description, class, group, and vendor information. - Options Panel
Contains pricing and inventory options, such as list price, markup percentage, and options for including this Asset in Inventory, marking it as a bulk item, or displaying it on your eCommerce website. - Safety Notes Panel
Allows you to attach safety notes to the Asset. - Rates Panel
Contains options for the Asset’s rental rates. - Reorder Info Panel
Contains additional manufacturer information on the Asset, such as the make, model, and date of manufacture, along with fuel type information. - Attachments Panel
Any additional files attached to the Asset will be listed here. Click “ Download” to download an attached file.
 - Barcodes Panel
Allows you to add product-specific barcodes to this Asset. - Edit Button
By default, the information on this screen is locked to prevent accidental edits; click this button to unlock the fields and begin editing. You will know that editing has begun when the Edit button is replaced with two additional buttons, Save and Cancel: - Click
 to save all of your changes and lock the fields again.
 - Click
 to cancel editing without saving your changes.
The Edit Asset page shares most of its elements in common with the Asset creation page. For more information on the individual fields within each panel, please see “Creating a new Asset in Texada Web”.