
How to complete a Pickup, Delivery, or Task Ticket in Texada Mobile.
Quick Reference
- A Ticket is a document indicating that Assets need to be transported from one location to another, usually at the beginning or end of a Contract. Once a Ticket has been created and assigned to a Driver in Texada Web, the Driver can complete the Ticket using Texada Mobile.
- To complete a Delivery or Task Ticket in Texada Mobile:
- Log in to Texada Mobile and open the Ticket you’d like to complete.
- Tap the “Load Assets” button to begin loading.
- Tap the “Load All” button to load all Assets at once, or tap on each Asset to load it individually.
- Tap “Load Complete” to finish loading.
- Drive the Assets to their destination.
- Tap the “Unload Assets” button to begin unloading.
- Tap the “Unload All” button to unload all Assets at once, or tap on each Asset to unload it individually.
- Tap “Ticket Complete” to finish unloading.
- Review the details of the Ticket and tap “Next” to continue.
- Have the customer sign off on the Ticket, then tap “Complete Ticket” to finish.
- To complete a Pickup Ticket in Texada Mobile:
- Log in to Texada Mobile and open the Ticket you’d like to complete.
- Tap the “Load Assets” button to begin loading.
- Tap the “Load All” button to load all Assets at once, or tap on each Asset to load it individually.
- Tap “Load Complete” to finish loading.
- Review the details of the Ticket and tap “Next” to continue.
- Have the customer sign off on the Ticket, then tap “Complete Ticket” to continue.
- Drive the Assets to their destination.
- Tap the “Unload Assets” button to begin unloading.
- Tap the “Unload All” button to unload all Assets at once, or tap on each Asset to unload it individually.
- Tap “Ticket Complete” to finish.
Introduction
A Ticket is a document indicating that Assets need to be transported from one location to another, usually at the beginning or end of a Contract. Tickets are created in Texada Web, then assigned to a Driver. The Driver can then use Texada Mobile to complete the Ticket. The following article will detail the process of completing an assigned Ticket in Texada Mobile.
There are three different types of Ticket:
- Delivery: Delivering Assets from inventory to the Customer’s work site.
- Pickup: Picking up Assets from the Customer’s work site and returning them to inventory.
- Task: Moving an Asset from one location to another.
All three Ticket types feature similar completion processes. The primary difference between Pickup Tickets and Delivery and Task Tickets is when the Customer’s signature is required: Pickup Tickets require a signature when Assets are picked up, while Delivery and Task Tickets require a signature when Assets are dropped off.
These processes are outlined in full in the diagram below. Click to see the full-sized image.

Complete a Delivery or Task Ticket
To complete an assigned Delivery or Task Ticket in Texada Mobile, follow the instructions below.
At the Origin Address
- Open a Ticket
Log in to Texada Mobile and open the Ticket you’d like to complete. See “Browsing Tickets in Texada Mobile” for more information. - Start Loading Assets
Scroll down to the bottom of the Ticket Details page and tap the “Load Assets” button to change the Ticket’s status to Loading. - Select an Asset to Load
Tap on an Asset under the “Assets” header to load it (step 4). Tap the Load All button to load all Assets at once. Note that some Assets cannot be loaded in this way.
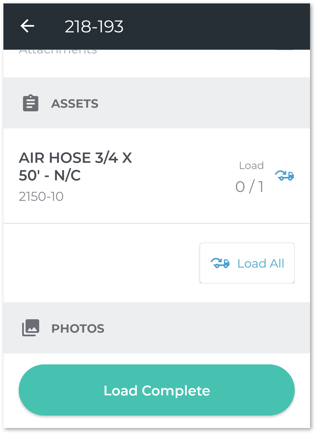
- Load Asset
When loading an Asset, Tap the plus and minus
  buttons to increase or decrease the quantity loaded. Tap the Add Photo button
  to take photos of the Asset; see “Add a Photo to a Document in Texada Mobile” for more information. Once you are finished, tap “Complete” to load the Asset.
- Finish Loading
Once you have finished loading Assets, tap “Load Complete” to change the Ticket’s status to In Progress. You can now drive the Assets to the Ticket’s Destination Address.
At the Destination Address
- Start Unloading Assets
Scroll down to the bottom of the Ticket Details page and tap the “Unload Assets” button to change the Ticket’s status to Unloading. - Unload Assets
Proceed with unloading Assets. The process for unloading Assets is the same as for loading them; see steps 3-4 above for more information. - Finish Unloading and Review
Once you have finished unloading Assets, tap “Ticket Complete” to finalize the Ticket. You will be taken to a review screen containing all the information for the Ticket. Review the information for accuracy, then tap “Next”. - Sign Ticket
The next screen allows the customer to sign off on the delivery, with the option to send a copy of the signed Ticket to one or more recipients. See “Electronically Sign a Document in Texada Mobile” for more information.
Once the customer has signed off on the Ticket, tap “Complete Ticket” to finish.
Complete a Pickup Ticket
To complete an assigned Pickup Ticket in Texada Mobile, follow the instructions below.
At the Origin Address
- Open a Ticket
Log in to Texada Mobile and open the Ticket you’d like to complete. See “Browsing Tickets in Texada Mobile” for more information. - Start Loading Assets
Scroll down to the bottom of the Ticket Details page and tap the “Load Assets” button to change the Ticket’s status to Loading. - Select an Asset to Load
Tap on an Asset under the “Assets” header to load it (step 4). Tap the Load All button to load all Assets at once. Note that some Assets cannot be loaded in this way. - Load Asset
When loading an Asset, tap the plus and minus buttons to increase or decrease the quantity loaded. Tap the Add Photo button to take photos of the Asset; see “Add a Photo to a Document in Texada Mobile” for more information. Once you are finished, tap “Complete” to load the Asset. - Finish Loading and Review
Once you have finished loading Assets, tap “Load Complete”. You will be taken to a review screen containing all the information for the Ticket. Review the information for accuracy, then tap “Next”. - Sign Ticket
The next screen allows the customer to sign off on the pickup, with the option to send a copy of the signed Ticket to one or more recipients. See “Electronically Sign a Document in Texada Mobile” for more information.
Once the customer has signed off on the Ticket, tap “Complete Ticket” to change the Ticket’s status to In Progress. You can now drive the Assets to the Ticket’s Destination Address.
At the Destination Address
- Start Unloading Assets
Scroll down to the bottom of the Ticket Details page and tap the “Unload Assets” button to change the Ticket’s status to Unloading. - Unload Assets
Proceed with unloading Assets. The process for unloading Assets is the same as for loading them; see steps 3-4 above for more information. - Finish Unloading
Once you have finished unloading Assets, tap “Ticket Complete” to finish.