
How to create a new Customer record in Texada Web.
Quick Reference
- A Customer is a company or individual – often a construction company – who rents or purchases equipment from a rental company.
- To create a new Customer record in Texada Web:
- Navigate to Customers → Create Customer in the left side menu.
- Fill out the desired information for the Customer, then click “Create Customer” once you are finished.
Introduction
A Customer is a company or individual – often a construction company – who rents or purchases equipment from a rental company. By maintaining an up-to-date Customer list, you can vastly improve the effectiveness of Texada’s products; many functions throughout the system, such as creating a new rental Contract, require an existing Customer record to complete.
The following article will detail the process of creating a new Customer record in Texada Web.
Creating a Customer
To create a new Customer in Texada Web, navigate to Customers → Create Customer in the left side menu. This will open the Create Customer screen, where you can fill out all the information for the new Customer:
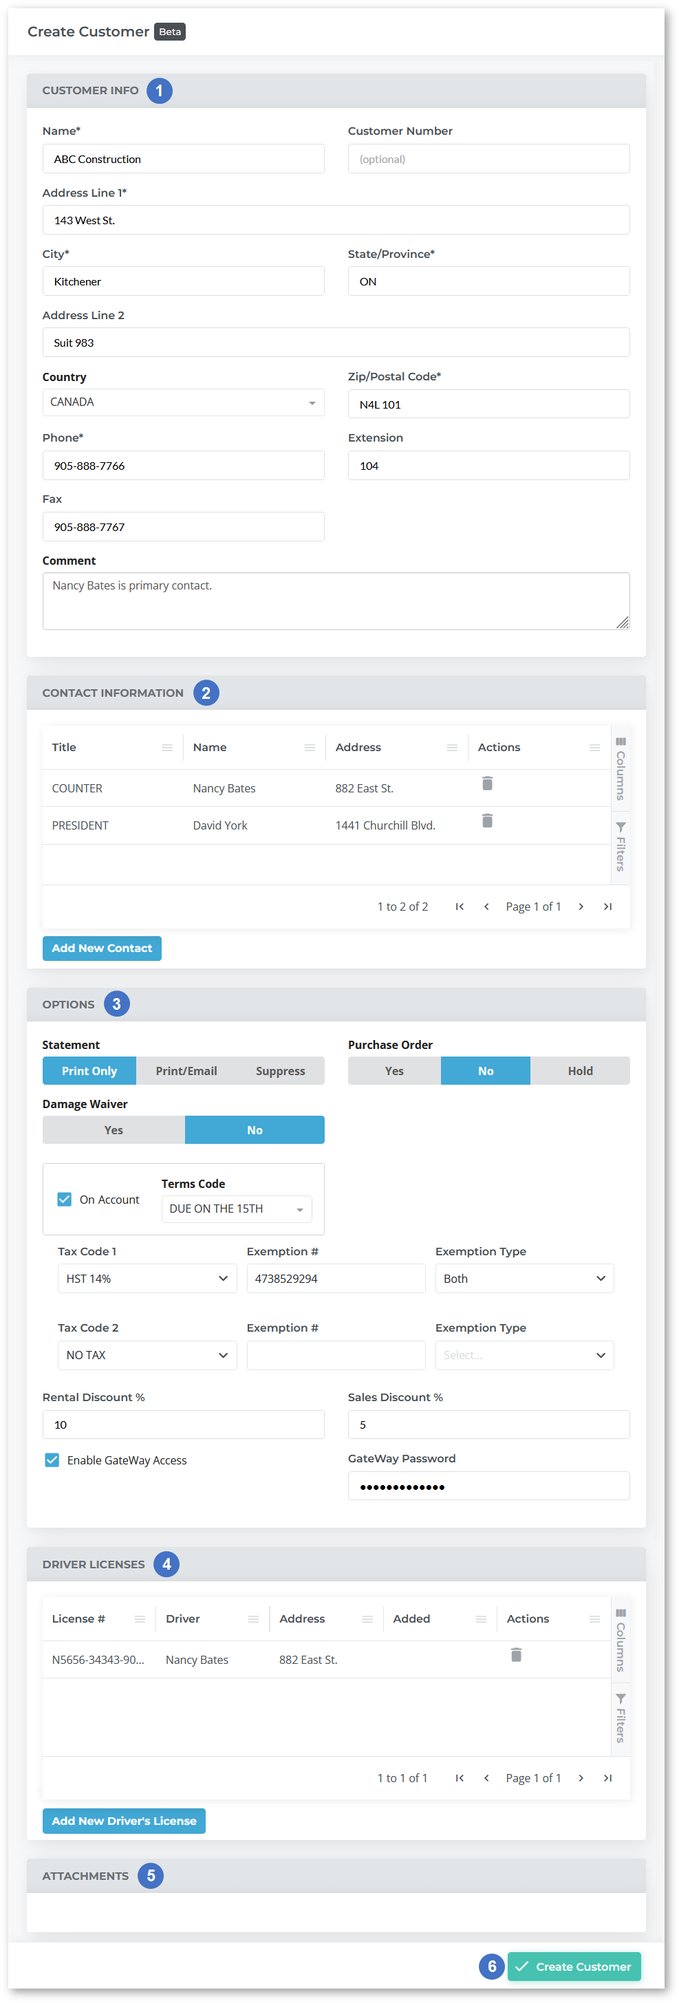
- Customer Info Panel
Contains basic information about the Customer. - Contact Information Panel
Contains the list of Customer Contacts. A Contact is an individual at a company who has their own set of contact information. A single Customer record can have zero, one, or multiple associated Contact records. - Options Panel
Contains a number of options for the Customer record, including purchase order and damage waiver requirements, tax and discount information, and GateWay access. - Driver’s Licenses Panel
Contains the list of driver’s licenses that have been added to this Customer record. A single Customer record can have zero, one, or multiple associated driver’s licenses. - Attachments Panel
Contains any external files that have been attached to the Customer record. Note that attachments can only be added to existing Customers, and cannot be added while creating a new Customer. To add an attachment, save the Customer record by clicking the “Create Customer” button, then use the “Edit” button to edit the record. - Create Customer Button
Use this to create a new Customer record using the information you have entered.
Required fields are marked with an asterisk *.
Once you are satisfied with the information you have entered on this page, click the “Create Customer” button to save the Customer record.
- If creation was successful, you will receive a message that reads “New customer added. Customer # [Customer number]”.
- If there were issues with the information entered, you will receive a message that reads “Something went wrong. See above for more details.” Problem fields will be highlighted in red; scroll up to review and change as necessary.
- If you entered a Customer number that already belongs to a Customer in your system, you will receive a message that reads “Customer [Customer number] already exists.” Try entering a different Customer number, or blank out the field to allow the system to automatically select one.
Once your Customer record has been created, it can be viewed via the Customer List page.
Detailed information on the individual sections within the Create Customer screen can be found below.
Customer Info Panel
This panel contains basic information about the Customer.
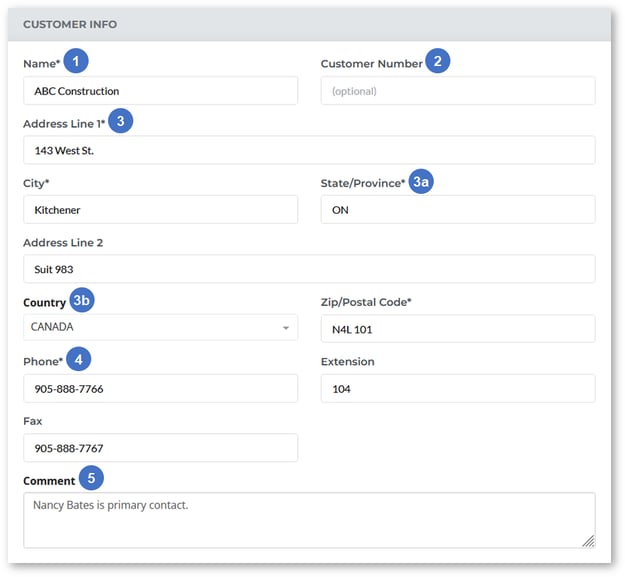
- Customer Name
The Customer’s name. This will appear on any documents associated with this Customer, including Contracts and Work Orders. Customer names are not required to be unique in Texada Web/SRM; it is possible to have two or more Customers with the same name. - Customer Number
The Customer’s unique ID in the system. Customer numbers are alphanumeric and cannot exceed 6 characters in length. Once a Customer has been created, their Customer number is inherently linked with their Customer record and cannot be changed or re-used. At the time of creation, you can enter a Customer number of your choosing or leave the field blank. If the field is left blank, the system will automatically assign the next available number. - Address Information
The Customer’s address. This is often the address of the Customer’s head office. Addresses for individual Contacts or Sites can be added under the Contact Information or Sites panels, respectively.- State/Province: The contents of this field cannot be more than 5 characters in length. It is recommended to use the ISO state or province code for this field (ON for Ontario, CA for California, etc.)
- Country: The list of countries available in this drop-down is managed in Texada SRM, at System Maintenance → Configure System Settings → System → Country Codes.
- Phone and Fax Number
The phone number, extension, and fax number for the Customer. Phone numbers for individual Contacts or Sites can be added under the Contact Information or Sites panels, respectively. - Comment
Use this field to enter a brief comment about the Customer. The contents of this field cannot be more than 40 characters in length, and will appear as a notification under the Customer’s name when creating documents such as Contracts, Work Orders, and Invoices.
Contact Information Panel
This panel contains information on the individual Contacts within the Customer's company.
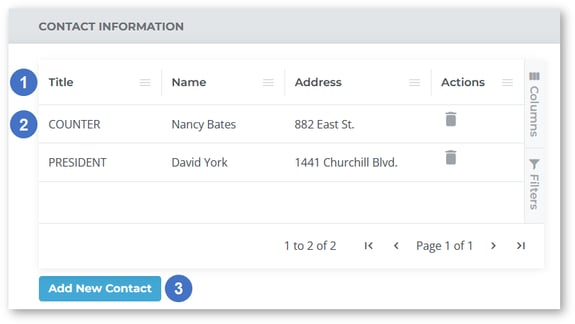
- Contact Table
This table contains a list of all the Customer’s existing Contacts. The appearance of this table can be modified in a number of ways; see “Working With Tables” for more information. - Contact
Click on a Contact’s record to edit it. See “Add, Edit, or Delete a Customer Contact in Texada Web” for more information. Click the bin icon under the Actions column to delete the record; this cannot be undone once confirmed.
 - Add New Contact Button
Click to add a new Contact to the Customer. See “Add, Edit, or Delete a Customer Contact in Texada Web” for more information.
Options Panel
This panel contains a number of different options for customizing the way the Customer is handled throughout the system.

- Statement Selector
This option determines the method by which the system generates and sends account statements to the Customer. It is equivalent to the “Statement Output” option in Texada SRM.- Print Only: The Customer should be sent printed statements only.
- Print/Email: The Customer should be sent printed statements and/or statements by email. In order to receive statements by email, two conditions must be fulfilled:
- The “Use Contact Document Emailing” feature must be enabled via the Company Email Configuration utility in Texada SRM.
- The Customer must have a Contact with a valid Primary or Alternate email address, and who is flagged to receive Statements via the Edit Contact window in Texada Web, or the Contact Information window in Texada SRM.
- Suppress: The Customer should not be sent printed or emailed statements.
- Purchase Order Selector
This option determines whether a Purchase Order # is required when creating documents for the Customer (Quotes, Reservations, Contracts, Invoices and Work Orders). It is equivalent to the “P.O.# Required” option in Texada SRM.- Yes: A Purchase Order # is always required when creating documents for the Customer.
- No: A Purchase Order # is not required.
- Hold: A Purchase Order # is required for posting Invoices only. Invoices that do not have a PO# will receive a status of “HOLD” when passing through the Daily Close process in SRM, and cannot be posted until a PO# has been added.
- Damage Waiver Selector
This option determines whether or not the Customer will be charged a waiver when equipment is rented out on a Contract. It is equivalent to the “Damage Waiver” option in Texada SRM.- Yes: The Customer will be charged a waiver.
- No: The Customer will not be charged a waiver.
- On Account Toggle
Check this box to indicate that the Customer is an On-Account Customer (as opposed to a Cash Customer). On-Account Customers are able to charge Invoices on account. - Terms Code Selector
This option determines the terms of payment for On Account Customers. The options available in this drop-down are managed in Texada SRM, at System Maintenance → Configure System Settings → Customer Management → Terms Codes. For more information, see “Terms Codes” (SRM help file).
This selector is only available for On-Account Customers and is equivalent to the “Terms Code” option in Texada SRM, located at Customer Information → Codes. - Tax Code
The tax code to which the Exemption # applies. Up to two tax exemption numbers can be entered for each Customer. Tax Codes are managed in Texada SRM, at System Maintenance → Configure System Settings → Accounting → Tax Codes. - Exemption #
The Customer’s tax exemption number. - Exemption Type
The type of transaction to which the tax exemption applies:- Rental: Applies to rentals.
- Sale: Applies to purchases.
- Both: Applies to both rentals and purchases.
- Neither: Does not apply to rentals or purchases.
- Rental Discount %
Enter a percentage discount to apply to the Customer’s rentals. Discounts are applied when a Contract is created for the Customer and can be overridden at that time. This field is equivalent to the “Rental Disc %” field in Texada SRM. - Sales Discount %
Enter a percentage discount to apply to the Customer’s purchases. Discounts are applied when a Contract is created for the Customer and can be overridden at that time. This field is equivalent to the “Sale Disc %” field in Texada SRM. - Enable GateWay Access Toggle
This field corresponds to the “Allow Website Access” checkbox in Texada SRM, located at Accounts Receivable → Customer Information → Internet Info.
Check this box to enable the Customer to access the Texada GateWay Customer Access Portal. In order to log in to the Customer Access Portal, the Customer will still need to be given an Email Address and Website Password via the Internet Info utility in Texada SRM. See “Customer Internet Information” (SRM help file) for more information. - GateWay Password
This field corresponds to the “Website Password” field in Texada SRM, located at Accounts Receivable → Customer Information → Internet Info.
This password, along with the Email Address specified in the Internet Info utility in Texada SRM, are the credentials the Customer can use to log in to the Texada GateWay Customer Access Portal. See “Customer Internet Information” (SRM help file) for more information.
Driver’s Licenses Panel
This panel allows you to add driver’s licenses to the Customer record for identification purposes.
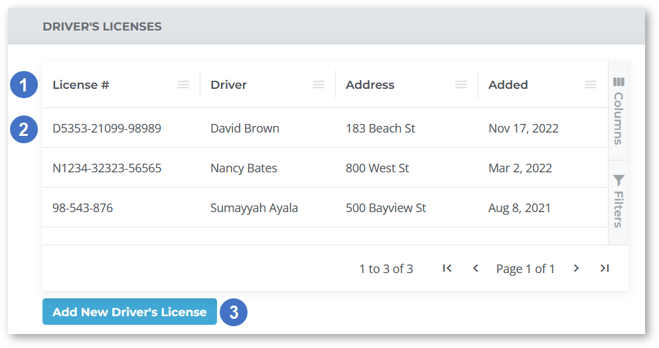
- Driver’s Licenses Table
This table contains a list of the driver’s licenses that have been added to the Customer’s record. The appearance of this table can be modified in a number of ways; see “Working With Tables” for more information. - Driver’s License
Click on a license record to edit it; see “Add, Edit, or Delete a Driver's License in Texada Web” for more information. - Add New Driver’s License Button
Click to add a new license record; see “Add, Edit, or Delete a Driver's License in Texada Web” for more information.