
- Texada Knowledge Base
- E-Commerce
- Integrations
-
Top Searched Articles
-
Product Updates
-
Support & Troubleshooting
-
Onboarding Programs
-
Equipment CRM
-
Service Management
-
SRM
-
Handle
-
Analytics
-
E-Commerce
- Getting Started
- New Administration Panel
- Administration Panel
- Administration Panel - CMS
- Administration Panel - Products, Categories, and Attributes
- Administration Panel - Users
- Administration Panel - Requests
- Customer Access Portal
- Customer Access Portal - Rentals
- Customer Access Portal - Invoices
- eCommerce Websites
- eCommerce Websites - Ordering
- Integrations
-
Texada Mobile
-
Payments
-
Texada Web
-
Rental Asset Management
-
Order Fulfillment
-
Power Systems Projects
-
Equipment Quoting
-
Condition Monitoring Portal
-
Equipment Monitoring Toolkit
-
Parts and Service Quoting
-
Service Agreement Quoting
-
Equipment CRM - Additional Tools
Search the List of HubSpot Support Tickets in GateWay
Describes how to search and customize the list of HubSpot support tickets in GateWay.
Type
How to
Audience
GateWay Customer, Salesperson
Products
GateWay
In This Article
- Search the list of HubSpot support tickets by ticket number
- Customize the list of HubSpot support tickets
Context
As the list of HubSpot support tickets grows, you can use the search functionality to quickly locate the ticket you need to view. You can customize the list of tickets to only display the information that is relevant to you.
Before You Begin
Required: Internet connection; valid GateWay account; valid login credentials and access permissions; existing HubSpot support ticket
Steps
Search the list of HubSpot support tickets by ticket number
- In the HubSpot menu bar, navigate to Tickets
The list of existing HubSpot support tickets opens in the main area
- Type the ticket number of the ticket you need to view in the Search tickets by # field
The list of support tickets is narrowed to reflect your search term
Customize the list of HubSpot support tickets
- In the HubSpot menu bar, navigate to Tickets
The list of existing HubSpot support tickets opens in the main area - Optional: In the list of assets, click Columns

The Columns menu opens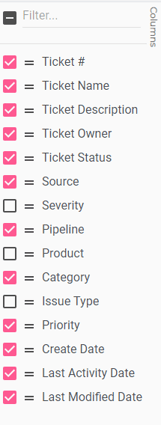
- Optional: In the Columns menu, do one of the following:
- Check the columns you need to include in the list of assets
- Drag and drop the columns from the list of assets into the columns menu to remove them
- Check Filter… to remove all columns from the list of assets
- Optional: Drag and drop the column headers in the list of assets to reorder the columns
- Optional: Do one of the following to set a column in a particular location:
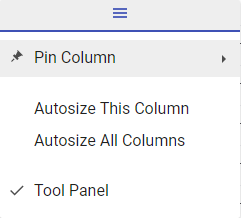
- Click the hamburger menu
 in the header of the column you need to set
 - Use the Pin Column drop-down to do one of the following:
- Click Pin Left to permanently set the column to the leftmost side of the list
- Click Pin Right to permanently set the column to the rightmost side of the list
- Click No Pin to unset the column and allow users to drag and drop the column

- Click the hamburger menu
- Optional: Do one of the following to resize a column:
- Drag and drop the border of a column until the column is the desired width
- Click the hamburger menu
 in the header of the column you want to set, and do one of the following:
-
- Click Autosize This Column to automatically resize the currently selected column to the largest value in the column
- Click Autosize All Columns to automatically resize all columns in the table to the largest value in each column
-
Related Articles
- About GateWay
- About the GateWay HubSpot Integration
- Set Up the HubSpot Integration in GateWay
- Link a HubSpot Company Record to an SRM Customer Record
- Set Up HubSpot Support Ticket Access in GateWay
- Create a HubSpot Support Ticket in GateWay
- View the Details of a HubSpot Support Ticket in GateWay