
Describes how to search, filter, and customize the list of user accounts in the customer access portal.
Type
How to
Audience
GateWay Company Administrator
Products
GateWay’s customer access portal
In this Article
- Search the list of user accounts
- Filter the values in a column in the list of user accounts
- Customize the list of user accounts
Context
As your company grows, your list of customer access portal user accounts grows as well. Use the search and filter functionality to quickly locate the user account profile you need to view or update. You can customize the list of user accounts to only display the information that is relevant to your business.
Before You Begin
Required: Internet connection, valid GateWay account, valid login credentials and access permissions
Steps
Search the list of user accounts
- In the customer access portal header bar, use the user menu to select Manage Users

The Manage Users page opens in the main area
- Type a search term, such as a user name in the Search for users field
The list of user accounts is narrowed to reflect your search term
Filter the values in a column in the list of user accounts
- In the customer access portal header bar, use the user menu to select Manage Users

The Manage Users page opens in the main area - Click the hamburger menu
 in the header of the column you need to filter
 - Click filter

The column filter menu opens and displays a list of values that apply to that column
- Optional: Type a search term in the Search... field to locate a specific column value
The list of values is narrowed to reflect your search term - Optional: Check (Select All) to select or to deselect all column values
- Optional: Check a column value to only display list rows that contain that value
Customize the list of user accounts
- In the customer access portal header bar, use the user menu to select Manage Users
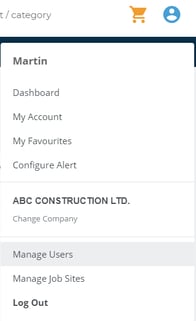
The Manage Users page opens in the main area - Optional: Click a column header to sort the contents of the column alphabetically

- Optional: In the list of users, click Columns

The columns menu opens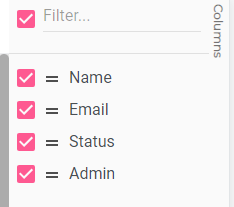
- Optional: In the columns menu, do one of the following:
- Check the columns you need to include in the list of users
- Drag and drop the columns from the list of users into the columns menu to remove them
- Check Filter… to remove all columns from the list of users
The list of users is updated to reflect your selections
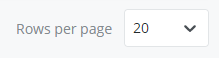
- Optional: Use the Rows per page drop-down to select the number of rows that displays on a single page of users
- Optional: Drag and drop the column headers in the list of users to reorder the columns
- Optional: Do the following to set a column in a particular location:
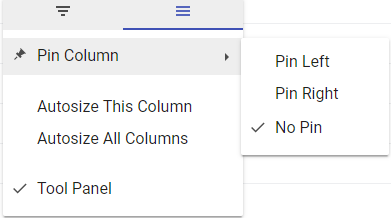
- Click the hamburger menu
 in the header of the column you need to set
 - Click the hamburger menu
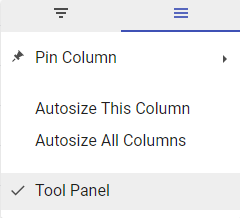
- Use the Pin Column drop-down to do one of the following:
- Click Pin Left to permanently set the column to the leftmost side of the list
- Click Pin Right to permanently set the column to the rightmost side of the list
- Click No Pin to unset the column and allow users to drag and drop the column
- Click the hamburger menu
- Optional: Do one of the following to resize a column:
- Drag and drop the border of a column until the column is the desired width
- Click the hamburger menu
 in the header of the column you want to set, then click the hamburger menu
  and do one of the following:
- Click Autosize This Column to automatically resize the currently selected column to the width of the widest value in the column
- Click Autosize All Columns to automatically resize all columns in the list to the widest value in each column
Related Articles
- About GateWay
- About Users in GateWay
- Log In and Out of the Customer Access Portal
- Reset or Change Your Password in the Customer Access Portal
- Filter the List of User Accounts in GateWay
- Create a User Account for Another User in the Customer Access Portal
- Set Up Access Permissions in the Customer Access Portal
- Create Your User Account in the Customer Access Portal
- Edit a User Account in the Customer Access Portal