
- Texada Knowledge Base
- Payments
- Processing Payments
-
Top Searched Articles
-
Product Updates
-
Support & Troubleshooting
-
Onboarding Programs
-
Equipment CRM
-
Service Management
-
SRM
-
Handle
-
Analytics
-
E-Commerce
- Getting Started
- New Administration Panel
- Administration Panel
- Administration Panel - CMS
- Administration Panel - Products, Categories, and Attributes
- Administration Panel - Users
- Administration Panel - Requests
- Customer Access Portal
- Customer Access Portal - Rentals
- Customer Access Portal - Invoices
- eCommerce Websites
- eCommerce Websites - Ordering
- Integrations
-
Texada Mobile
-
Payments
-
Texada Web
-
Rental Asset Management
-
Order Fulfillment
-
Power Systems Projects
-
Equipment Quoting
-
Condition Monitoring Portal
-
Equipment Monitoring Toolkit
-
Parts and Service Quoting
-
Service Agreement Quoting
-
Equipment CRM - Additional Tools
Manually Process a Banking Payment Using Texada Pay in Canada, Australia, and New Zealand
Describes how to manually process a bank account payment using Texada Pay in Canada, Australia, and New Zealand.
Type
How to
Audience
SRM Counter and Bookkeeper
Products
SRM, Texada Pay
Context
Manually process a banking payment if your customer prefers to pay using Texada Pay via direct withdrawal from a bank account over the phone.
If the customer allows it, you can capture their bank account information and store it in SRM as an on-file bank account. This is useful if you have a new customer that anticipates they will do further business with you and wants the convenience of automatic payments.
If your customer opts to add their banking information on-file, follow the directions in: “Add a Bank Account On-File for Use With Texada Pay in Canada, Australia, and New Zealand”.
Note: You can use this bank account with any part of SRM involving customer payments, except Accounts Receivable Customer Payments (AR03)
Before You Begin
Required: valid bank account number, valid bank routing number, valid SRM account and access permissions, Texada Pay is set up for bank accounts/EFT payments, existing Type M payment method
Steps
To manually make a payment using a bank account over the phone with Texada Pay, do the following:
- On the SRM Navigation page, navigate to anywhere you can process a debit payment using Texada Pay, such as a contract
- Add any relevant information to the form
- Use the Deposit/Payment Method dropdown to select a Type M Payment.
Note: See “Set Up Payment Methods in Texada Pay” for more information on the different types of payment and how to set them up - Type the amount to be paid using this method in the Amount Of Payment field
- Click Accept
The Texada Pay - Select Card Type pop-up opens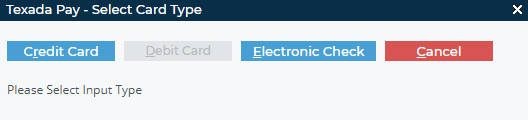
- Click Electronic Check
The Texada Pay Banking Information popup opens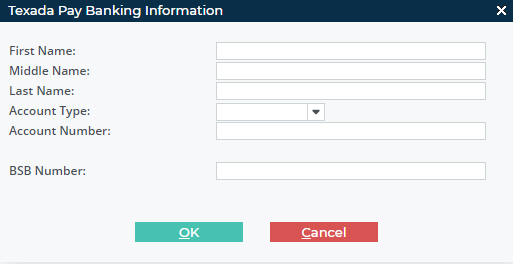
- Type the customer’s first name in the First Name field
- Optional: Type the customer’s middle name in the Middle Name field
- Type the customer’s last name in the Last Name field
- Use the Account Type dropdown to select the type of bank account you need to add
- Type the account number in the Account Number field
- Type the BSB/Security number for the account in the BSB Number field
- Optional: Check Auto Pay if you need to process automatic payments during cycle billing to this bank account
- Click OK
The Information popup opens
- Click OK
The payment information is submitted to the bank
Related Articles
- About Texada Pay
- Set Up Texada Pay in Canada
- Set up Texada Pay in Australia and New Zealand
- Set Up Payment Methods in Texada Pay
- Add a Bank Account on File for Use with Texada Pay in Canada, Australia, and New Zealand
- Process an On-File Bank Account Payment Using Texada Pay in Canada, Australia, and New Zealand