
Describes how to enable Texada Pay in Australia or New Zealand in your SRM (Systematic Rental Management) application for the entire company.
Type
How to
Audience
SRM Counter and Bookkeeper
Products
SRM, Texada Pay
Context
Set up Texada Pay when you need to enable your company to accept and process payments and have the payment information flow into SRM and on to your bank and credit card institutions.
Notes:
- Your company in SRM must be set up to use Australia/New Zealand currency
- See: “Set Up Texada Pay in the U.S.” or “Set Up Texada Pay in Canada” if you need to set up card reader hardware in those regions.
Account Credentials and API Keys
Account credentials and API keys work together to communicate whether an instance of Texada Pay is authorized to work with ezidebit. You require an ezidebit account credential and API key to use Texada Pay for on-file payments, but do not require one for in-person payments using the card reader hardware. Contact Texada Software at support@texadasoftware.com to obtain account credentials and an API key.
Texada Pay only supports ezidebit card reader hardware in Australia and New Zealand. If you wish to use this functionality, you must first be an ezidebit customer. See: “About Texada Pay” for more information on how to contact ezidebit.
Before You Begin
Required: Internet connection, valid SRM login credentials and access permissions, valid ezidebit account, existing company profile set up to use Australia/New Zealand currency Optional: ezidebit card reader hardware, valid Texada Pay account credential and API key
Body
To set up Texada Pay, do the following:
- On the SRM navigation page, navigate to System Maintenance > Configure System Settings > System tab > Company Parameters
The Company Parameters pop-up opens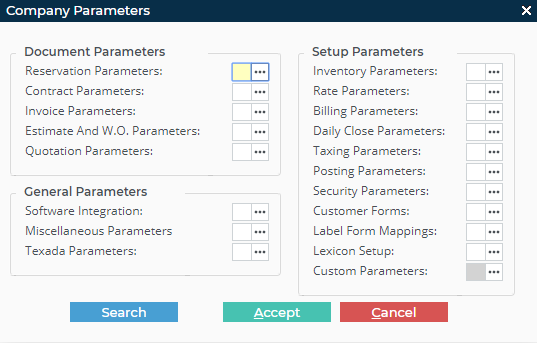
- Next to Software Integration, click more options

The Software Integration Parameters pop-up opens - Click the Texada Pay tab
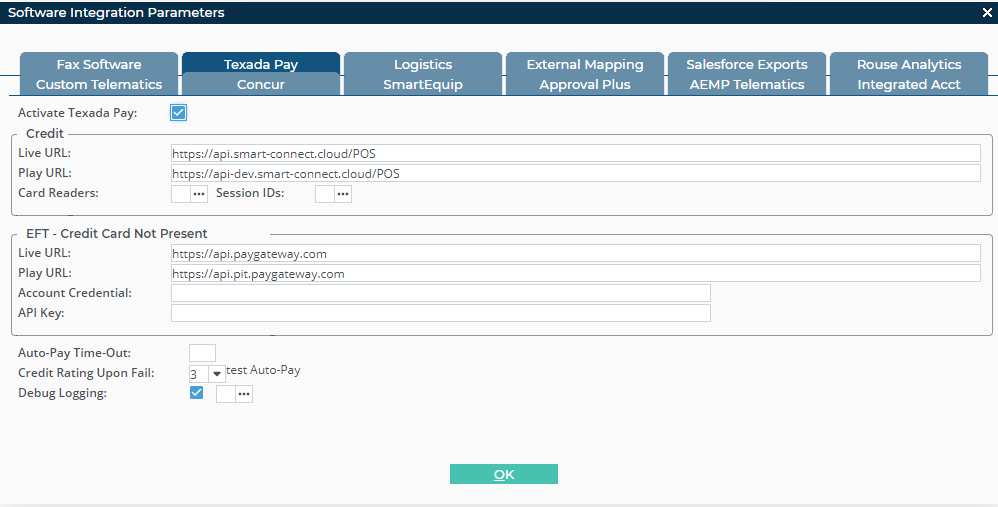
- Check Activate Texada Pay
- Optional: Type your Texada Pay account credential in the Account Credential field if you need to process on file payments
Notes:- See: “Set Up Payment Methods in Texada Pay” for more information on on file payments
- You can only have a single active account credential at a time per company in each instance of SRM
- Optional: Type your Texada Pay API key in the API Key field if you need to process on file payments
Note: You can only have a single active API key at a time per company in each instance of SRM - Next to Card Readers, click more options

The Texada Pay Card Readers popup opens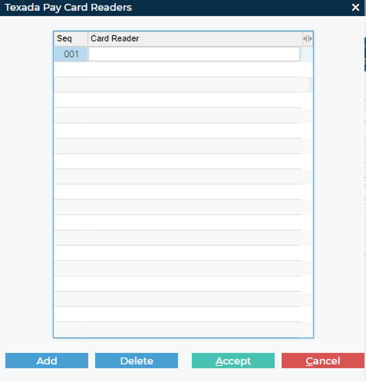
- Click Add
A line is added in the next available space in the list - Type the name of your card reader, such as the make, model, or reader number in the Card Reader field
- Click Accept
- Click OK
- Click Accept
Texada Pay is set up to process payments for this company
Note: If you have installed the Texada Pay card reader software and hardware, you can use Texada Pay with your Smartpay card reader console to take in-person payments
Next Steps
| Install Texada Pay Card Reader Hardware in Australia and New Zealand | Set Up Payment Methods in Texada Pay | |