.png?width=365&height=50&name=Texada%20Logo%20(Black).png)
Quick Reference
- When building out a Quote in SAQ, it is possible to create multiple Revisions (versions) of the same Quote and edit each Revision independently. Each Revision features its own Revision Details screen, accessible from the Quote Details screen, that contains all of the information for that Revision.
- Click on the three dots
in the top-right corner of the Revision Details page to access options for editing or cloning the Revision:
- Change Status to Complete: Changes the Revision’s status to Complete.
- Change Status to In Progress: Changes the Revision’s status to In Progress.
- Copy to New Quote: Create a copy of the Quote and Revision you are currently viewing.
- Copy to New Revision: Copy the current Revision to a new Revision under the same Quote.
- Delete Revision: Delete the current Revision.
- The Revision Financials panel contains basic and financial information about the Revision, including the Parts, Labor, and Misc totals, and the Revision’s cost per hour.
- The Equipment List panel contains a list of the equipment included in the Revision.
- Click the “Add Multiple Equipment” button
to open the Equipment Search window and select equipment to add to the Revision.
- Click the “Add Empty Equipment” button
to add a blank equipment entry to the Revision. This entry can then be manually filled out.
- Click the “Save” button
to save your changes.
- Click the bin icon
next to a piece of equipment to remove it from the Revision.
- Click the search icon
next to a piece of equipment to open the Equipment Search window and select a piece of equipment to replace the selected piece.
- Click the “Add Multiple Equipment” button
The Quote Details Screen
This page is part of a series on the Quote Details Screen in Service Agreement Quoting. The structure of this screen and its subscreens is as follows:
- The Quote Details Screen
- Quote Header
- CVA Contract
- Customer Details
- Revision Details (you are here)
Introduction
The Quote Details screen in Service Agreement Quoting contains all of the information about an existing Quote. It comprises a number of subscreens, one of which is the Revision Details screen.
When building out a Quote in SAQ, it is possible to create multiple Revisions (versions) of the same Quote and edit each Revision independently. This allows you to experiment with different equipment and event combinations and explore the pricing differences between them. As each Revision is created, it will appear in the left navigation menu of the Quote Details screen. Click on a Revision in the menu to view its details.
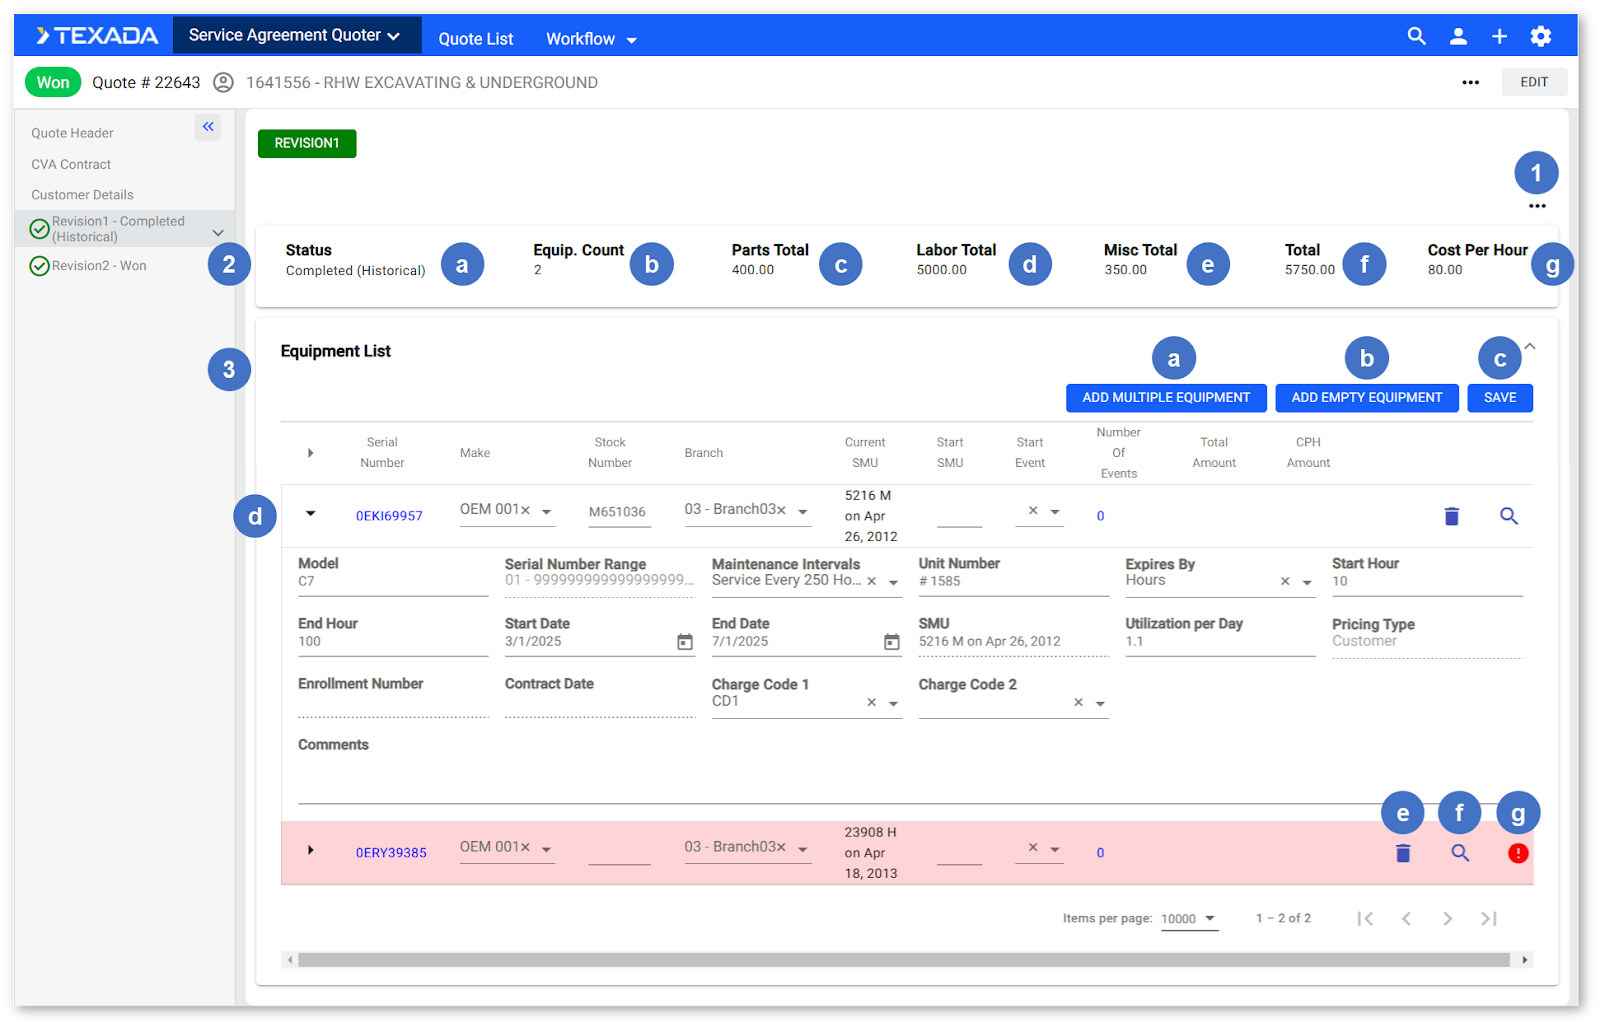
Revision Details
- Revision Actions
This menu contains a number of actions that can be applied to the Revision.- Change Status to Complete
Changes the Revision’s status to Complete. - Change Status to In Progress
Changes the Revision’s status to In Progress. - Copy to New Quote
Click to create a copy of the Quote and Revision you are currently viewing. The new Quote will retain all of the header information from the original Quote, but only the Revision you are currently viewing will be copied over. - Copy to New Revision
Click to copy the current Revision to a new Revision under the same Quote. By creating branching Revisions in this manner, you can experiment with modifying a Revision without overriding its original version. Revisions are named incrementally as they are created starting with Revision 1. Each new Revision will appear in the left navigation menu of the parent Quote. - Delete Revision
Click to delete the current Revision. This will delete the Revision itself as well as any attached documents and equipment. This button will only be visible if at least 2 Revisions exist for the current Quote.
- Change Status to Complete
- Revision Financials Panel
Contains basic information about the Revision, including its cost totals.- Status
The Revision’s current status. This value is read-only and can be changed via the Change Status button (1a). - Equip. Count
The number of pieces of equipment included in this Revision. - Parts Total
The total cost of the Parts components of all Events included in this Revision. - Labor Total
The total cost of the Labor components of all Events included in this Revision. - Misc Total
The total cost of the Misc components of all Events included in this Revision. - Total
The total cost of this Revision. - Cost Per Hour
The total cost of this Revision per hour of labor.
- Status
- Equipment List Panel
Contains the list of equipment included in this Revision.- Add Multiple Equipment Button
Click to open the Equipment Search window and add equipment to the Revision. - Add Empty Equipment Button
Click to add an empty row to the Equipment List. This allows you to manually fill out a piece of equipment to add to the Revision. - Save Button
Click to save your changes. - Equipment List
This table contains a list of all the pieces of equipment included in the Revision. Click on a column header to sort the table by the contents of that column. Click and drag the column headers to rearrange the order of the columns. Click the right arrowor down arrow
to the left of a piece of equipment to expand or collapse its row. Click the arrows in the top-left corner of the table to expand or collapse all rows. For a description of all the information included for each piece of equipment, see “Equipment Information”.
- Delete Equipment Button
Click the bin iconto remove a piece of equipment from the Revision.
- Replace Equipment Button
Click the search iconto open the Equipment Search window and replace the current piece of equipment with another.
- Warnings
If the piece of equipment is missing any required fields or has other issues, a red warning signwill appear to the right of its row in the Equipment List. Hover your mouse over the warning sign to see more information.
- Add Multiple Equipment Button
Equipment Search
Clicking the “Add Multiple Equipment” button or clicking the search icon
next to a piece of equipment in the Equipment List will open the Equipment Search window. This window allows you to search for and add equipment to the Revision.
If the “Add Multiple Equipment” button was clicked, you will have the option of selecting multiple pieces of equipment to be added to the Revision. If the search icon was clicked, you will only be able to select a single piece of equipment to replace the one you selected.
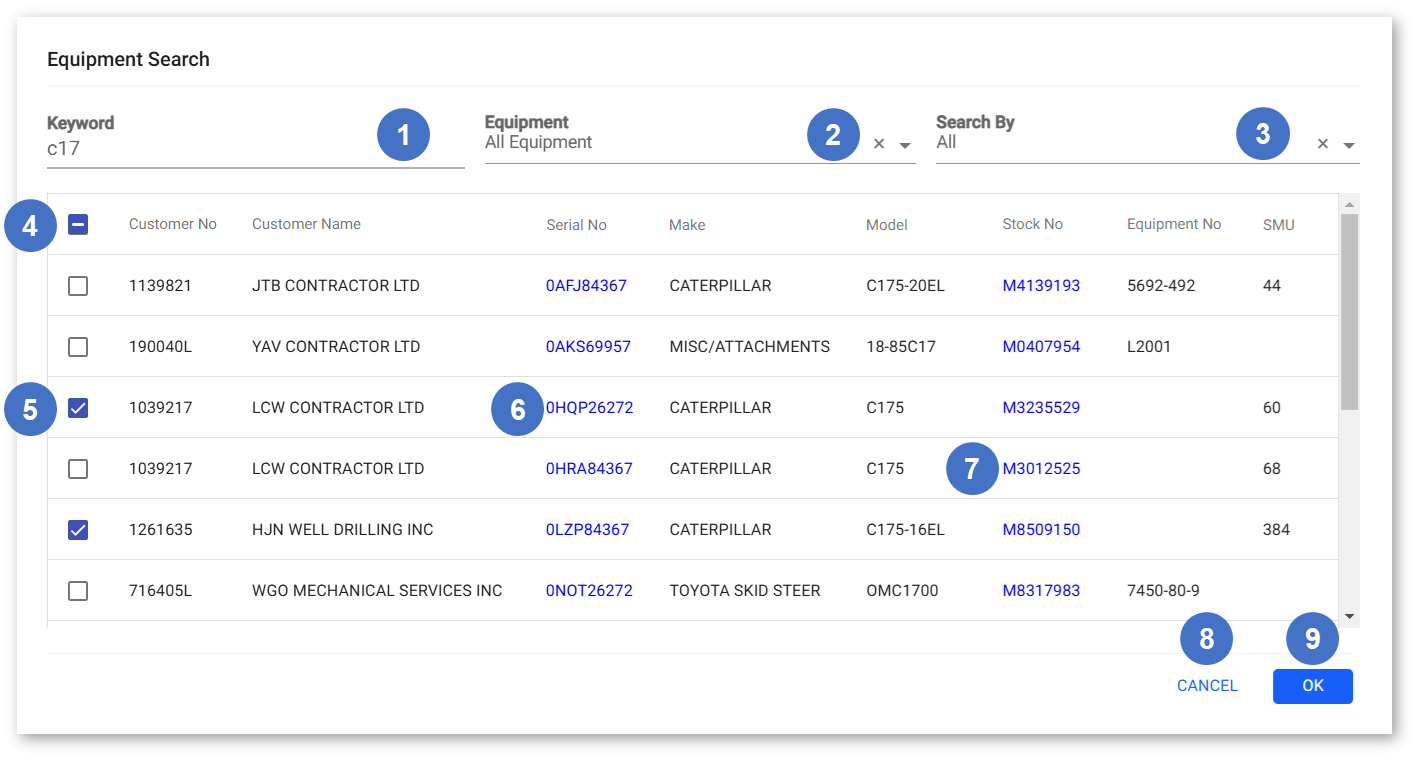
- Keyword
Being typing into the Keyword field to filter the list of equipment by the text entered. This will search by the field selected in the “Search By” drop-down (3). - Equipment
Select whether to search through all equipment or only equipment owned by the Quote’s Customer. - Search By
Select which field to search by when entering text into the “Keyword” field (1). - Equipment Table
Contains the list of equipment that matches the current search terms. Click on a column header to sort the table by the contents of that column. Click and drag the column headers to rearrange the order of the columns. If adding multiple pieces of equipment, check the checkbox in the top-left corner of the table to select or deselect all equipment. - Equipment Select
Add Multiple Equipment only. Check the checkbox next to a piece of equipment to select it to be added to the Revision. Uncheck the checkbox to deselect it. - Equipment Serial No
Click on a piece of equipment’s Serial No to add it to the Revision. If replacing equipment via the search icon - Equipment Stock No
Click on a piece of equipment’s Stock No to add it to the Revision. If replacing equipment via the search icon - Cancel Button
Add Multiple Equipment only. Click to close the Equipment Search window without saving your changes. - OK Button
Add Multiple Equipment only. Click to add the selected pieces of equipment to the Revision.
Equipment Information
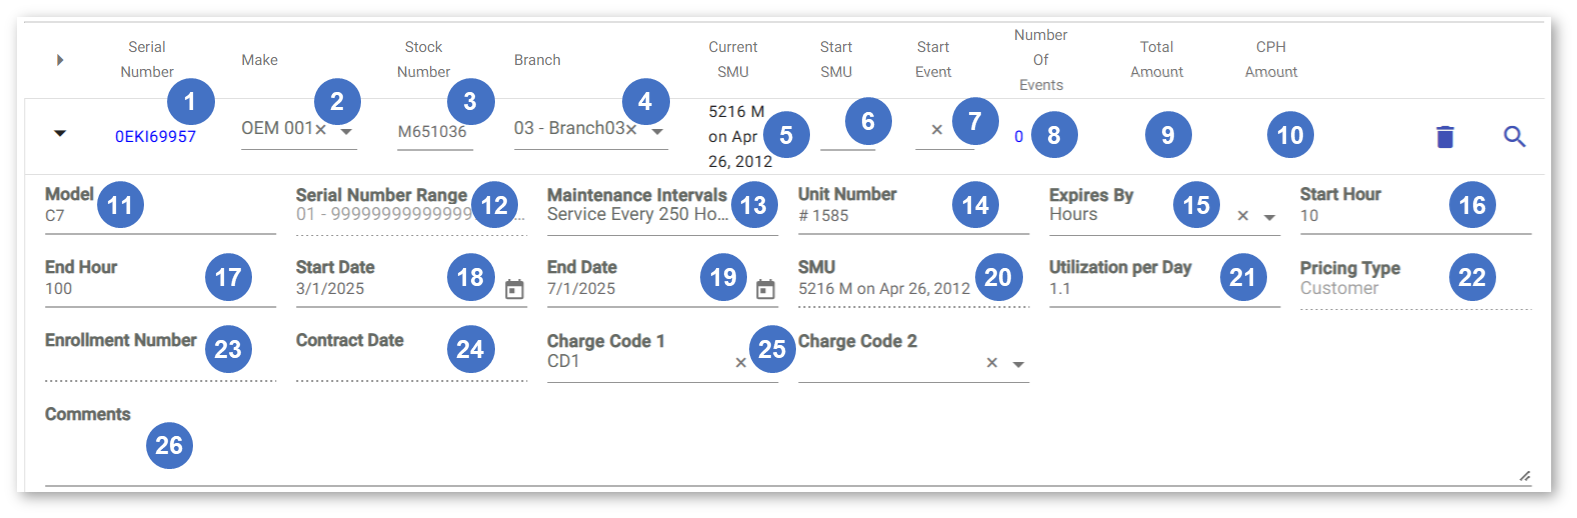
- Serial Number
The equipment’s serial number. Click to jump to that piece of equipment’s details page. - Make
The equipment’s make. Click on the drop-down to select a different make. - Stock Number
The equipment’s stock number. - Branch
The branch with which the piece of equipment is associated. - Current SMU
The date and value of the most recent available meter reading for the piece of equipment. - Start SMU
The SMU reading at which the Start Event (7) should be performed. For example, if the machine currently has 800 hours and the Start SMU is 1000, the Start Event will be performed in 200 SMU hours. - Start Event
The Event that should be performed once the Start SMU (6) value is reached. - Number of Events
The number of Events included in the Revision for this piece of equipment. - Total Amount
The total cost of the Events included for this piece of equipment. - CPH Amount
The total cost per hour (CPH) of the Events included for this piece of equipment. - Model
The equipment’s model. Note that as different Events are supported by different equipment models and serial number ranges, changing an equipment’s model will result in you needing to rebuild the Events and Packages included for that piece of equipment. - Serial Number Range
The equipment’s serial number range. Note that as different Events are supported by different equipment models and serial number ranges, changing an equipment’s serial number range will result in you needing to rebuild the Events and Packages included for that piece of equipment. - Maintenance Intervals
The interval at which the equipment should be serviced. - Unit Number
The equipment’s unit number. - Expires By
Select whether Contracts for this piece of equipment will expire by Service Meter Units (Hours), Date, or Both. Contract expiry dates are captured in the End Hour (17) and End Date (19) fields. If “Both” is selected, Contracts will expire by whichever comes first. - Start Hour
The starting hour of the Contract for this piece of equipment. - End Hour
The ending hour of the Contract for this piece of equipment. - Start Date
The start date of the Contract for this piece of equipment. - End Date
The end date of the Contract for this piece of equipment. Contracts that expire by Date (15) will expire at the End Hour (17) of this date. - SMU
The equipment’s current Service Meter Units (SMU). This field is read-only. - Utilization per Day
The equipment’s daily utilization, measured in Service Meter Units (hours). - Pricing Type
The equipment’s pricing type (Standard or Customer). This will affect the appearance of the “Financials” tab of the Event Details screen.- Standard: The default pricing type for newly-added equipment. The pricing for each Event added to this piece of equipment will be pulled from that Event’s Standard Job.
- Customer: Unlocks additional pricing customization based on Customer pricing, including labor and miscellaneous charge codes.
- Enrollment Number
The equipment’s enrollment number. This field is read-only. - Contract Date
The equipment’s Contract date. This field is read-only. - Charge Codes
The equipment’s charge codes. Up to 2 codes can be selected. - Comments
Any additional comments.