
All about the Asset List page in Texada Web.
Quick Reference
- An Asset is a piece of heavy equipment, such as a scissor lift or compressor, which can be sold or rented out as part of a Contract.
- To view the list of Assets in Texada Web, navigate to Inventory → Assets in the left side menu.
- Tips for navigating the Asset List page:
- Use the controls at the top of the page to search, filter, and export the list of Assets.
- Click on an Asset in the list to view and edit its details.
- Click the “Add New Asset” button to create a new Asset.
- Click the “Present” button to open the Rental Board in full-screen mode.
Introduction
An Asset is a piece of heavy equipment, such as a scissor lift or compressor, which can be sold or rented out as part of a Contract. The Asset List page in Texada Web allows you to browse the list of Assets in your system.
To reach the Asset List, navigate to Inventory → Assets in the left side menu.
The Asset List Page
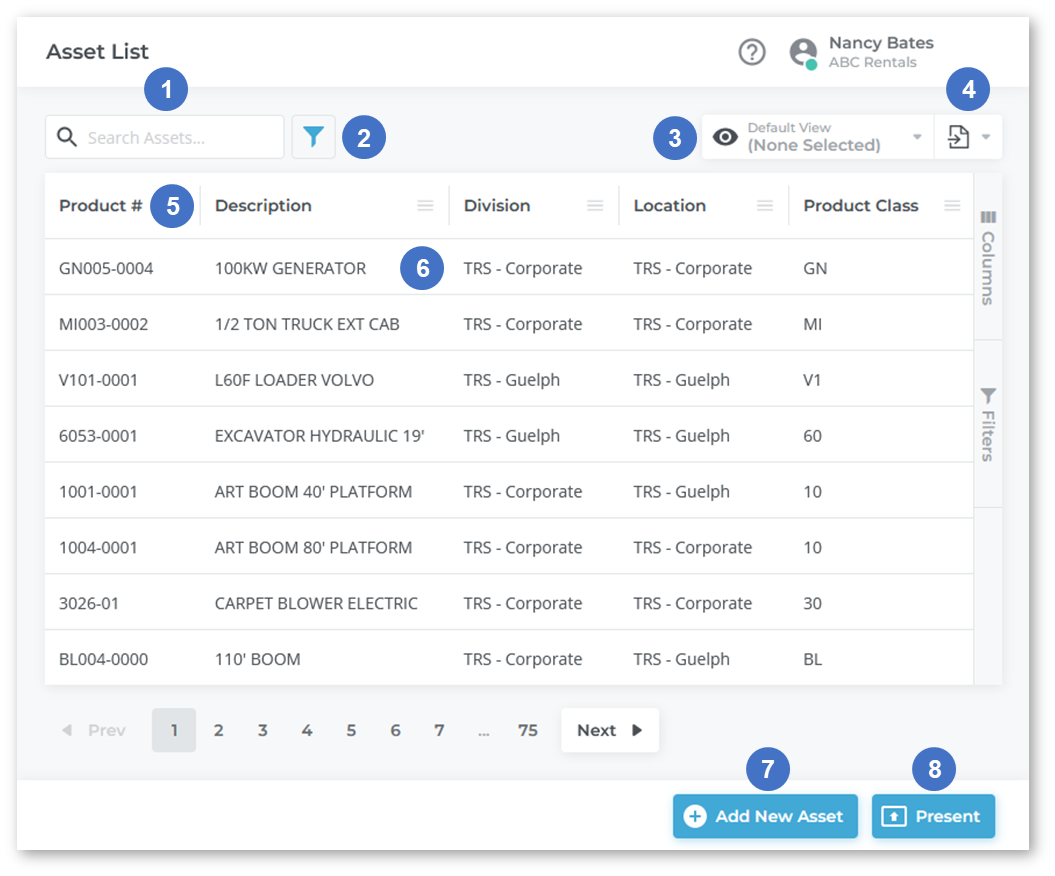
- Search Bar
Begin typing here to filter the list of Assets by the text entered. This will search by Product #, Description, and Vendor Product #. - Advanced Filter Button
Click to display advanced search fields for each column. Begin typing into a column’s search field to filter only that column by the text entered. - View Manager
Use to manage custom views for this table. See “The View Manager” for more information. - Export Button
Use to export the table’s contents for use in other programs. See “Exporting the Contents of a Table” for more information. - Assets Table
This table contains a list of all the Assets that meet the current search criteria, or all Assets if no search terms have been entered. The appearance of this table can be modified in a number of ways; see “Working with Tables” for more information. - Asset
Each Asset is displayed in its own row. Click anywhere on the row to view the details of that Asset. See “View and Edit the Details of an Asset in Texada Web” for more information. - Add New Asset Button
Click to create a new Asset. See “Create an Asset in Texada Web” for more information. - Present Button
Click to present the current Asset list in full-screen mode. See “The Rental Board” for more information.
The Assets Table - Columns
The Assets table comprises the following columns:
- Product #: The unique ID of the Asset.
- Description: The Asset’s description.
- Status Code: The Asset’s status code. Status codes can be set when editing an individual Asset and indicate that Asset’s general status, such as Available, Hard Down, or Excessive Damage. Status codes are defined in Texada SRM, at System Maintenance → Configure System Settings → Operations → Product Status Codes.
- Asset Document Status: Which documents (Contracts, Work Orders, Tickets etc.) are currently associated with the Asset, if any. This field uses letter codes for the various document types; the system-assigned options are:
- C = On Contract.
- CP = On a Closed Pickup. The Asset is still on Contract but waiting for the Rental Return to be completed. The customer is waiting on the final bill. This status does not generate revenue.
- D = On Delivery. This Asset is en route to the customer. This status does not generate revenue.
- F = Off Rent. Billing for this Asset has been paused (rain, equipment down, etc.) This status does not generate revenue.
- I = Inventory transfer.
- O = On Sales Order. There is a customer commitment to purchase this Asset.
- P = On a Pickup Ticket. The customer has finished with the equipment and is waiting for pickup. This status does not generate revenue.
- R = On a Reservation.
- S = Saved. On a saved Worksheet or a draft Contract.
- W = On a Work Order.
- X = on a Pickup Exchange.
- A = The Asset is either a re-rental or has been flagged to not use quantity controls, meaning that in-house quantities do not apply.
- Division: The division where the Asset is located.
- Location: The location where the Asset is located.
- Product Class: The class to which the Asset belongs. When an Asset is first created, its class is selected from a list of existing classes. This list is managed in Texada SRM, at System Maintenance → Configure System Settings → Accounting → Rental Classes / Sales Classes. See “Classes, Groups and Products” for more information.
- Product Group: The group to which the Asset belongs. When an Asset is first created, its group is selected from a list of existing groups. This list is managed in Texada SRM, at System Maintenance → Configure System Settings → Operations → Groups. See “Classes, Groups, and Products” for more information.
- Make: The Asset’s make, or brand name.
- Model: The Asset’s model name.
- Quantity on Hand: The total quantity of the Asset across all locations.
- List Price: The online list price of this Asset.
- Include in Inventory: Whether or not the Asset is included in the current inventory.
- Average Cost Each: The estimated purchase price of the Asset. This is automatically calculated for each Asset, based the following formula:
Average Cost Each = List Price/(Markup%+100%). - Vendor Prod. Desc.: Vendor product description. The Asset’s description according to its vendor.
- Date of Manufacture: The Asset’s date of manufacture.
- Date Acquired: The date on which the Asset was first acquired.
- Serial Number(s): The Asset’s serial number(s).
- Vendor Number: The unique identifier for this Asset’s vendor.
- License #: License Number. The Asset’s license plate number, if any.