
Everything you need to know about managing Work Orders in Texada Mobile.
Quick Reference
- To view the details of a Work Order in Texada Mobile, navigate to the Work Orders tab (
icon at the bottom of the screen), then tap on a Work Order in the list. If you are viewing Work Orders in map mode, tap on a Work Order’s pin to open its basic information, then tap the information box to be taken to its details page. You can also view the Work Order history for a single Asset via the Asset Management screen.
- Work Order details are divided into three tabs:
- Info tab: Contains basic information about the Work Order, including Customer information, comments, Asset information, and attached photos.
- Items tab: Contains a list of the billable items logged against the Work Order. Billable items are further subdivided into Parts, Labor, and Services.
- Inspection tab: Contains any inspection forms that have been attached to the Work Order in Texada SRM, Web, or Mobile.
Introduction
The Work Orders tab of the Texada Mobile application provides Mechanics with a convenient place to review the Work Orders that have been assigned to them. The following article will provide an overview of the information available when viewing a Work Order in Texada Mobile.
Viewing the Details of a Work Order
There are three different ways to see the details of a Work Order in Texada Mobile:
- Work Orders - List view: Tap the Work Order in the list.
- Work Orders - Map view: Tap the Work Order’s pin on the map to open its basic information, then tap the information box.
- Asset Management - Work Order History: Open the Work Orders tab, then tap on a Work Order to view it.
The details of a Work Order are divided into three tabs: Info, Items, and Inspection. You can switch between the three tabs using the buttons at the top of the screen. You can also switch between the tabs by swiping left or right anywhere on the screen.
The Info Tab
This tab contains general information about the Work Order, including Customer information, comments, Asset information, and attached photos.
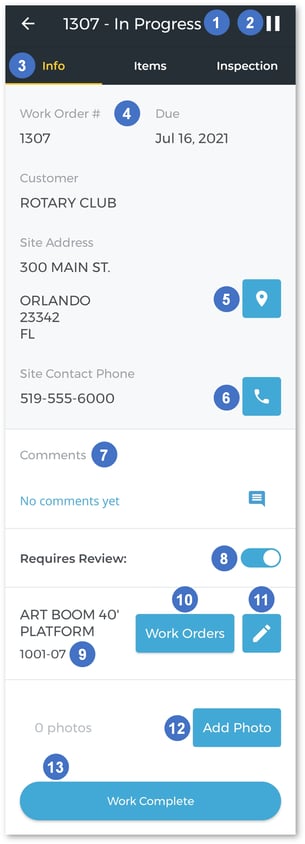
- Work Order Number and Status
The Work Order’s number and current status are displayed here. See “About Work Order Statuses” for more information on Work Order statuses. - Start Working / Pause Work Button
The appearance and function of this button will change depending on whether you have started work on this Work Order:- If you have not started work on this Work Order yet, this button will look like a play symbol
 . Tapping it will set the status of this Work Order to In Progress. If the “Auto Time Tracker” option is enabled in Texada Web, you will also be prompted to select a labor line to track your time against. See “Add Labor to a Work Order in Texada Mobile for more information.
 - If this Work Order is already in progress, this button will look like a pause symbol
 . Tapping it will open the following window, prompting you to enter a reason for pausing the Work Order:
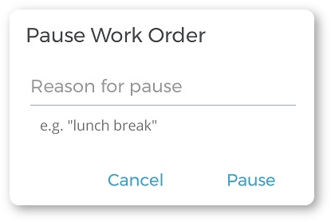
Once you have entered a reason and tapped ‘Pause’, the status of this Work Order will change to Paused, and Labor tracking will stop. Note that when a Work Order is paused in this manner, the pause reason will be displayed in Texada Web alongside the labor line.
- If you have not started work on this Work Order yet, this button will look like a play symbol
- Info / Items / Inspection Tabs
Use these buttons to switch between the Info, Items, and Inspection tabs. You can also switch between tabs by swiping left or right anywhere on the screen. - Work Order information
General information about the Work Order, including Work Order number, due date, Customer name and address, and any contact numbers can be found here. - View on Map
Tap this button to open the site of the Work Order in Google Maps (Android) or Apple Maps (iPhone). - Call Contact Number
Tap this button to call the saved site contact number. - Comments
Here you can review any comments left on the Work Order. You can also tap the comment icon to leave your own comments, which will be visible to any dispatchers viewing the Work Order in Texada Web.
 - Requires Review Toggle
Use this toggle to mark the Work Order as requiring review. This will flag the Work Order in Texada Web, bringing it to the attention of a dispatcher. This is most useful when used alongside the comments feature; by leaving a comment, then flagging the Work Order for review, you can quickly receive input on your question. Dispatchers are also able to flag Work Orders from Texada Web. - Asset Information
Information on the Asset to which this Work Order applies is displayed here. - Work Orders Button
Tap this button to view all Work Orders associated with this Asset. - Edit Asset Button
Tap this button to change the Asset attached to this Work Order. This option is only available once you have started work on the Work Order. - Add Photo Button
Use this button to attach a photo to the Work Order. See “Add a Photo to a Document in Texada Mobile” for more information. - Start Working / Work Complete Button
The appearance and function of this button will change depending on whether you have started work on this Work Order:- If you have not started work on this Work Order yet, this button will read ‘Start Working’. Tapping it will set the status of the Work Order to In Progress. If the “Auto Time Tracker” option is enabled in Texada Web, you will also be prompted to select a labor line to track your time against.
- If this Work Order is already in progress, this button will read ‘Work Complete’. Tapping it will start the process of closing this Work Order.
The Items Tab
This tab contains a breakdown of all the billable items that comprise the Work Order. These items fall under three categories: Parts, Labors, and Services.
- Parts: The physical Parts required to complete this Work Order, such as cables, bolts, and filters.
- Labors: The billable time the Mechanic has spent on the Work Order. Whenever a Mechanic starts working on a Work Order, the app will prompt them to select a labor line to track their time against. By switching between labor lines as work progresses, the Mechanic can keep an accurate record of how long they spent performing different tasks.
- Services: Any additional billable services not covered by Parts or Labor, such as delivery charges, relocation or refueling fees, or travel time.
The appearance of the Items tab will differ depending on whether your company’s administrator has selected the “Prompt for Maintenance Codes on Work Order Details” option in Texada SRM. If this option is not enabled, the Items tab will only contain the Parts, Labors, and Services categories. If this option is enabled, items will be organized by maintenance code, with each code having its own Parts, Labors, and Services sub-categories. You will also have the option of adding new maintenance codes to the Work Order. See “Add a Maintenance Code to a Work Order in Texada Mobile” for more information.
The images below show the two different versions of the Items tab. In the image on the left, maintenance codes are disabled. In the image on the right, they are enabled, and the ‘Cylinder Head’ code has been expanded to show its sub-categories.
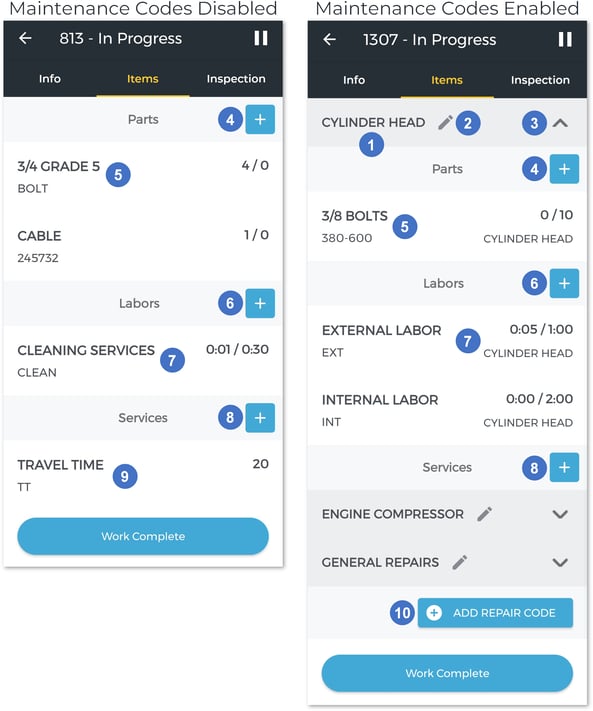
- Maintenance Code Name
The name of the maintenance code. - Change Maintenance Code
Tap the pencil icon next to a maintenance code to change it. All of the Parts, Labors, and Services already logged under that code will be attributed to the new code.
 - Expand/Collapse Maintenance Code
Tap the down/up arrow /
/ next to a maintenance code to show or hide its sub-categories (Parts, Labors, and Services).
 - Add Part
Tap the blue plus icon next to the Parts header to add a new Part to the Work Order. This option will only be available if you have already started work on this Work Order. See “Add a Part to a Work Order in Texada Mobile” for more information.
 - Parts List
Parts that have already been added to this Work Order/maintenance code are listed here. Tap a Part to view and edit its details. The two numbers near the right side of each row (4/0 in the example above) indicate the quantities of this Part that have been issued and requested, respectively. - Add Labor
Tap the blue plus icon next to the Labors header to add a new labor line to the Work Order. This option will only be available if you have already started work on this Work Order. If the “Auto Time Tracker” option is enabled in Texada Web, you will also be prompted to select, and possibly add, a labor line to the Work Order when starting work on the Work Order, or when resuming work on a paused Work Order. See “Add Labor to a Work Order in Texada Mobile” for more information. - Labor List
Labor lines that have already been added to this Work Order/maintenance code are listed here. Tap a labor line to view and edit its details. The two numbers near the right side of each row (0:01/0:30 in the example above) indicate how much time has been tracked against this labor line, and the total allotted time for this labor line, respectively. Note that you cannot manually edit your time tracked against a labor line. - Add Service
Tap the blue plus icon next to the Services header to add a new service to the Work Order. This option will only be available if you have already started work on this Work Order. See “Add a Service to a Work Order in Texada Mobile” for more information. - Services List
Services that have already been added to this Work Order/maintenance code are listed here. Tap a service to view and edit its details. - Add Repair Code Button
Tap this button to add a new maintenance code to the Work Order. See “Add a Maintenance Code to a Work Order in Texada Mobile” for more information.
The Inspection Tab
This tab contains a list of all the inspections included with this Work Order. Any inspection forms attached to the Work Order can be viewed and completed from this tab. New inspection forms can also be added.
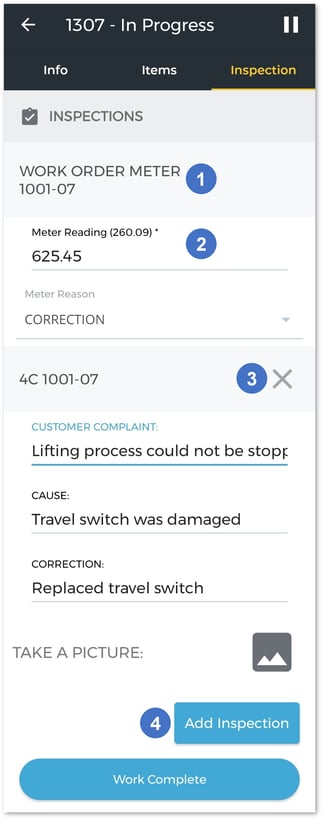
- Inspection Name
The name of the inspection form. - Inspection Body
All of the fields included in each inspection form will appear below its name. All required fields must be filled out before the Work Order can be submitted. - Remove Inspection
Tap the ‘X’ icon next to an inspection’s name to delete it. Any information submitted for this inspection, such as entered text or attached photos, will be lost. Note that you can only delete inspections that you yourself have added to the Work Order; inspections added by a dispatcher cannot be deleted. - Add Inspection
Use this button to add a new inspection form to the Work Order.
For more information on viewing and completing inspections, see: